-
AeroGCS CONFIG User Manual
5. Using AeroGCS CONFIG
AeroGCS CONFIG is designed to provide an intuitive and user-friendly interface, making drone configuration and management straightforward and efficient. Once you have completed the initial setup, you can start exploring the various features and functionalities that AeroGCS CONFIG offers.
5.1 Signing in
Before you can begin configuring and managing your drone with AeroGCS CONFIG, you need to sign in to the application. Whether you are an OEM user with a provided account or trying out the software with a 15-day trial, this section will guide you through the process of logging in and establishing a connection with your drone. Follow the steps below to ensure a smooth and successful login experience.
5.1.1 OEM User
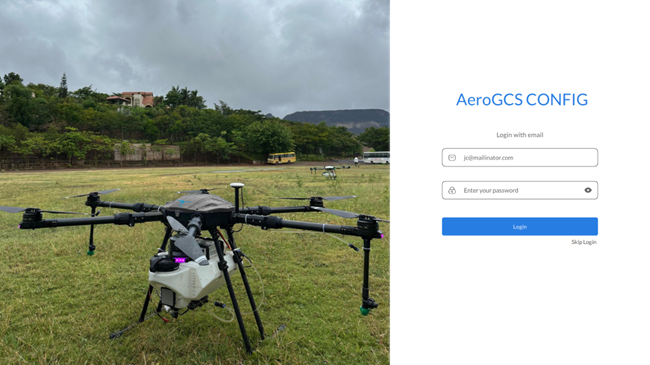
Step 1: Open AeroGCS CONFIG
- Double-click “AeroGCS-CONFIG.exe” or use the shortcut on your Desktop. This will open the Login screen.
Enter your username and password (OEM User’s User Name and Password) as shown in the following screen.
Note:- If you receive a warning from Windows about the application being untrusted, kindly trust the AeroGCS-CONFIG.exe file. |
Step 2: Log In
- Click the “Login” button to continue.
Step 3: Confirm Login
- After successfully logging in with your OEM credentials, a “Connect to Drone” screen will appear. Otherwise, an appropriate error message will be shown to the user.
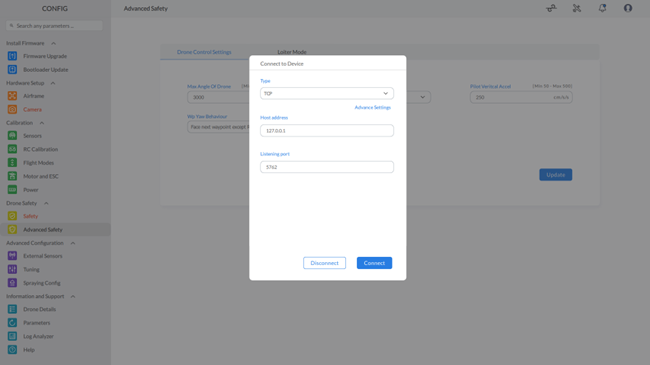
Step 4: Establish a Connection with Your Drone
- On the “Connect to Drone” screen, choose your connection type: Serial, TCP, UDP, or Bluetooth.
- Enter the required parameters and click the “Connect” button. As shown in the following screen
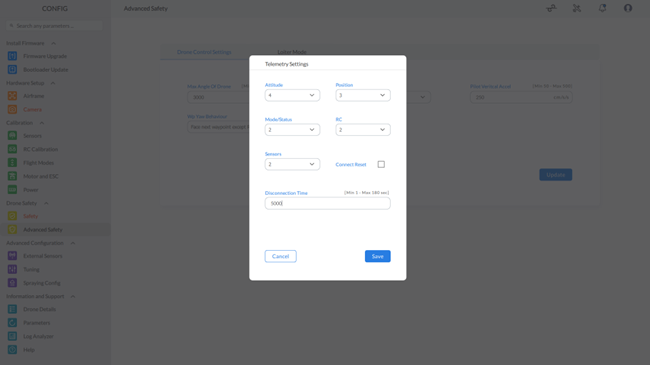
Step 5: Save Advanced Settings
- Enter the necessary values in the Advanced Telemetry Options screen and click the “Save” button to store your settings.
Following these steps, you can easily and efficiently connect AeroGCS CONFIG with your drone.
5.1.2 For Trial User
You can use AeroGCS CONFIG as a trial version. To use the 15-day trial version, follow the steps given below:
Step 1: Initiate Trial
Click “Skip Login” under the “Login” button. The screen will be displayed as shown in
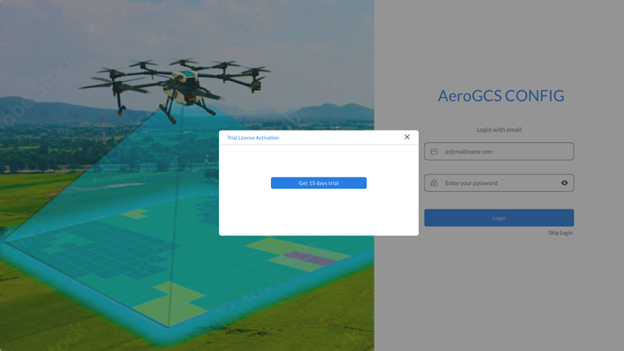
Step 2: Request a Trial License Key
• Click on “Get 15 Days Trial.” The following screen will appear:
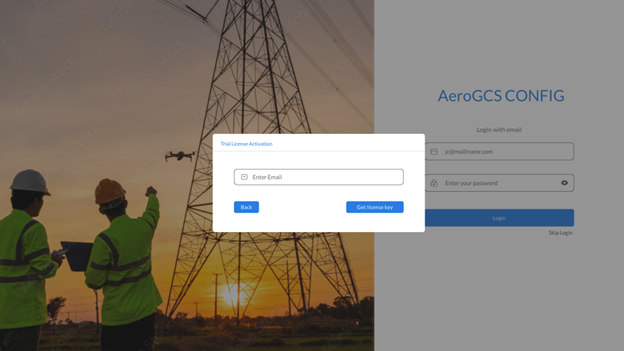
- Enter your email address.
- Click on “Get License Key.”
- If the email ID already exists in the system, a message will display: “Email already exists, cannot generate key.”
- If the email ID is new, a license key will be sent to the provided email address. A confirmation message will be shown: “Key sent to email ID.”
- Click “OK.”
Step 3: Activate Account
The following screen will appear:
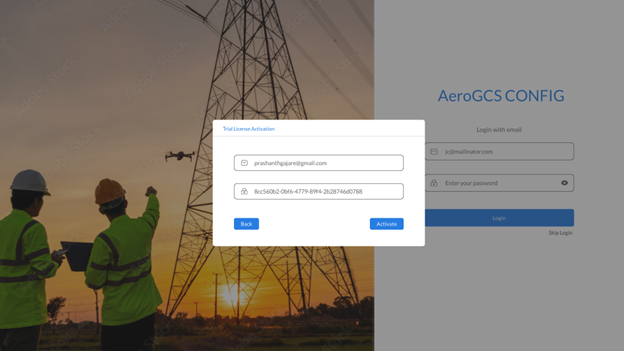
- Enter the email address you provided for the license key.
- Enter the received license key.
- Click “Activate” to activate your account.
- Once activated, the “connect to device” screen will appear, indicating that you can connect to your drone.
After this process, you can use the skip login feature for up to 15 days during the trial period.
Note: Trial login users cannot access the log analyzer and firmware upgrade features. |
5.2 Establishing Drone Connection for Configuration:
For a flight to proceed seamlessly, the drone must reliably interpret and react to Remote Control (RC) commands. This mandates a sound connection between the drone, Ground Control Station (GCS), and RC. The connection is wireless, necessitating the user to input pertinent details for effective drone-software interaction.
Within AeroGCS CONFIG, the user is presented with several avenues to facilitate drone connectivity. These options encompass the subsequent mechanisms for establishing the vital communication link between the drone and the software.
Drone connectivity can be established through the following:
Setting Communication Links through available Serial, TCP, UDP, and Bluetooth options.
5.2.1 Establishing Drone Connection via Serial Port:
To connect your drone using the serial port, follow these steps:
- Choose “Serial”: From the dropdown list on the screen, select the “Serial” option.
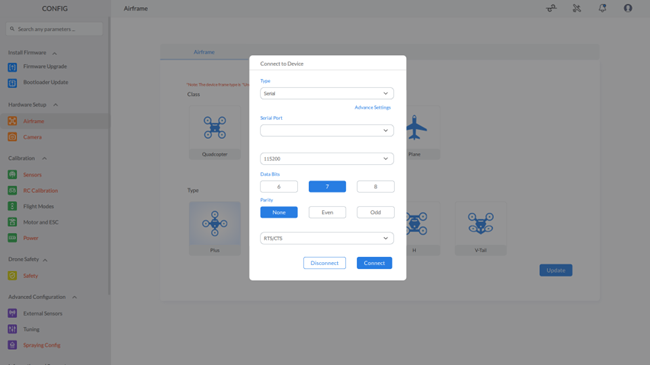
2. Serial Port Settings: Configure the parameters for the serial connection.
1. Select Serial Port – Pick the correct serial port from the dropdown list to ensure a reliable connection.
2. Baud Rate – This defines the speed of data transfer. For example, a “9600 baud” rate means 9600 bits can be transmitted per second. Select an appropriate baud rate based on your needs.
3. Data Bits – These bits carry information like commands and sensor readings. Typically, 8 data bits are used, but it can range from 5 to 8.
4. Parity – This is an error-checking method ensuring the number of 1s in a data set is even or odd. Set the parity based on the requirement to prevent errors.
5. Data Flow Control
• RTS/CTS Protocol: Uses signals to manage data flow, ensuring devices are ready to send or receive data.
• XON/XOFF Flow Control: Uses control characters to start (XON) or stop (XOFF) data transmission.
3. Establish the Connection
After configuring the settings:
• Click the ‘Connect’ button.
• If successful, a “Communication link established” message will appear. Click “OK” to proceed to the next screen.
• If the connection fails, an error message will be displayed.
By following these simplified steps, you can establish a serial port connection with your drone.
5.2.2 Establishing Drone Connection via TCP:
To connect your drone using TCP, follow these steps:
- Choose “TCP”: From the dropdown list on the screen, select the “TCP” option.
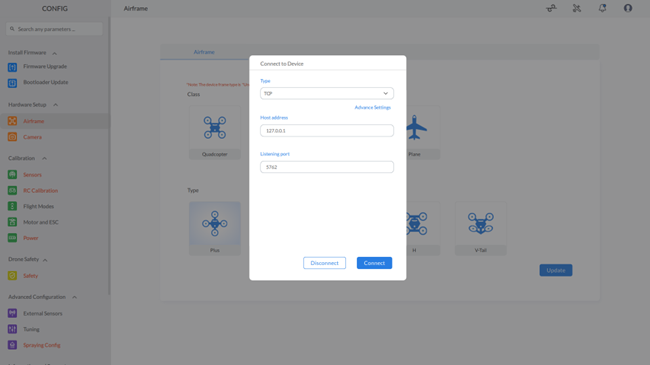
- Configure TCP Settings: Input the necessary values for the host address and listening port as shown on the screen.
TCP Connection Settings:
- Host Address: This is the address of your drone. Modify it if necessary. For example, the IP address might be 192.168.1.25.
- Listening Port: This is the port number of the connected device within your system. Modify this address as needed.
3. Establish the Connection
Once you’ve entered the Host Address and Port Number:
- Click the ‘Connect’ button.
- If successful, a “Communication link established” message will appear. Click “OK” to proceed to the next screen.
- If the connection fails, an error message will be displayed.
By following these steps, you can establish a TCP connection with your drone.
5.2.3 Establishing Drone Connection via UDP:
To connect your drone using UDP, follow these steps:
- Choose “UDP”: From the dropdown list on the screen, select the “UDP” option.
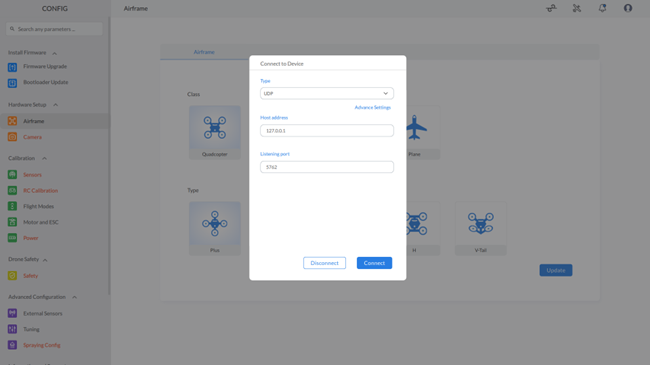
2. Configure UDP Settings: Input the necessary values for the host address and listening port as shown on the screen.
UDP Connection Settings:
- Host Address: This is the address of your drone. Modify it if necessary. For example, the IP address might be 192.168.1.25.
- Listening Port: This is the port number of the connected device within your system. Modify this address as needed.
3. Establish the Connection
Once you’ve entered the Host Address and Port Number:
- Click the ‘Connect’ button.
- If successful, a “Communication link established” message will appear. Click “OK” to proceed to the next screen.
- If the connection fails, an error message will be displayed.
By following these steps, you can establish a UDP connection with your drone.
5.2.4 Establishing Drone Connection via Bluetooth:
To connect your drone via Bluetooth, follow these steps:
- Enable Bluetooth: Make sure Bluetooth is enabled on both devices. If necessary, activate location services on your device.
- Scan for Bluetooth Devices: Click the “Scan Bluetooth Devices ” link on the screen to search for available Bluetooth-enabled drones.
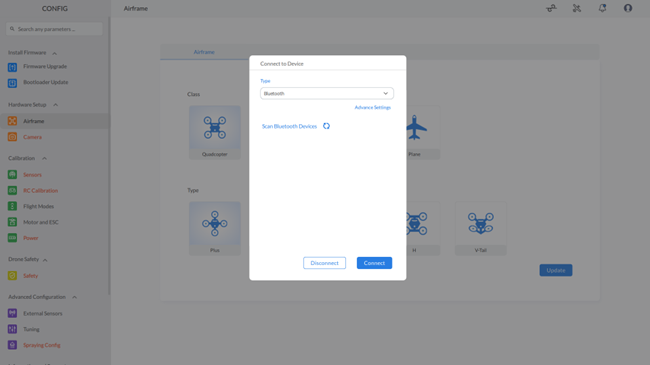
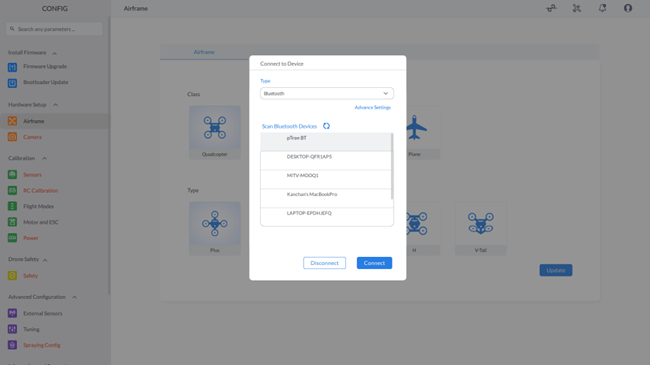
- If successful, a “Communication link established” message will appear. Click “OK” to proceed to the next screen.
- If the connection fails, an appropriate error message will be displayed.
By following these steps, you can establish a Bluetooth connection with your drone.
5.2.5 Elevate Your Communication Link with Advanced Settings:
To access detailed telemetry settings in AeroGCS CONFIG, Tap the “Advanced Settings” button on the Drone Connection Screen.
These settings provide a deeper level of configuration for the telemetry data your drone transmits.
Note that available options may vary depending on your drone model. Here are some common telemetry settings you can configure:
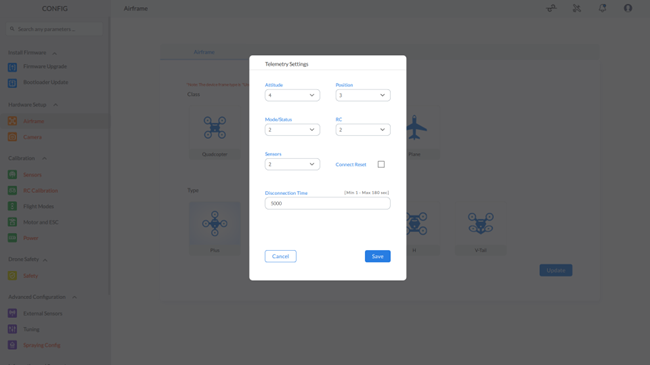
Common Telemetry Settings
- Altitude: Configure the telemetry-connected altitude sensor to ensure accurate altitude readings.
- Position: Specify the source of position data, such as GPS, to track your drone’s location accurately.
- Mode/Status: Set the telemetry mode or status, like flight mode, to monitor your drone’s operational state.
- RC Channel: Define the RC channel that receives the remote control signal to ensure proper communication between the drone and the controller.
- Sensor Selection: Choose the specific sensor data you want to monitor, such as battery voltage, to keep an eye on critical parameters.
- Disconnection Time: Set the inactivity time limit (less than 3 minutes) for automatic deactivation of the telemetry link to save power and prevent unnecessary connections.
- Connect Reset: Initiate a connection reset with the telemetry link for troubleshooting purposes, helping to resolve connection issues.
Tips for Using Advanced Telemetry Settings
- Keep it Simple: Use the default settings unless you are an experienced user with a specific need to adjust them.
- Refer to Your Drone’s Manual: For detailed information about the telemetry data specific to your drone model, consult the user manual provided by the manufacturer.
By accessing and configuring these advanced telemetry settings, you can fine-tune the data your drone provides, ensuring optimal performance and reliable operation during flights.