-
AeroGCS CONFIG User Manual
10. Drone Safety
This section of the AeroGCS CONFIG allows you to configure safety settings for Battery, RTL, Geofence, Arming Checks, Terrain, Parachute, and safety Switch.
10.1 Safety
10.1.1 Battery
To configure the battery settings, follow these steps: Step 1: Access Battery Settings:
- Click on “Drone Safety”.
- Then click on “Safety”.
- Select the “Battery” panel on the screen.
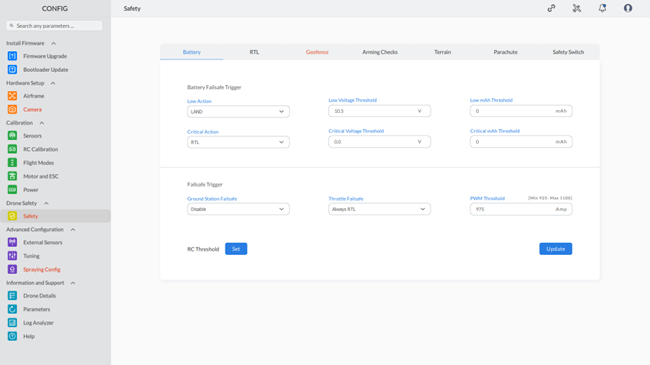
Battery Failsafe Trigger
Step 2: Configure Battery Failsafe Trigger:
- Select the low action from the available options in the dropdown menu.
- Enter the low voltage threshold and low mAh threshold.
- Select the critical action from the available options in the dropdown menu.
- Enter the critical voltage threshold and critical mAh threshold.
Failsafe Trigger
Step 3: Configure Failsafe Trigger:
- Select the ground station failsafe from the dropdown menu.
- Select the throttle failsafe from the dropdown menu.
- Enter the PWM threshold within the specified range.
RC Threshold
Step 4: Set RC Threshold:
- Click the “Set” button to set the RC threshold.
- Follow the on-screen instructions to complete the RC threshold setting.
Final Steps
Step 5: Update and Confirm Settings:
- After completing all three steps, click the “Update” button. This will send the parameters to the device and confirm by showing the message “Parameter sent to device”.
- Click the “OK” button to close the configuration window.
By following these steps, you will successfully configure the battery safety parameters.
10.1.2 RTL (Return to Launch) Configuration
To configure the battery settings, follow these steps:
Step 1: Access RTL Settings:
- Click on “Drone Safety”.
- Then click on “Safety”.
- Select the “RTL” panel on the screen.
This section allows you to configure the Return to Launch (RTL). The RTL settings screen will appear as shown.
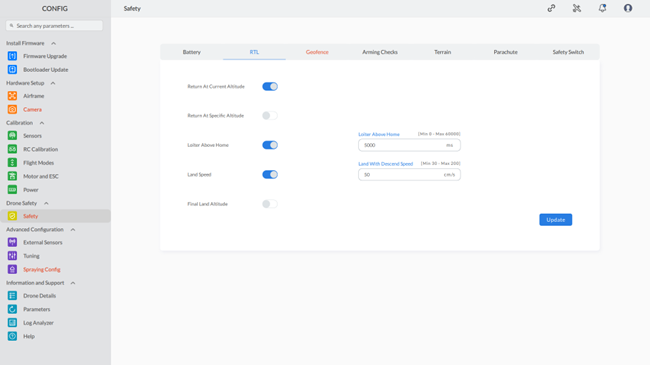
Note: The red highlighting serves as an indicator for both missing parameters and invalid configurations. The default color will be restored once the correct values are entered for these parameters. |
Step 2: Enable or Disable RTL Options
- Return at Current Altitude:
- Enable this option using the provided toggle button.
- If this option is enabled, the “Return at Specific Altitude” option is automatically disabled.
- Return at Specific Altitude:
- Enable this option if the “Return at Current Altitude” option is disabled.
- Set the “Return Altitude” value in the range of 0 – 8000 cm by entering the value in the provided field.
- Loiter Above Home:
- Enable this option using the provided toggle button.
- If enabled, set the “Loiter Above Home” value in the range of 0 – 60000 ms.
- Land Speed:
- Enable this option using the provided toggle button.
- If enabled, set the “Land with Descend Speed” value in the range of 30 – 200 cm/s.
- Final Land Altitude:
- Enable this option using the provided toggle button.
- If enabled, set the “Final Land Altitude” value in the range of 0 – 1000 cm.
Step 3: Update Settings
- After configuring all required RTL options, click on the “Update” button. This will send the parameters to the device and display the message “Parameters are sent to device”.
Step 4: Confirm and Close
- Click “OK” to close the configuration window.
By following these steps, you will successfully configure the Return to Launch (RTL) settings.
10.1.3 Geofence
To configure the geofence settings, follow these steps:
Step 1: Access Geofence Settings:
- Click on “Drone Safety”.
- Then click on “Safety”.
- Select the “Geofence” tab on the screen.
This section allows you to configure “Geofence” settings. The “Geofence” screen will appear as
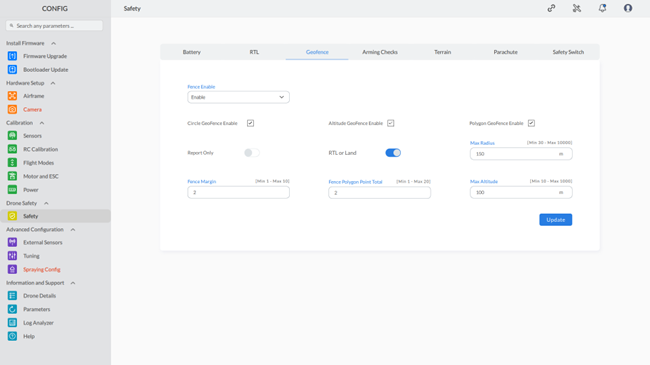
Step 2: Enable Geofence Options:
- Fence Enable: Use the dropdown menu to enable or disable the geofence.
- Circle Geofence Enable: Check this box to enable a circular geofence.
- Altitude Geofence Enable: Check this box to enable an altitude-based geofence.
- Polygon Geofence Enable: Check this box to enable a polygonal geofence.
Step 3: Set Geofence Parameters:
- Fence Margin: Enter the fence margin value (range: 1 – 10).
- Max Radius: Enter the maximum radius value in meters (range: 30 – 10000 m).
- Max Altitude: Enter the maximum altitude value in meters (range: 10 – 1000 m).
- Fence Polygon Point Total: Enter the number of points for the polygon geofence (range: 1 – 20).
Step 4: Additional Options:
- Report Only: Toggle this switch if you want the system to only report geofence breaches without taking action.
- RTL or Land: Toggle this switch to choose between Return to Launch (RTL) or land when a geofence breach occurs.
Step 5: Update Settings:
- After configuring all required geofence options, click the “Update” button. This will send the parameters to the device and display the message “Parameters are sent to device”.
By following these steps, you will successfully configure the geofence settings for your drone.
10.1.4 Arming Checks
To configure the arming checks, follow these steps:
Step 1: Access Arming Checks Settings:
- Click on “Drone Safety”.
- Then click on “Safety”.
- Select the “Arming Checks” tab on the screen.
This section allows you to configure “Arming Checks” settings. The “Arming Checks” screen will appear as
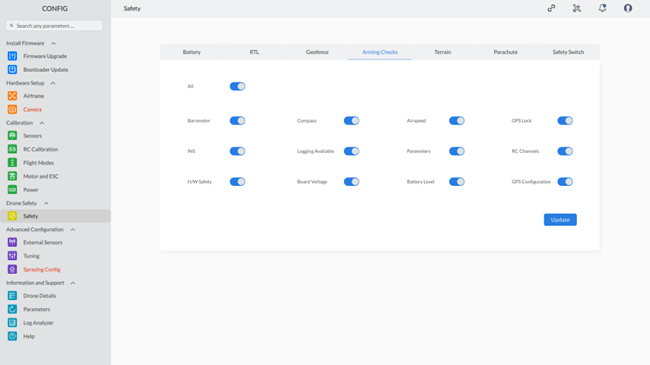
Step 2: Enable or Disable Arming Checks:
- All: Toggle this switch to enable or disable all arming checks at once.
- Barometer: Enable this option to perform a barometer check.
- Compass: Enable this option to perform a compass check.
- Airspeed: Enable this option to perform an airspeed check.
- GPS Lock: Enable this option to ensure a GPS lock before arming.
- INS: Enable this option to perform an Inertial Navigation System (INS) check.
- Logging Available: Enable this option to ensure logging is available.
- Parameters: Enable this option to check if parameters are correctly set.
- RC Channels: Enable this option to verify RC channels.
- H/W Safety: Enable this option to ensure hardware safety.
- Board Voltage: Enable this option to check the board voltage.
- Battery Level: Enable this option to monitor the battery level.
- GPS Configuration: Enable this option to check GPS configuration.
Step 3: Update Settings:
- After enabling or disabling the desired arming checks, click the “Update” button. This will send the updated parameters to the device and confirm by showing the message “Parameters are sent to device”.
By following these steps, you will successfully configure the arming checks for your drone, ensuring all necessary pre-flight checks are performed.
10.1.5 Terrain
To configure the terrain settings, follow these steps:
Step 1: Access Terrain Settings:
- Click on “Drone Safety”.
- Then click on “Safety”.
- Select the “Terrain” tab on the screen.
This section allows you to configure “Terrain” settings. The “Terrain” screen will appear as
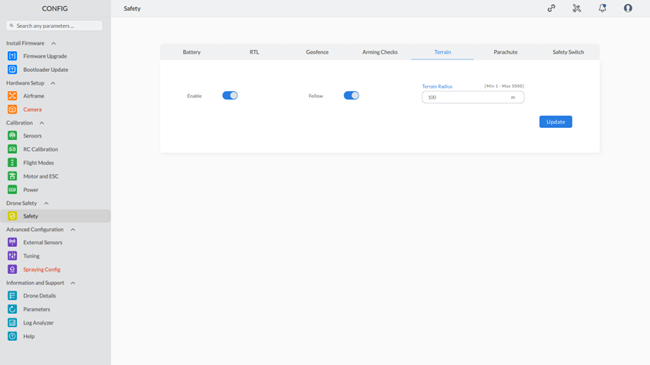
Step 2: Enable Terrain Options:
- Enable: Toggle this switch to enable terrain following.
- Follow: Toggle this switch to allow the drone to follow the terrain.
Step 3: Set Terrain Parameters:
- Terrain Radius: Enter the terrain radius value in meters (range: 1 – 5000 m).
Step 4: Update Settings:
- After configuring the required terrain options, click the “Update” button. This will send the parameters to the device and display the message “Parameters are sent to device”.
By following these steps, you will successfully configure the terrain settings for your drone, enabling it to follow the terrain and maintain a consistent altitude above ground level.
10.1.6 Parachute
To configure the terrain settings, follow these steps:
Step 1: Access Terrain Settings:
- Click on “Drone Safety”.
- Then click on “Safety”.
- Select the “Parachute” tab on the screen.
This section allows you to configure “Parachute” settings. The “Parachute” screen will appear as
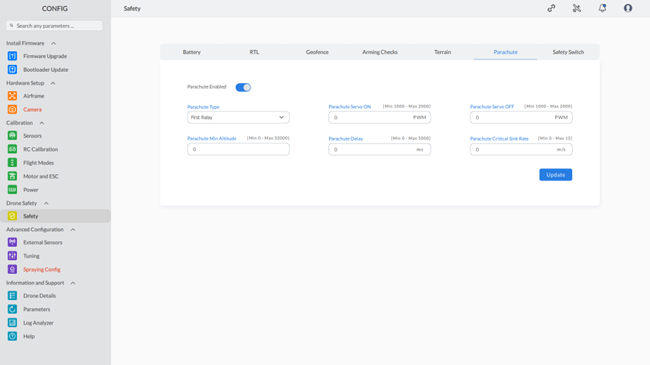
Note: The red highlighting serves as an indicator for both missing parameters and invalid configurations. The default color will be restored once the correct values are entered for these parameters. |
Step 2: Configure Parachute Options:
- Parachute Enabled: Use the toggle button to enable or disable the parachute.
- Parachute Type: Select the parachute type from the available options in the drop-down list.
- Parachute Servo ON: Set the value for the parachute servo ON position in the range of 1000 – 2000 PWM.
- Parachute Servo OFF: Set the value for the parachute servo OFF position in the range of 1000 – 2000 PWM.
- Parachute Min Altitude: Set the minimum altitude for parachute deployment in the range of 0 – 32000.
- Parachute Delay: Set the delay before parachute deployment in the range of 0 – 5000 ms.
- Parachute Critical Sink Rate: Set the critical sink rate for parachute deployment in the range of 0 – 15 m/s.
Step 3: Update Settings:
- After configuring the required parachute options, click the “Update” button. This will send the parameters to the device and display the message “Parameters are sent to device”.
By following these steps, you will successfully configure the parachute settings for your drone, ensuring safe and effective deployment when necessary.
10.1.7 Safety Switch
To configure the safety switch settings, follow these steps:
Step 1: Access Safety Switch Settings:
- Click on “Drone Safety”.
- Then click on “Safety”.
- Select the “Safety Switch” tab on the screen.
This section allows you to configure the safety switch settings. The “Safety Switch” screen will appear as shown.
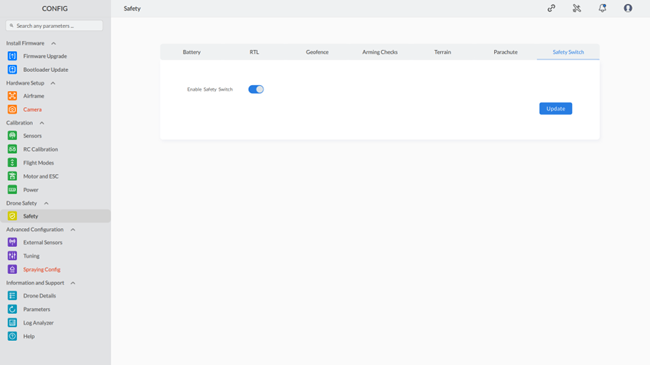
Step 2: Enable Safety Switch: Use the toggle button to enable or disable the safety switch.
Step 3: Update Settings:
- After configuring the required safety switch options, click the “Update” button. This will send the parameters to the device and display the message “Parameters are sent to device”.
By following these steps, you will successfully configure the safety switch settings for your drone, ensuring proper safety measures are in place during operation.