-
AeroGCS Enterprise User Manual
11. Settings
Tailor Your User, Security, and Flight Preferences in One Central Location
Introduction
The Settings module in AeroGCS Enterprise enables users to configure key personal and system-level preferences for a seamless operational experience. Whether you need to update your profile information, manage subscriptions, change security credentials, or customise your email alerts—this centralised interface gives you complete control.
Settings are segmented into clear sections, allowing for easy navigation and focused adjustments. Each setting tab is designed to support your role-specific needs—whether you’re a project manager, pilot, or admin user—ensuring your environment remains aligned with your workflow and responsibilities.
💡 Tip: Keeping your settings up to date ensures smooth coordination across your team and accurate data synchronisation across AeroGCS systems.
11.1 Accessing Settings
To begin managing your preferences, follow these steps to access the Settings module from within the AeroGCS Enterprise interface.
Steps to Access Settings:
- Log in to your AeroGCS Enterprise account using your registered credentials.
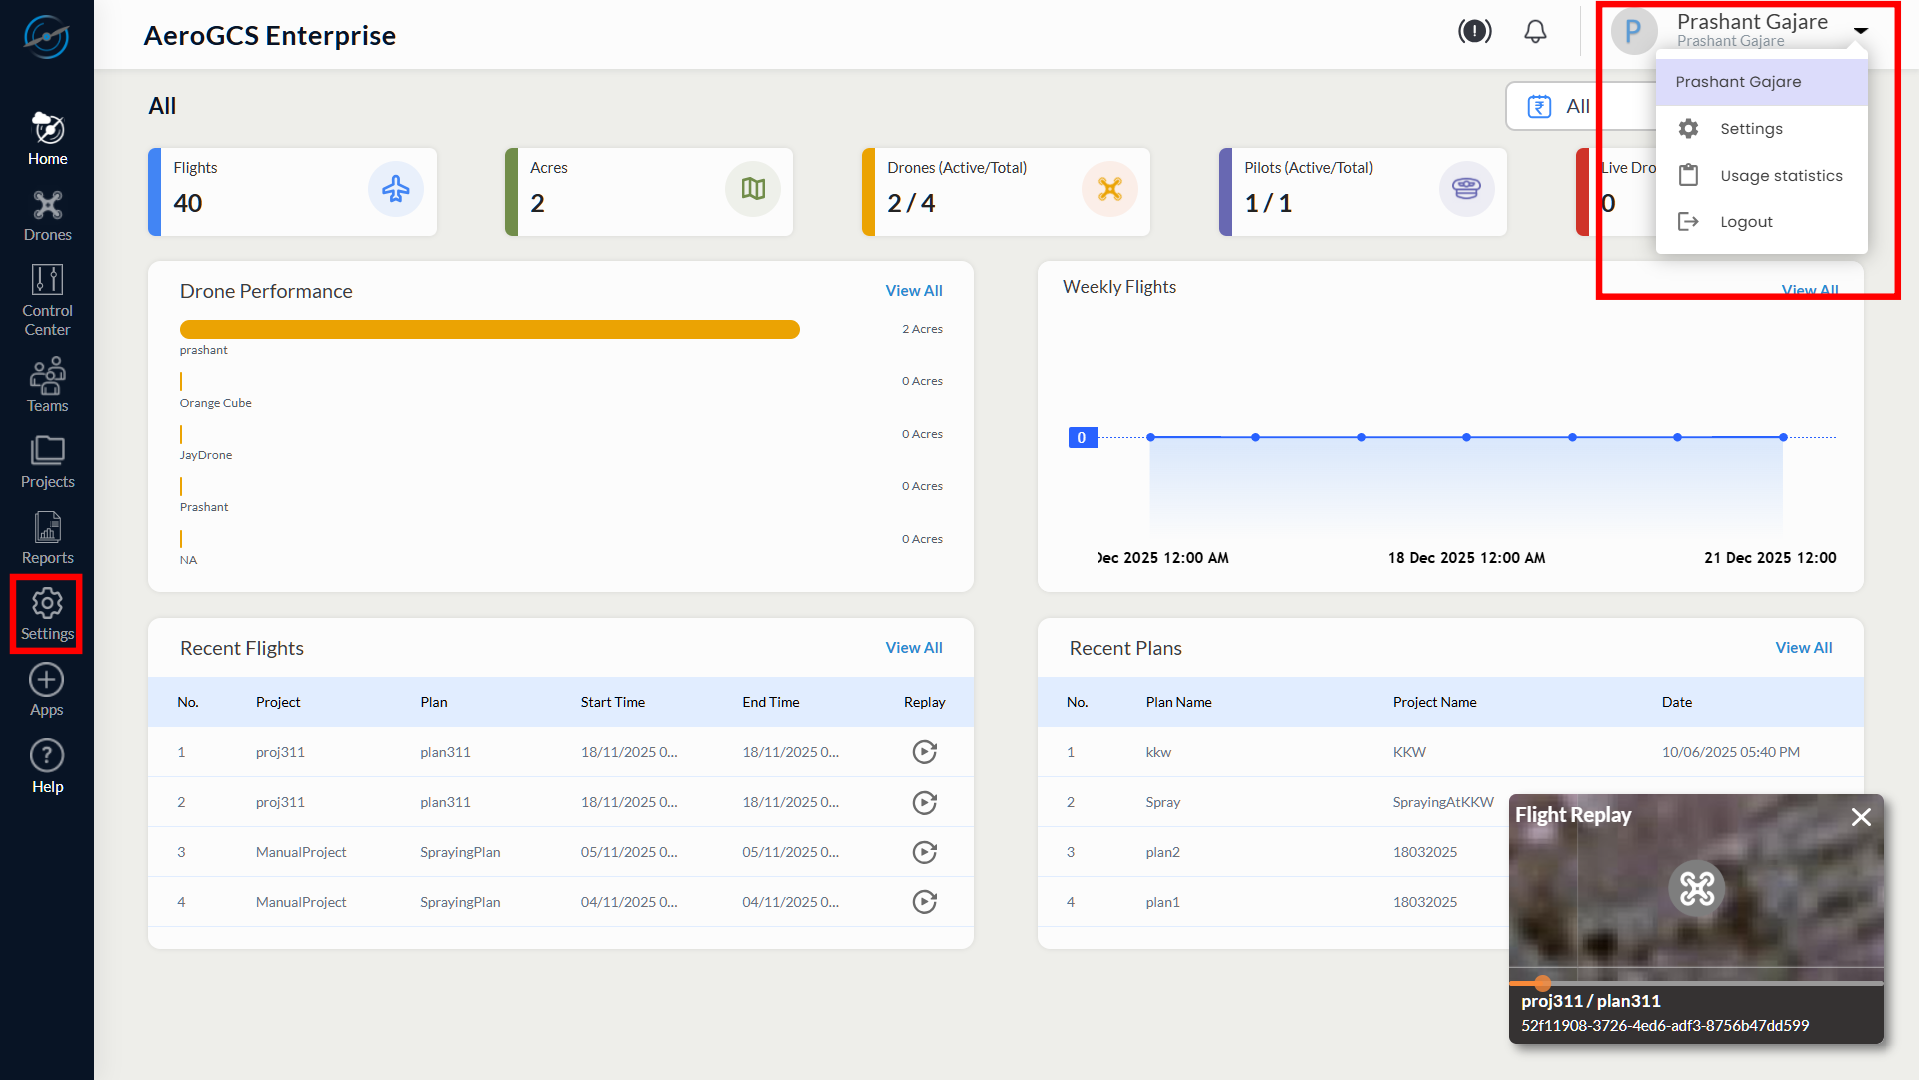
- In the top-right corner of the dashboard, click on your profile icon (this may display your initials or profile photo).
- From the dropdown menu, click on Settings.
UI Path: Top Navigation Bar → Profile Icon → Settings - You will be redirected to the Settings Panel, where a vertical tab list is displayed on the left side of the screen.
- Available tabs include:
– Profile
– Subscriptions
– Invoices
– Security
– API Keys
– Email Settings
– Flight & Spray
– My Team Access
11.2 Profile
The Profile section in the Settings module allows users to view and manage their personal information, address details, billing contact information, and billing details required for invoicing and compliance. Keeping this information accurate ensures correct system communication, subscription billing, and invoice generation.
The Profile page is organised into the following sections:
- Personal Details
- Address
- Billing Contact Details
- Billing Details
Each section can be viewed in read-only mode or updated using the Edit, Save Changes, and Cancel actions.
11.2.1 Profile Sections and Fields
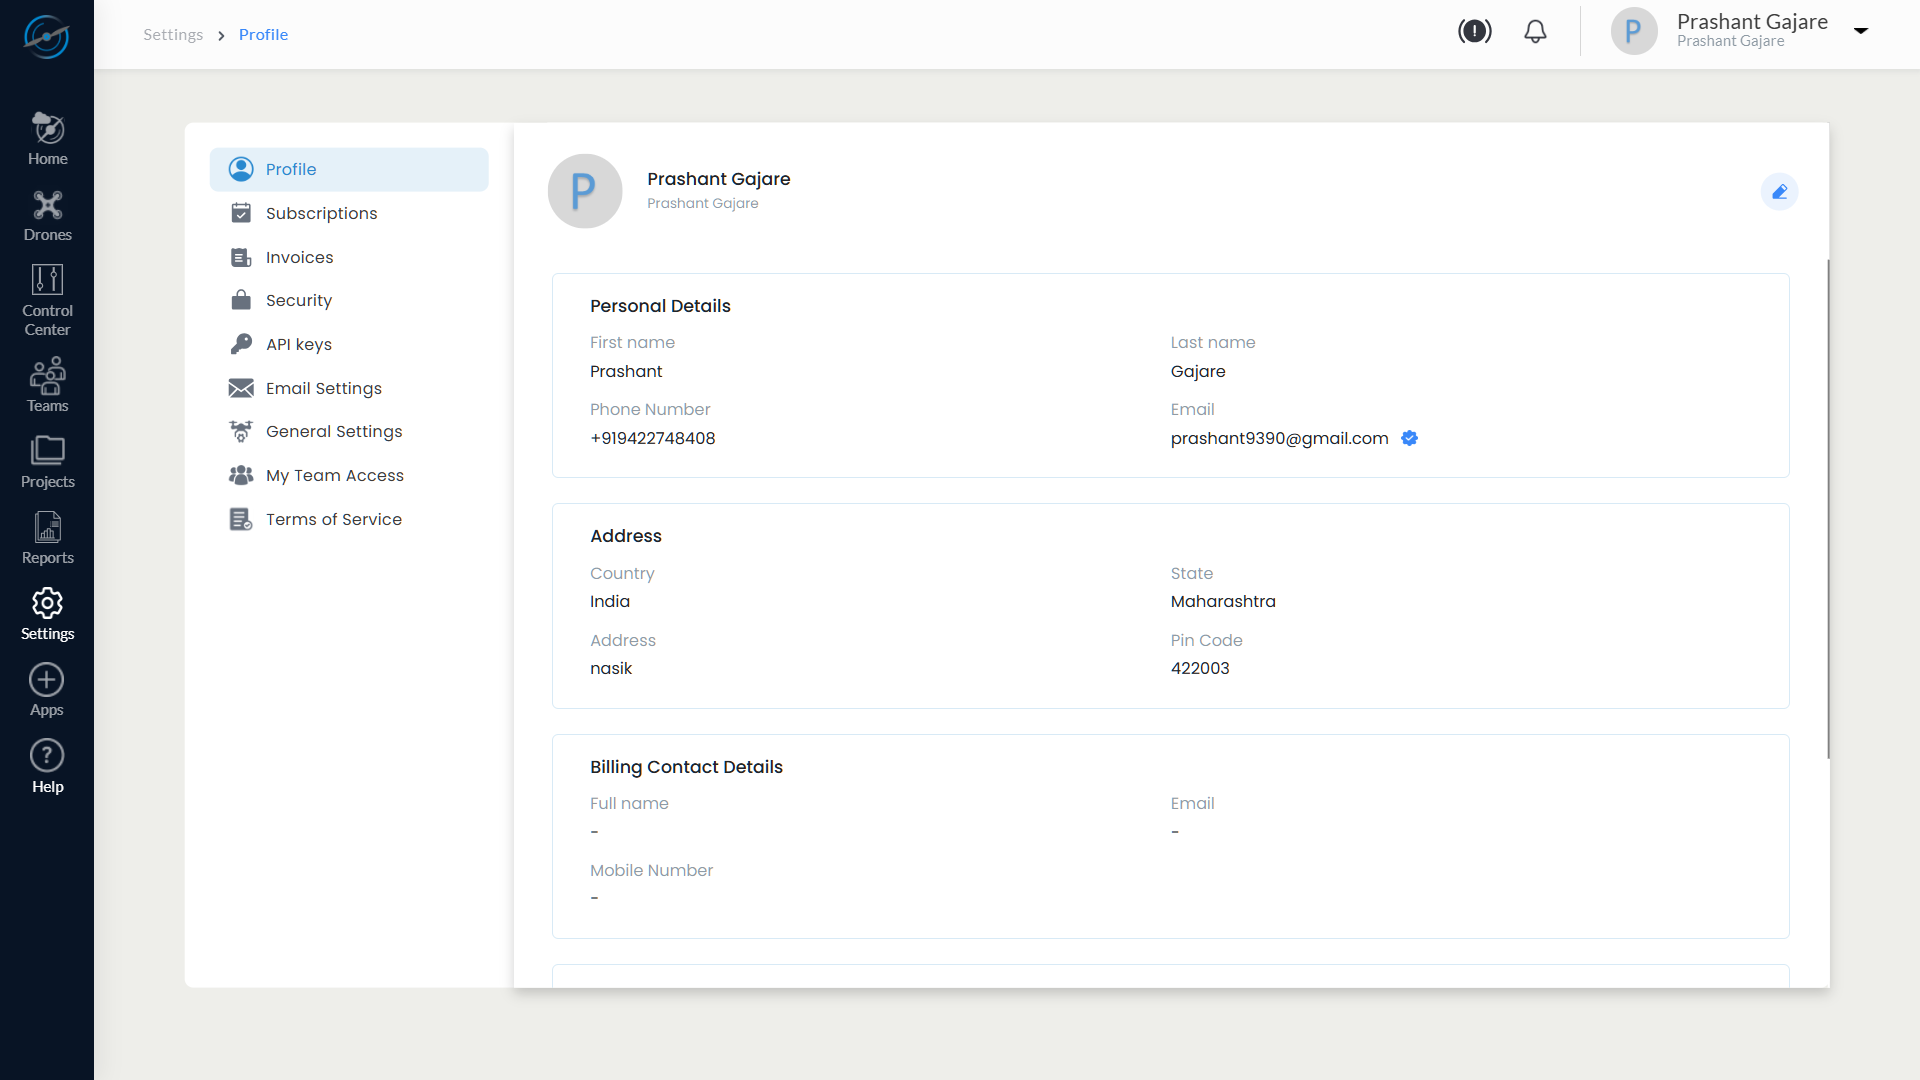
1. Personal Details
This section displays the primary identity and contact information of the logged-in user.
| Field | Description |
| First Name | User’s first name |
| Last Name | User’s last name |
| Phone Number | Registered mobile number |
| Registered email address |
- The Email field is displayed as verified and is not editable.
- Email editing restrictions may apply for users authenticated via SSO (Google or Microsoft).
2. Address
This section captures the user’s location details.
| Field | Description |
| Country | Country of residence |
| State | State or region |
| Address | City or local address |
| Pin Code | Postal or ZIP code |
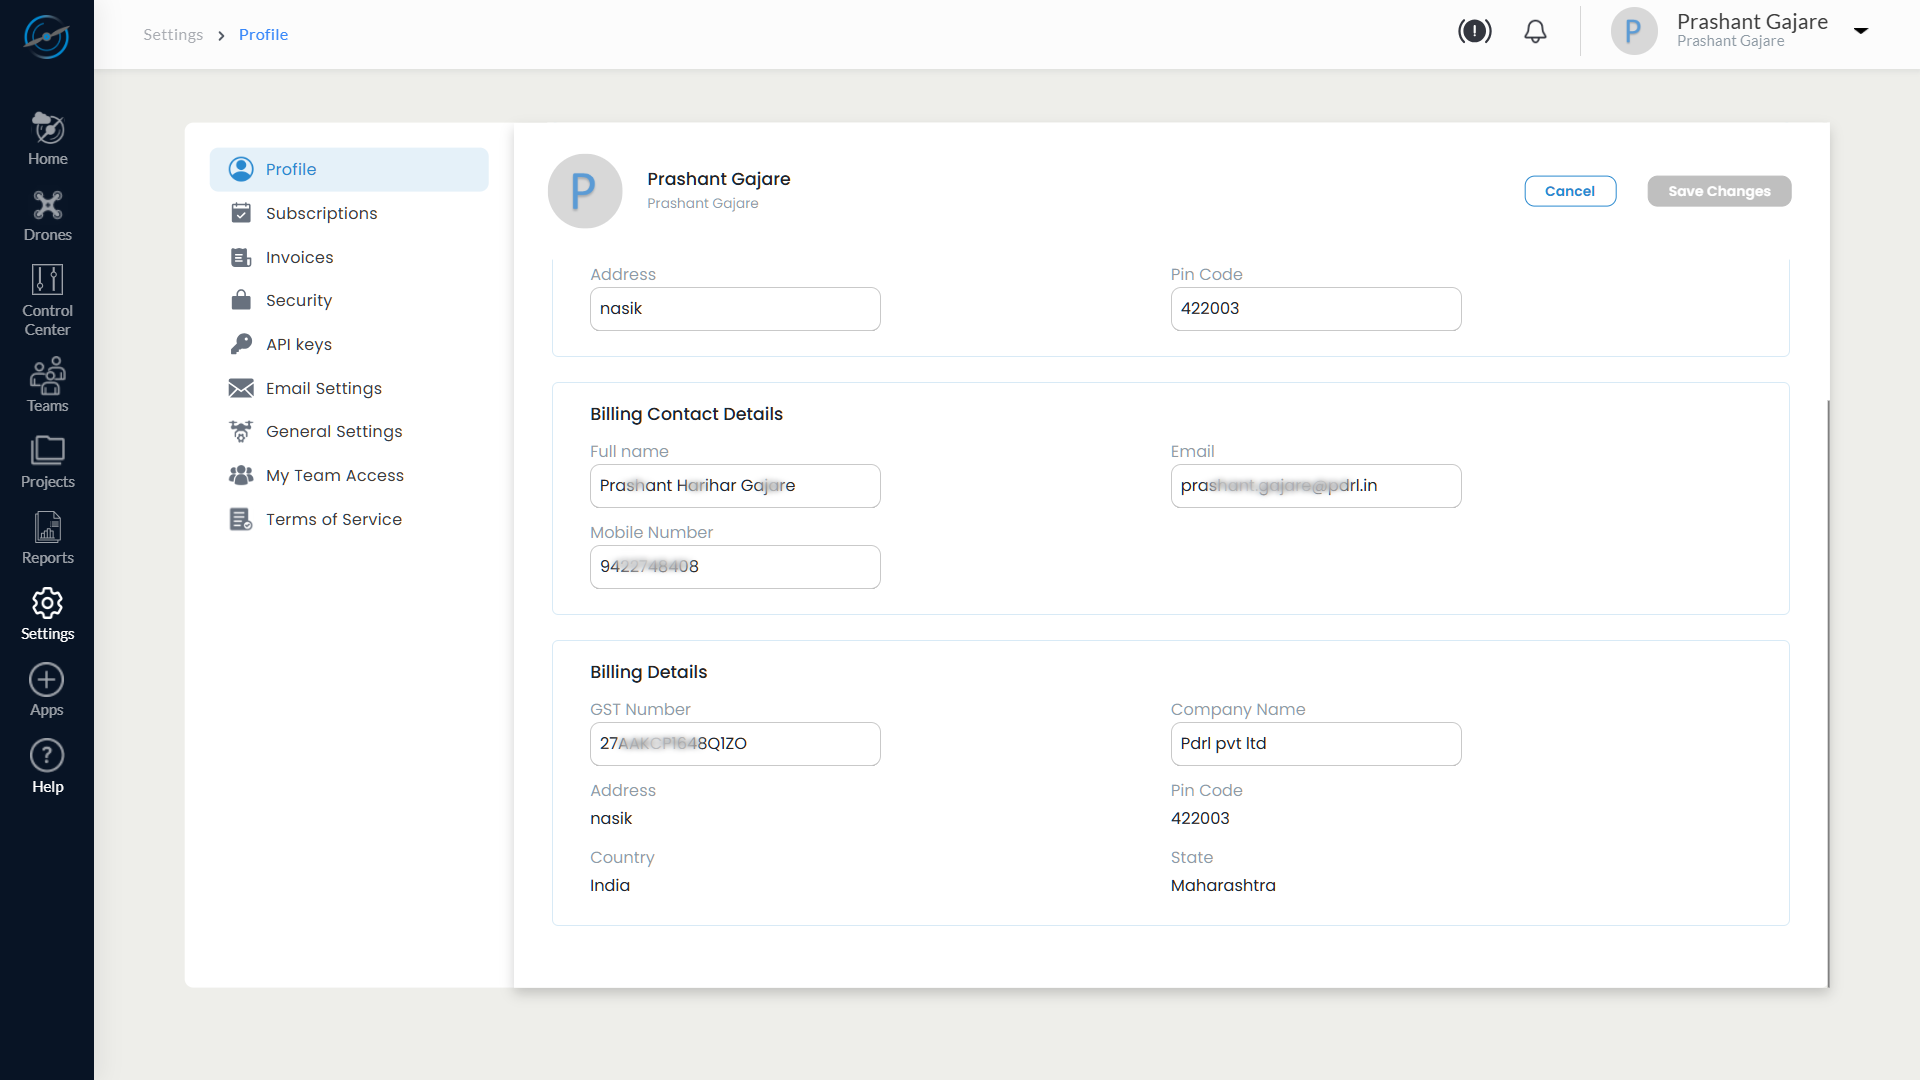
3. Billing Contact Details
This section defines the contact person responsible for billing-related communication.
| Field | Description |
| Full Name | Billing contact person’s name |
| Billing contact email address | |
| Mobile Number | Billing contact phone number |
4. Billing Details
Billing Details are used for tax compliance and invoice generation.
| Field | Description |
| GST Number / VAT Number | Tax identification number |
| Company Name | Registered company name |
| Address | Billing address |
| Country | Billing country |
| State | Billing state |
| Pin Code | Billing postal code |
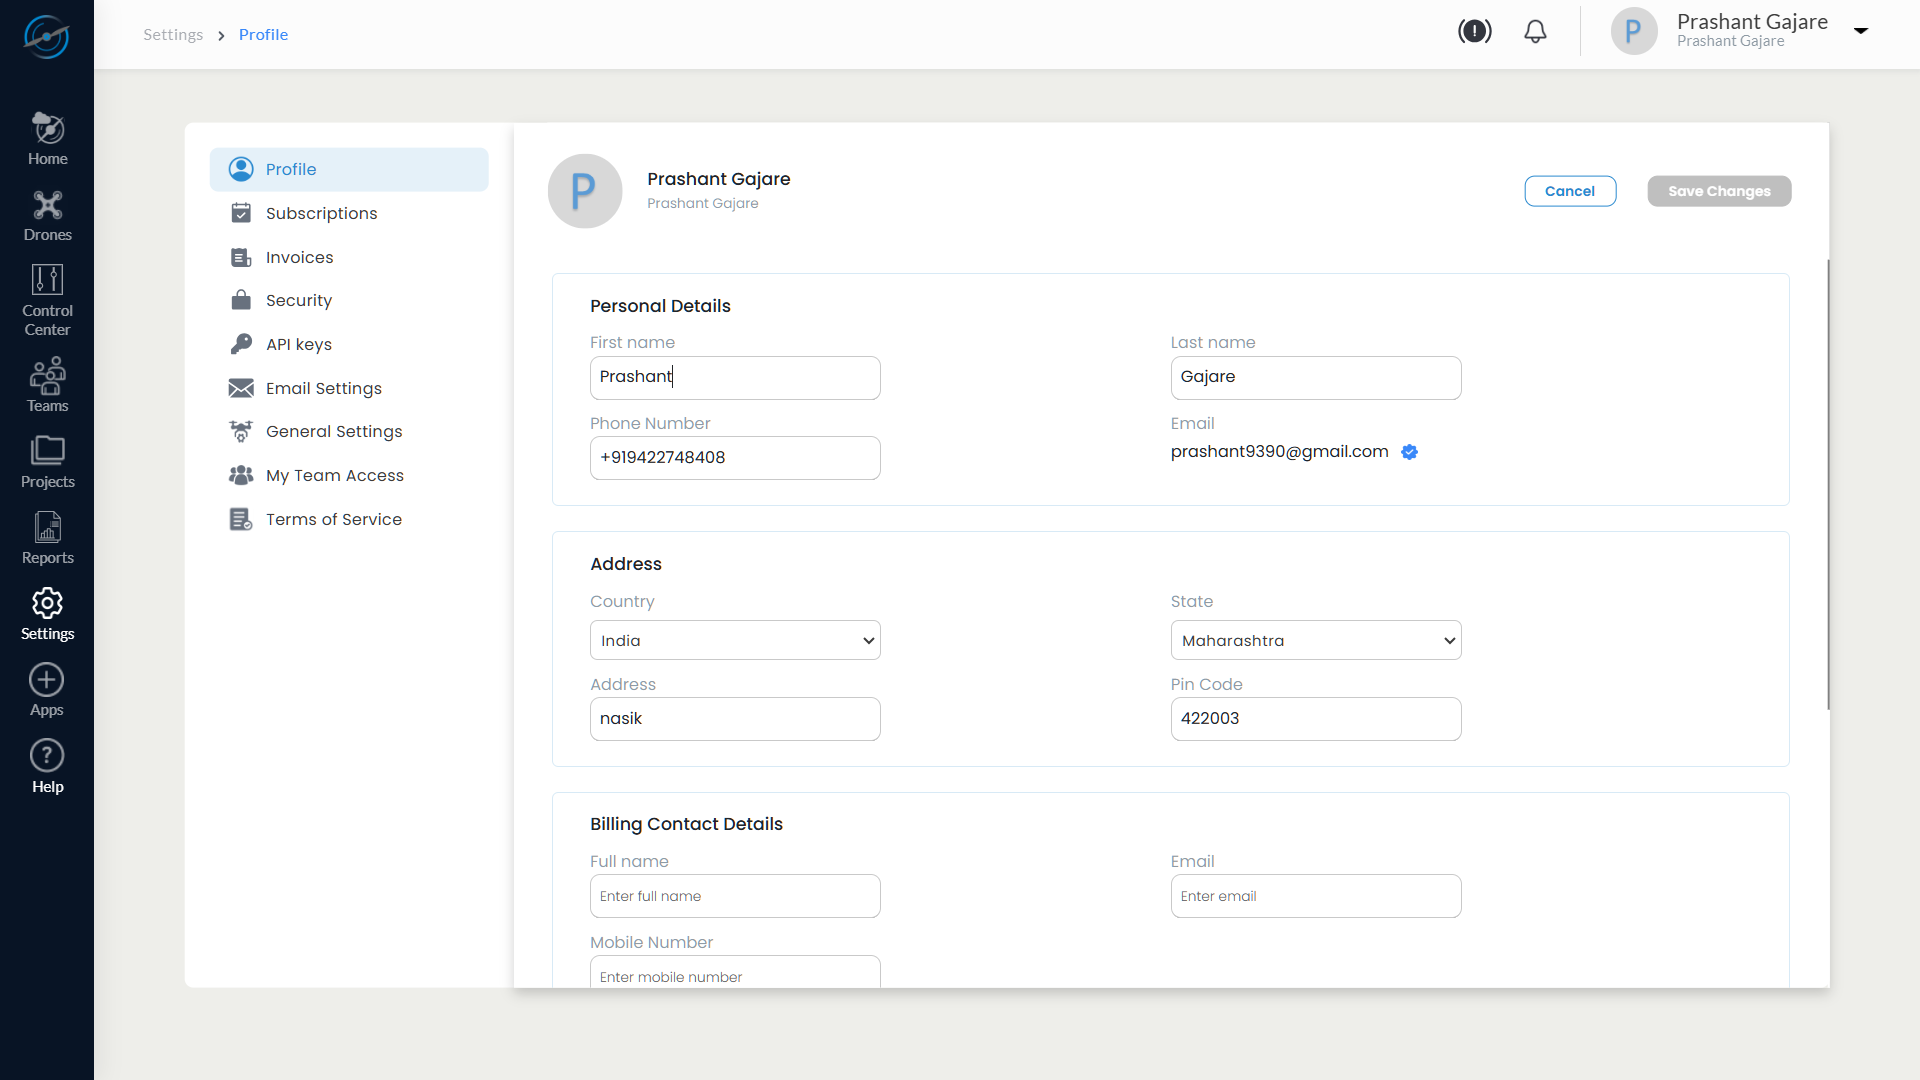
- Update the required fields.
- Click Save Changes to apply updates, or Cancel to discard changes.
11.2.3 Mandatory Billing Details Behavior
If Billing Details were not provided during registration, the system enforces completion during profile access:
- Upon accessing Settings → Profile, the page opens directly in Edit Mode.
- The Billing Details section is highlighted for completion.
- Users must enter valid billing information before proceeding.
This ensures accurate invoice generation and compliance with billing requirements.
⚠️ Important:
Incomplete billing details may restrict subscription management or invoice processing.
11.2.5 Usage Tips and Best Practices
- Keep billing contact and billing details up to date to ensure invoices and payment notifications reach the correct recipient.
- Verify GST/VAT numbers carefully to avoid billing or compliance issues.
- Review profile details after role changes or organisational updates.
11.3 Subscriptions
Manage your AeroGCS Enterprise subscription, add-ons, and usage limits
Overview
The Subscriptions section allows administrators and authorised users to view and manage their active AeroGCS Enterprise subscription. From this module, users can:
- Review current subscription cost and validity
- Monitor drone and storage usage
- Purchase additional drone capacity
- Modify or cancel the active subscription
- Compare available subscription plans
- Complete payments securely through the integrated billing system
All subscription-related actions are grouped into clearly defined panels to ensure transparency and controlled billing operations.

Subsections Available
The Subscriptions module is organised into the following panels:
- Billing Summary
- Current Plan
- Usage
- Plan Selection and Comparison (when modifying or purchasing a plan)
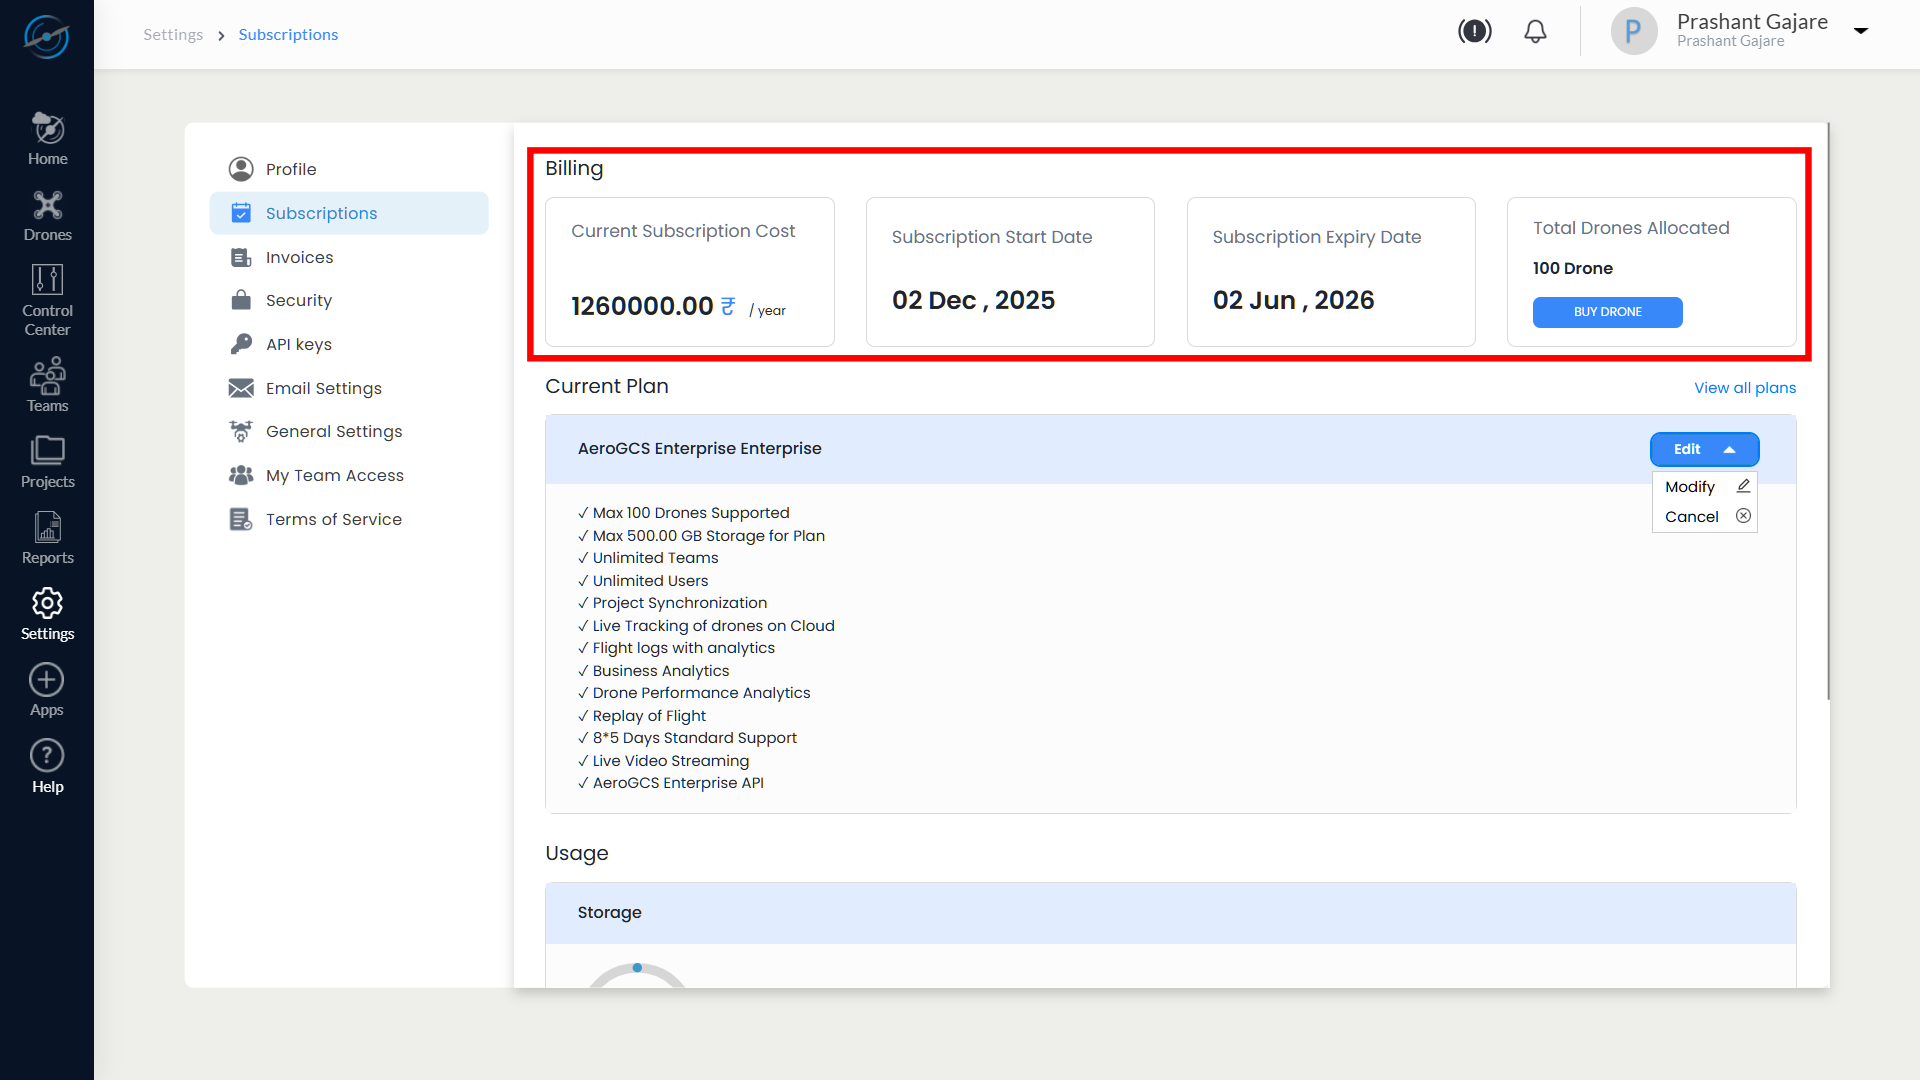
11.3.1 Billing Summary
The Billing Summary panel provides a snapshot of the current subscription status.
Fields Displayed
Field | Description |
Current Subscription Cost | Displays the total subscription cost per year |
Subscription Start Date | Date on which the current subscription became active |
Subscription Expiry Date | Date on which the current subscription will expire |
Total Drones Allocated | Maximum number of drones permitted under the plan |
A Buy Drone button is available in this panel to purchase additional drone slots without modifying the existing subscription plan.
Buying Additional Drones (Mid-Cycle Purchase)
The Buy Drone option enables real-time expansion of drone capacity during an active subscription.
Steps to Buy Drones
- Select Buy Drone from the Billing Summary panel.
- The Add-On Drones dialog opens.
- Specify the required quantity of additional drones.
- Review the pricing note indicating that charges apply immediately for the remaining subscription duration.
- Select Buy to proceed or Back to cancel.
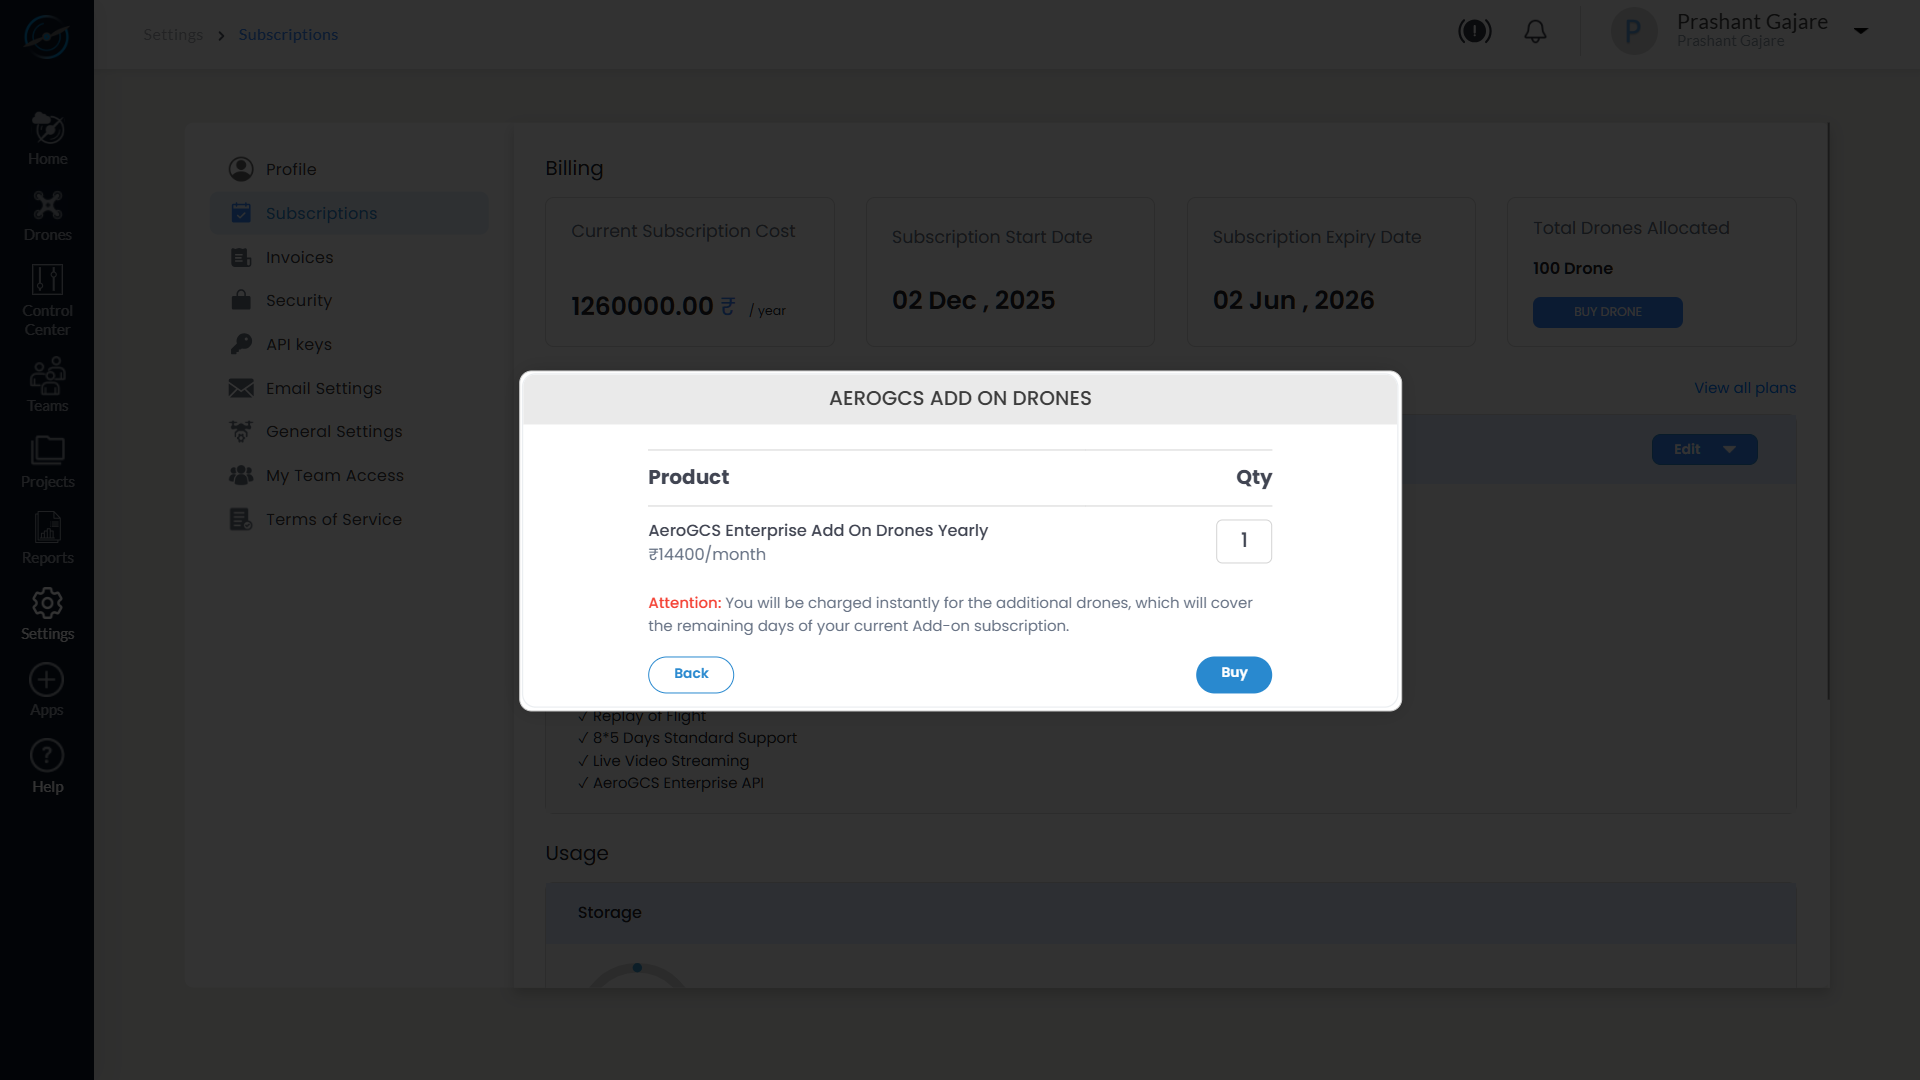
⚠️ Note:
- Additional drone charges are applied instantly.
- Purchased drones are immediately available for registration.
- This action does not affect the base subscription plan or expiry date.
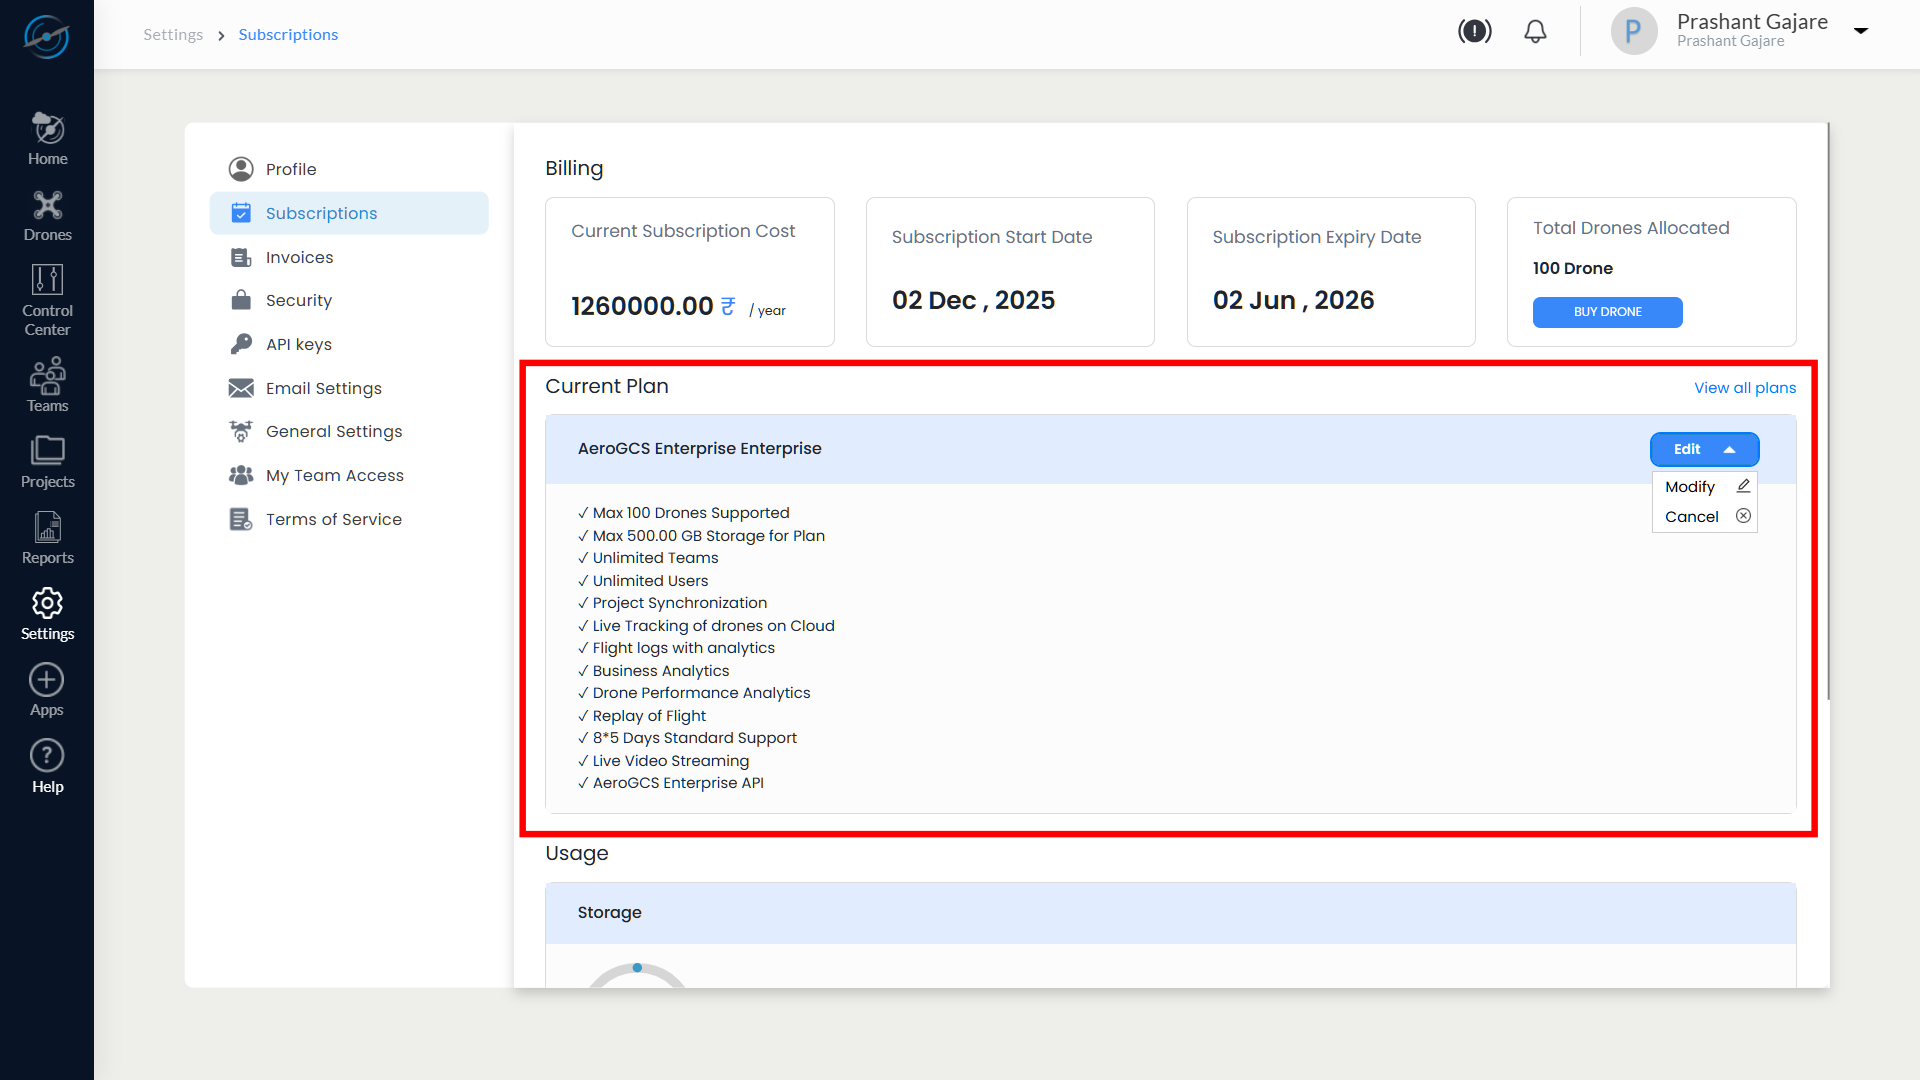
11.3.2 Current Plan
The Current Plan panel displays the active subscription tier and included features.
Example Plan: AeroGCS Enterprise
Included capabilities may include:
- Support for up to 100 drones
- 500 GB cloud storage
- Unlimited teams and users
- Project synchronisation
- Live drone tracking on cloud
- Flight logs with analytics
- Business and drone performance analytics
- Flight replay
- Live video streaming
- 8×5 standard support
- AeroGCS Enterprise API access
Editing the Current Plan
An Edit button is available in the Current Plan panel.
Edit Options
Option | Description |
Modify | Initiates subscription modification |
Cancel | Closes the Edit menu without changes |
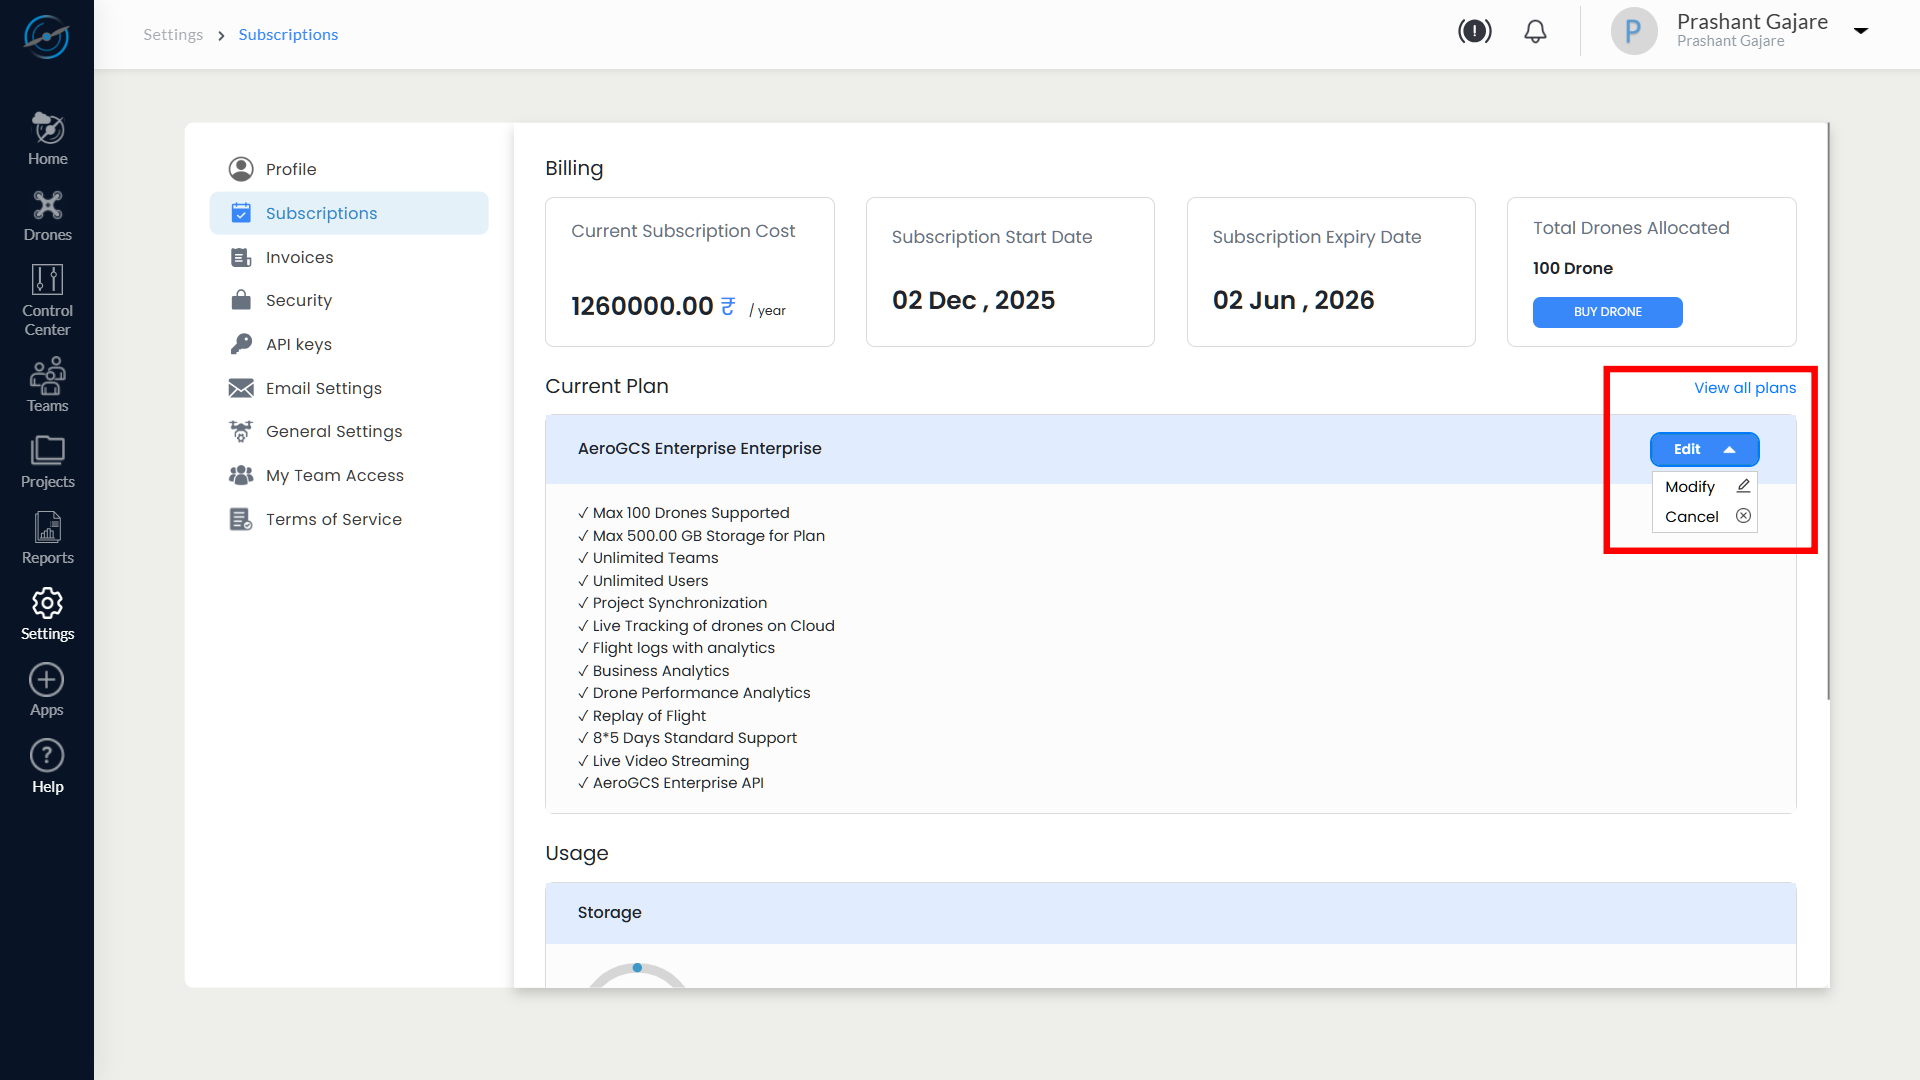
Modifying the Subscription
The Edit control in the Current Plan panel provides two distinct actions. Each action triggers a different system flow.
Steps to Access Edit Options
- Navigate to Settings → Subscriptions.
- Locate the Current Plan
- Select Edit to display the available options:
- Modify
- Cancel
Option 1: Modify Subscription
Use this option when you want to change the existing subscription plan.
Steps
- Select Edit → Modify.
- The system redirects you to the Subscription Plans
- Available plans are displayed with:
- Annual or Monthly toggle.
- Plan cards (Pro, Business, Enterprise).
- Buy Now action for the selected plan.
- Select the desired plan and proceed with purchase.

Behavior Notes
- The active subscription remains valid until the modification flow is completed.
- Billing adjustments are applied based on the selected plan and billing cycle.
- Plan comparison and selection are performed before final confirmation.
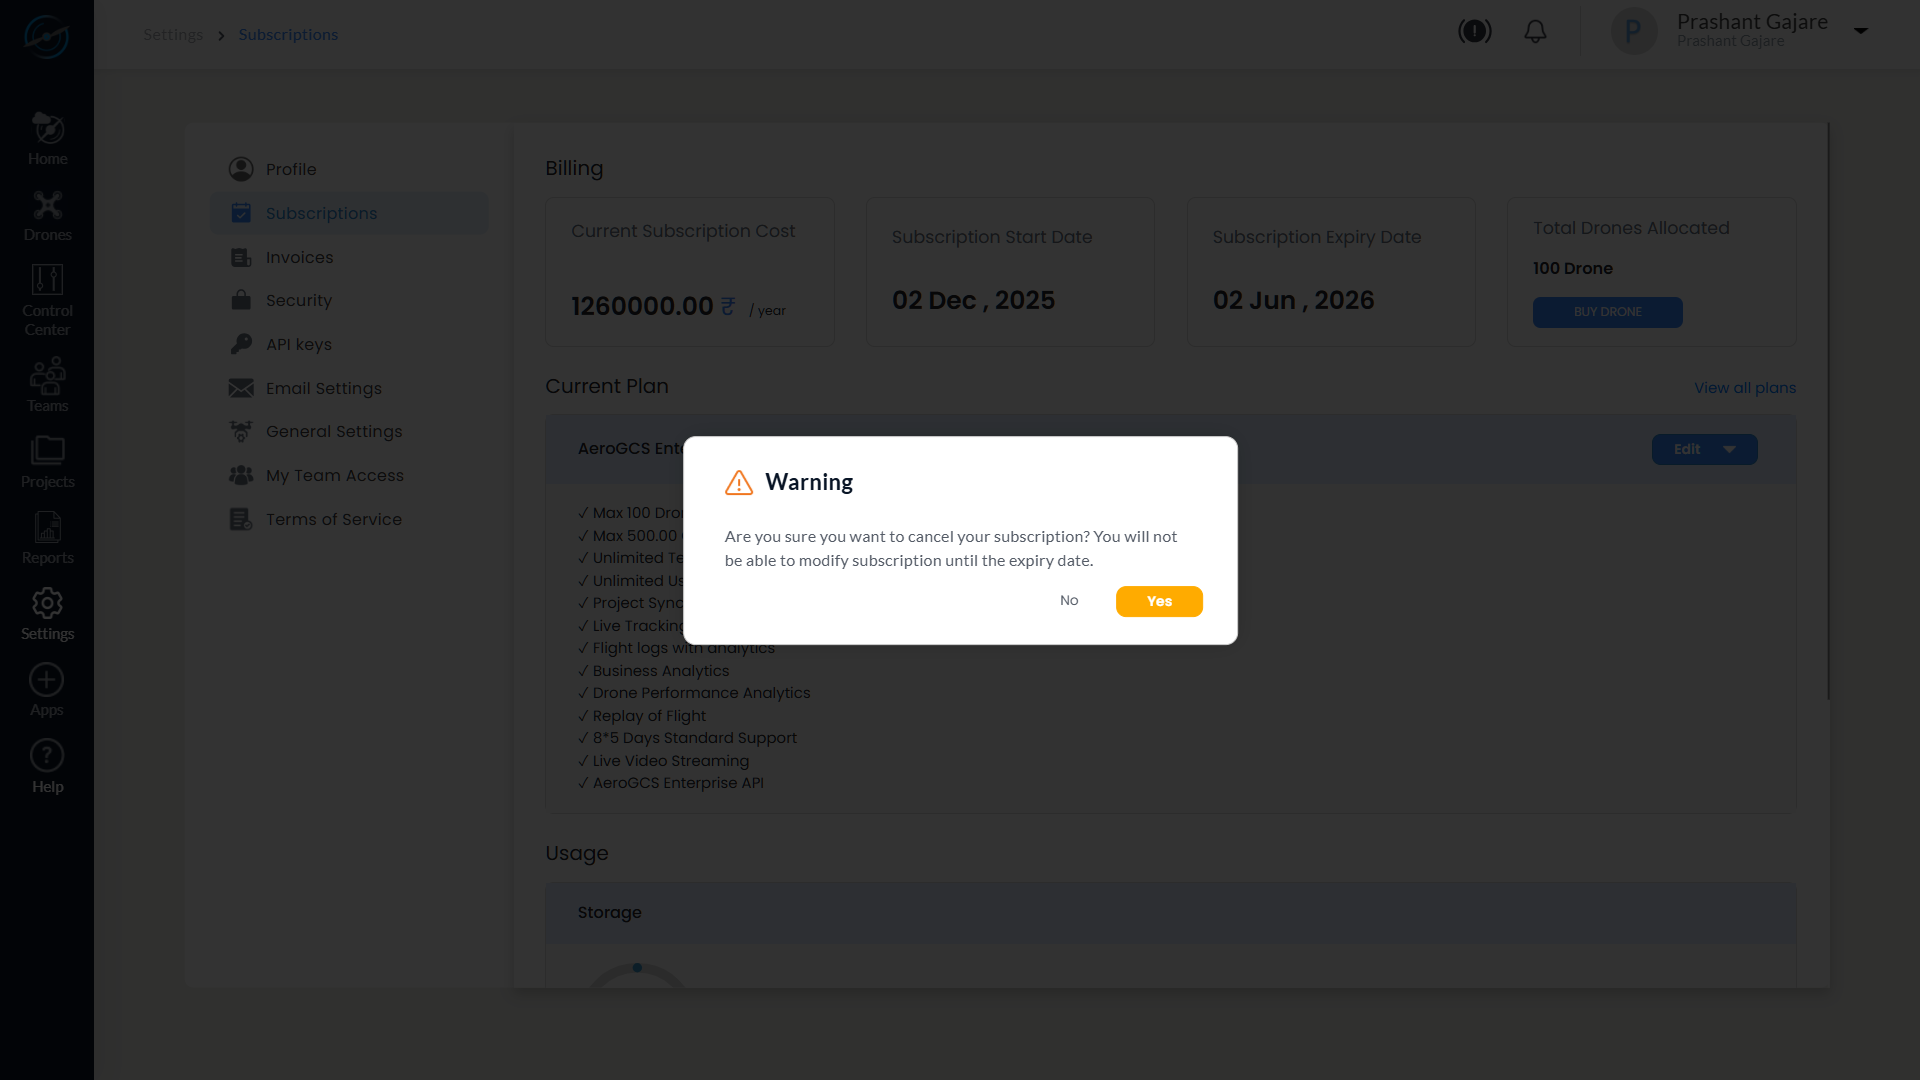
Option 2: Cancel Subscription
Use this option when you intend to cancel the active subscription.
Steps
- Select Edit → Cancel.
- A warning dialog is displayed:
Warning
“Are you sure you want to cancel your subscription? You will not be able to modify subscription until the expiry date.”
- Select one of the following:
- Yes. Confirms subscription cancellation.
- No. Aborts the action and returns to the Current Plan view.
Important Behavior and Restrictions
- Selecting Cancel → Yes immediately cancels the active subscription.
- Once cancelled:
- Subscription modifications are locked until the original expiry date.
- Services remain unavailable unless a new subscription is purchased.
- Selecting No makes no changes to the subscription.
⚠️ Important
- Modify → used for plan change and upgrade/downgrade.
- Cancel → used for terminating the subscription.
- These actions have billing and service-impacting consequences.
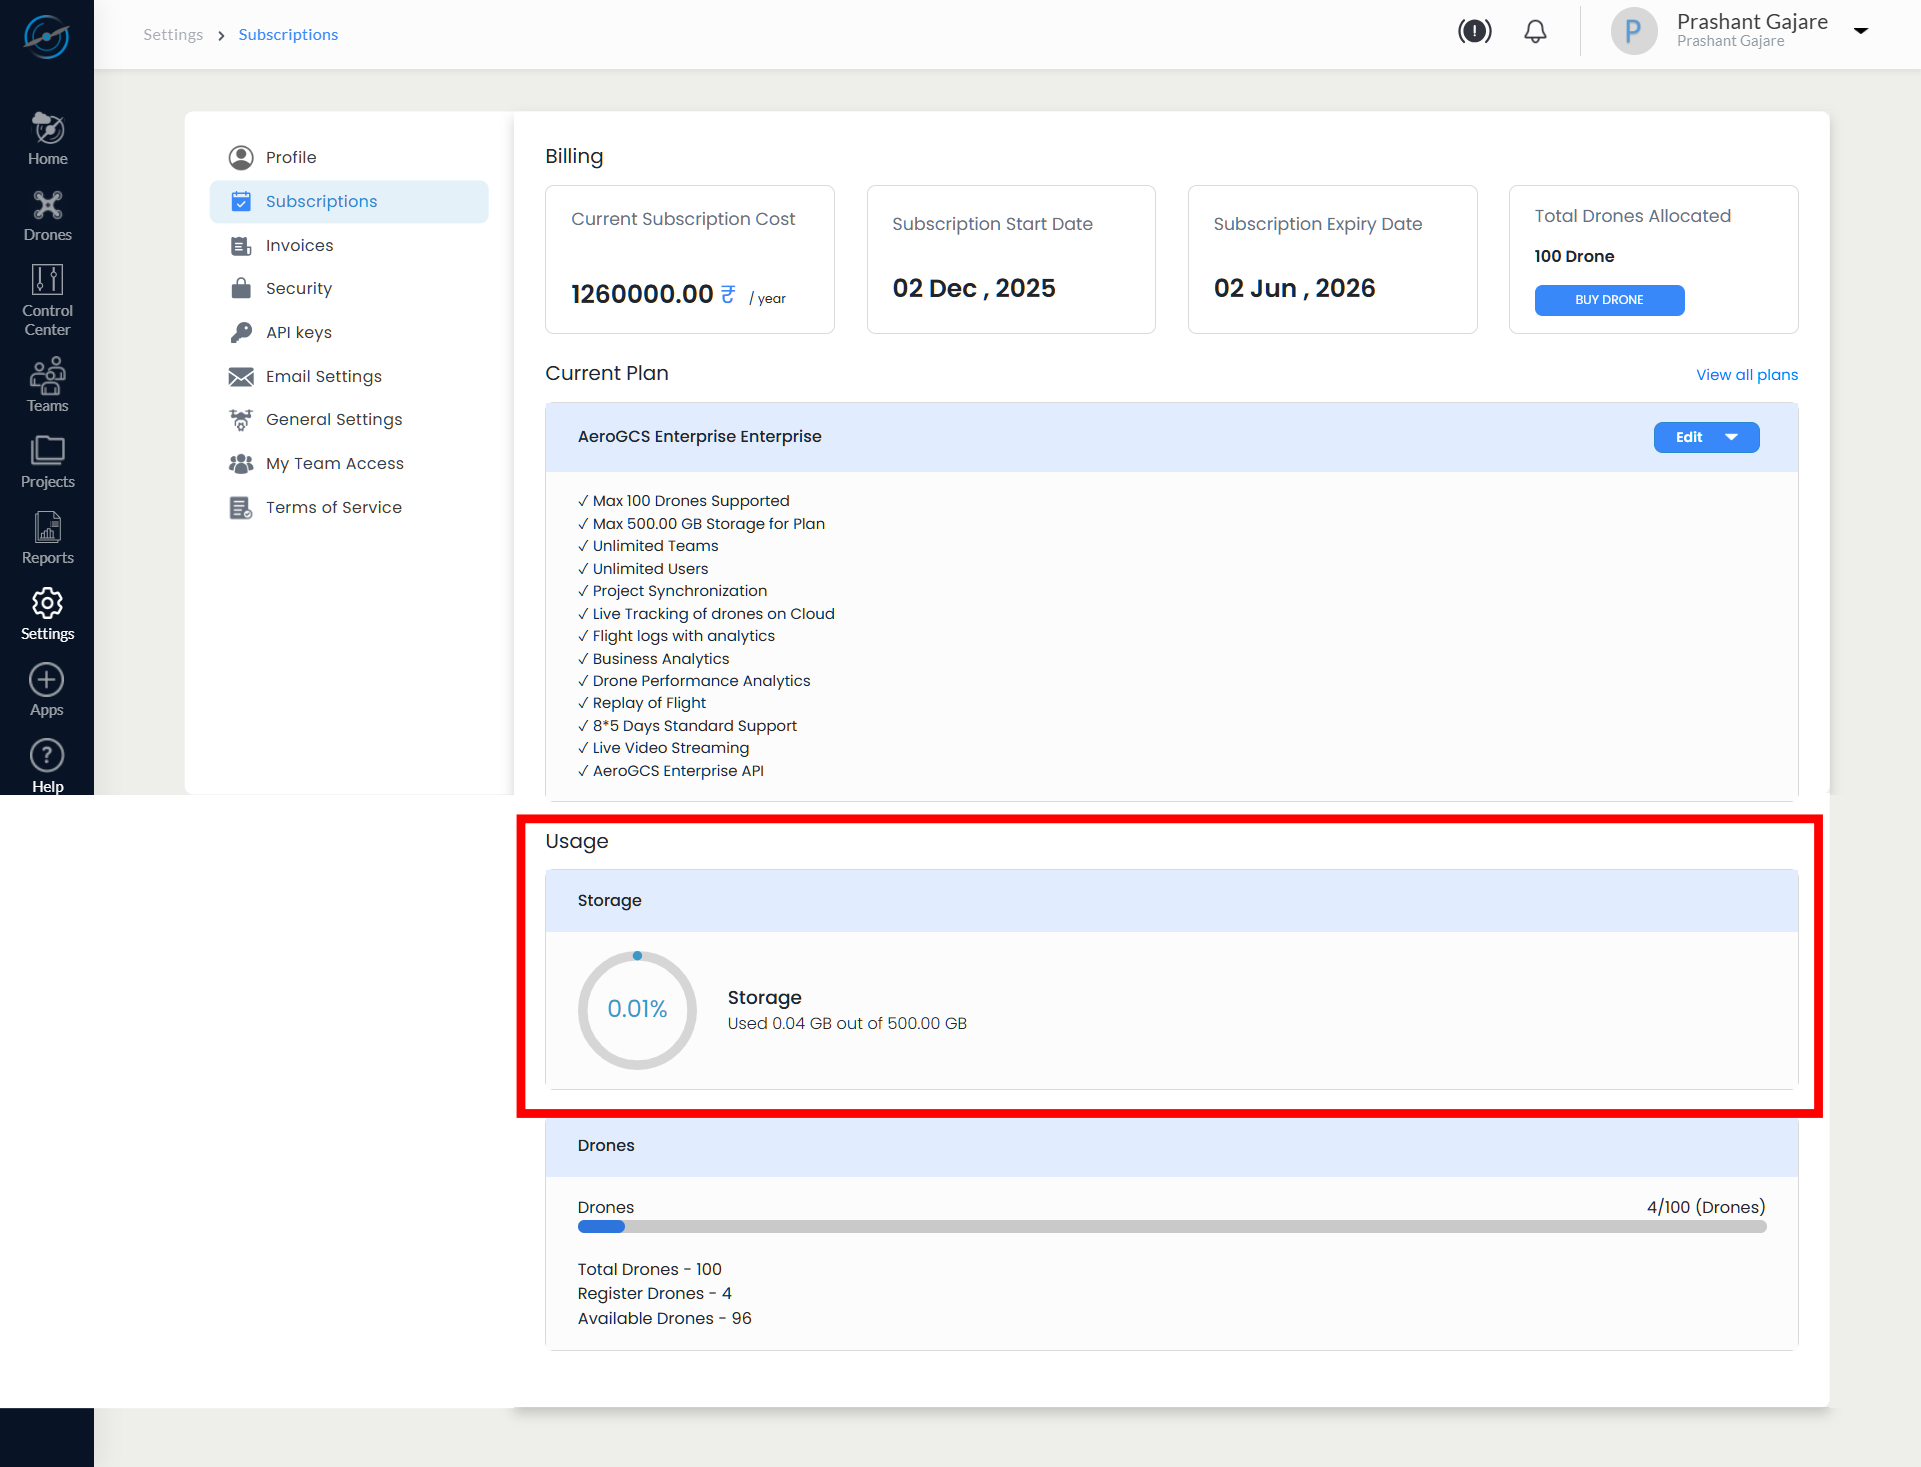
11.3.3 Usage Overview
The Usage section provides real-time visibility into consumed and available resources.
Storage Usage
Displays cloud storage utilisation.
Metric | Description |
Used | Storage consumed |
Limit | Total allocated storage |
Percentage | Visual indicator of usage |
A circular progress indicator represents usage proportionally.
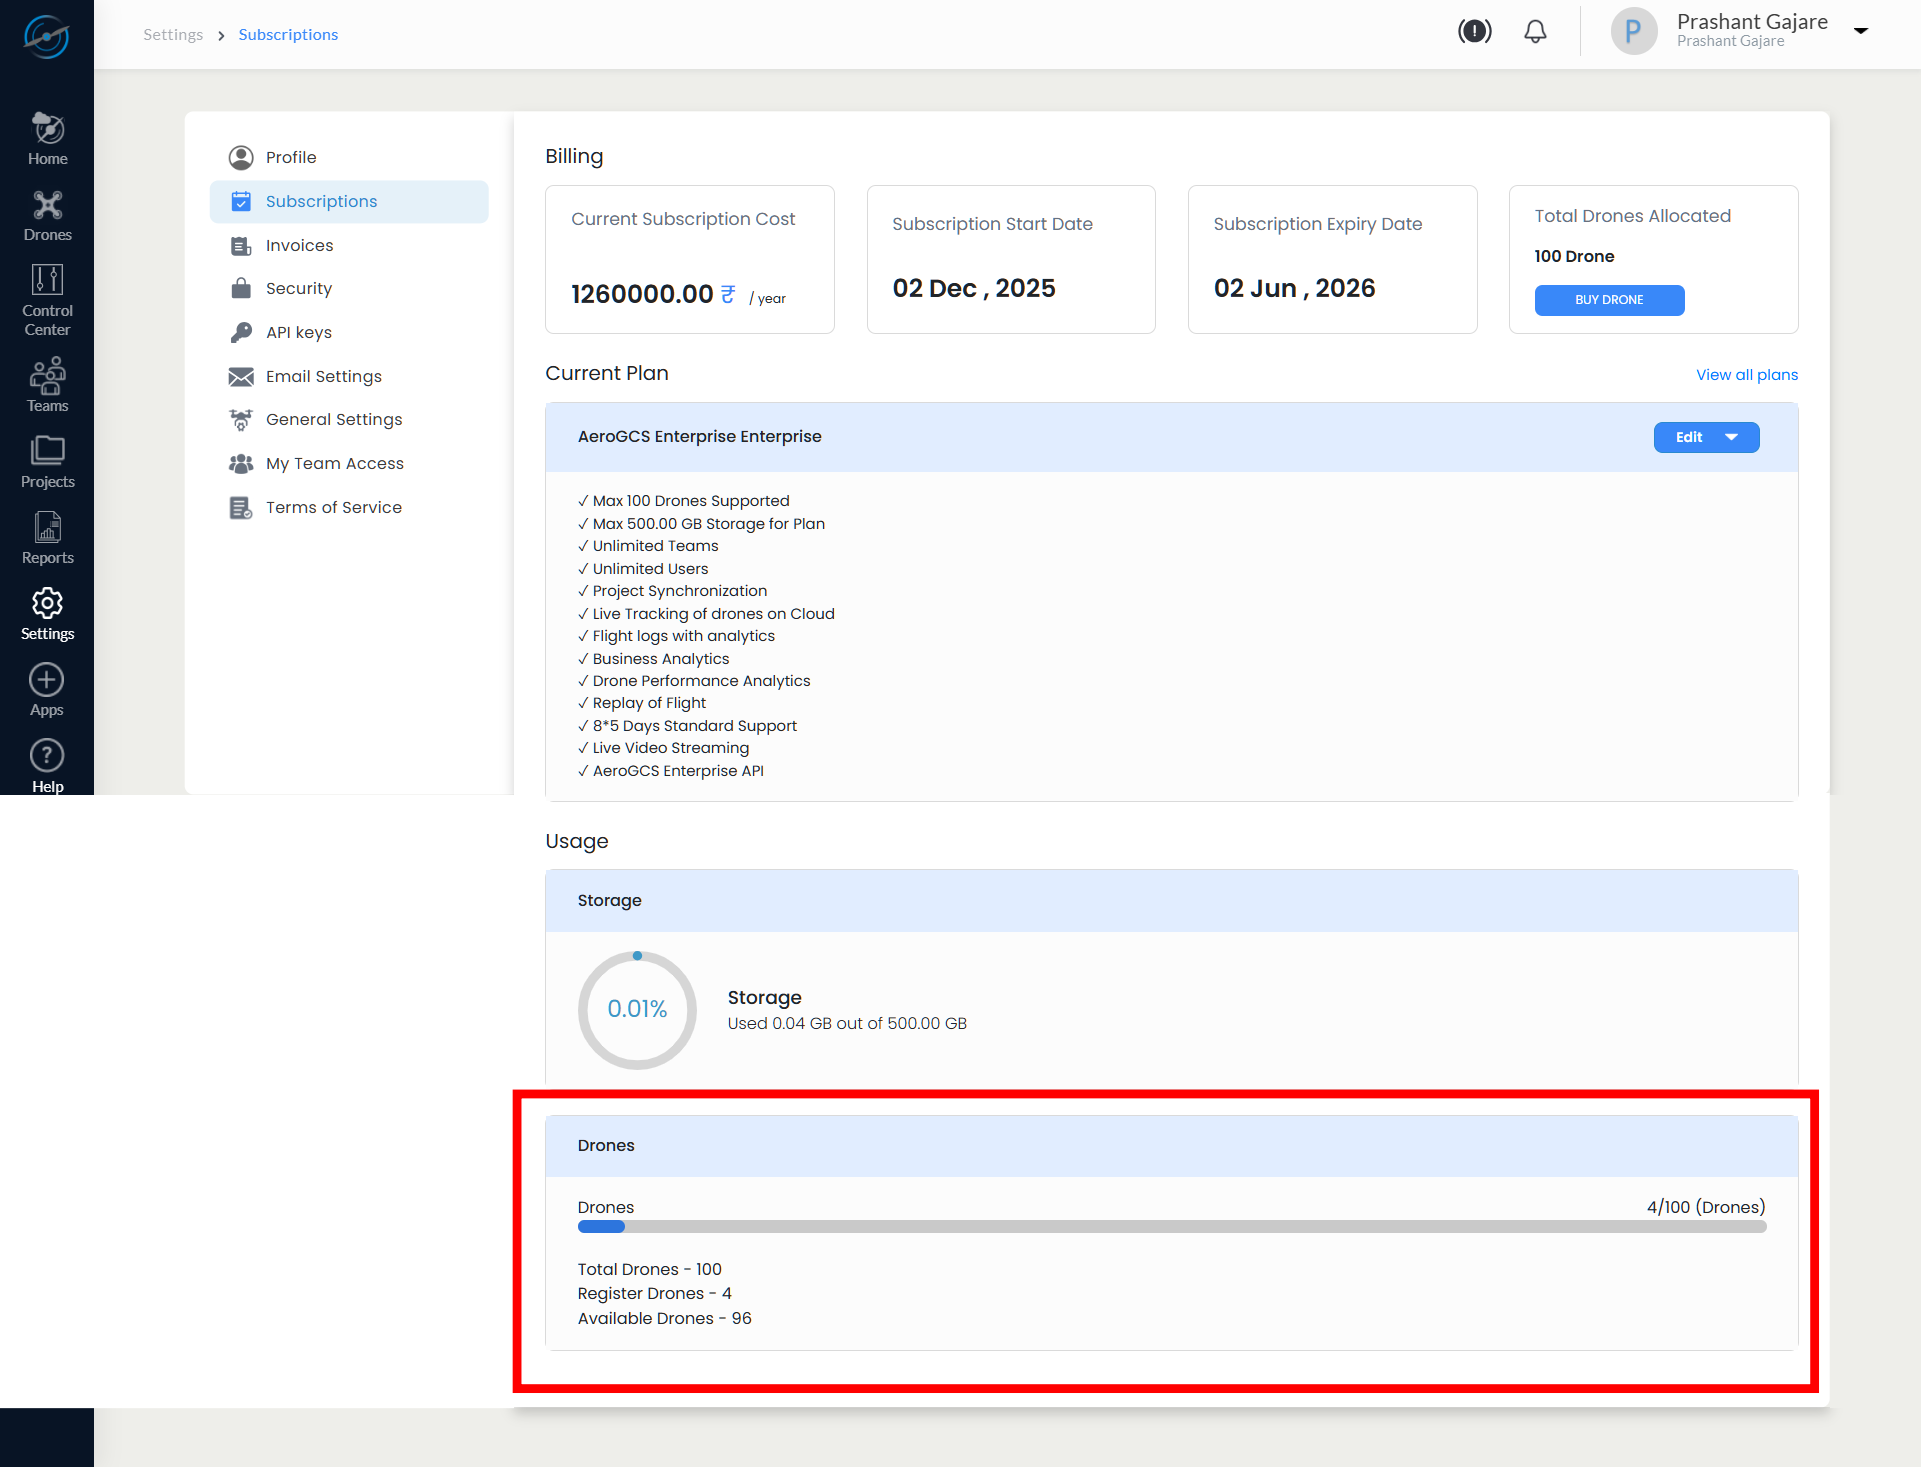
Drone Usage
Displays drone allocation and registration status.
Metric | Description |
Total Drones | Maximum drones allowed |
Registered Drones | Drones currently registered |
Available Drones | Remaining drone slots |
A horizontal progress bar visualises drone utilisation.
💡 Tip: Monitor usage regularly to avoid hitting allocation limits during operations.
Payments are processed securely via the integrated payment gateway.
Upon successful payment, the subscription or add-on is activated immediately.
Summary Table
| Section | Purpose |
| Billing Summary | View cost, dates, and drone allocation |
| Buy Drone | Purchase additional drones mid-cycle |
| Current Plan | Review features and manage subscription |
| Usage Overview | Monitor storage and drone consumption |
| Plan Selection | Compare and purchase subscription plans |
| Payment Flow | Secure checkout and activation |
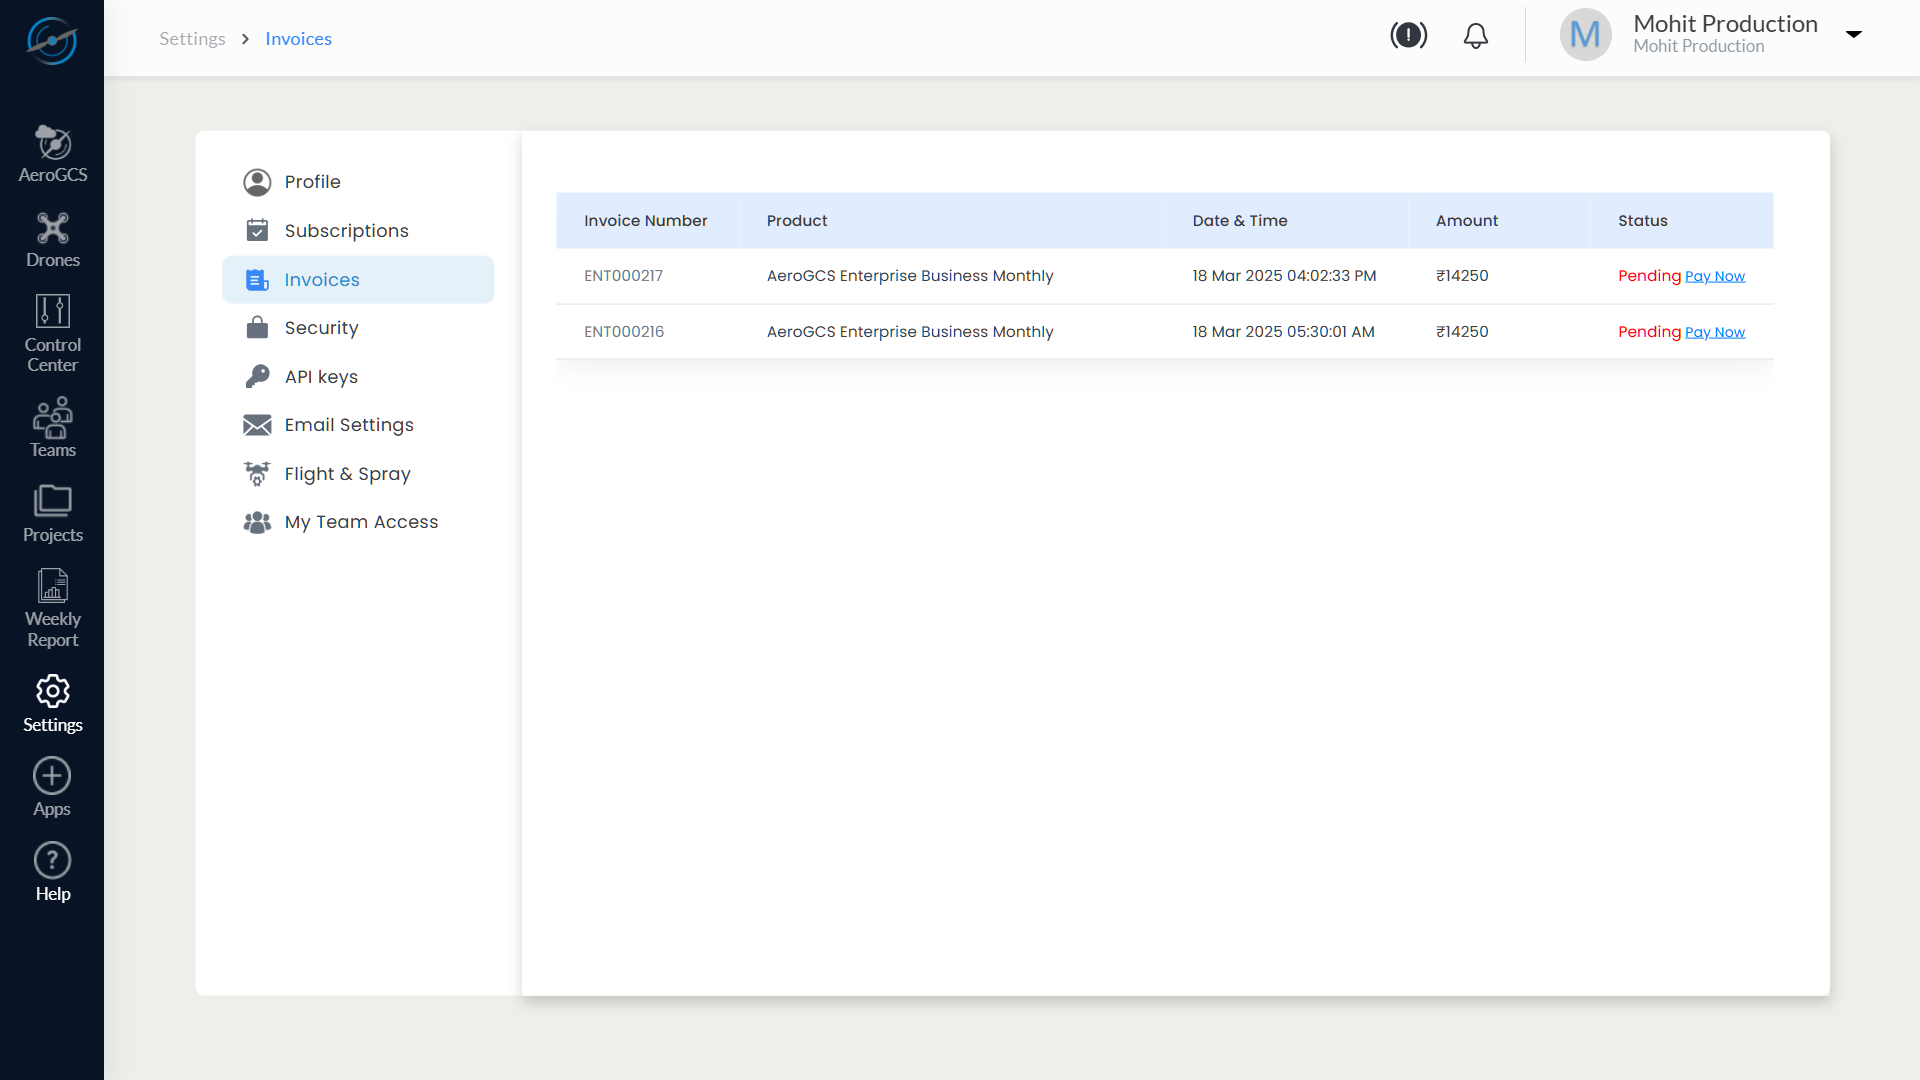
11.4 Invoices
View and manage your billing history and pending payments
The Invoices section in the AeroGCS Enterprise Settings module provides a detailed record of all invoices generated for your organisation’s subscriptions, add-ons, and billing activities. This section allows you to track invoice status, monitor payment deadlines, and take immediate action on unpaid invoices using the Pay Now option.
Invoice Table Overview
The invoice table displays key billing details for each transaction in a compact, scrollable view.
Column | Description |
Invoice Number | Unique identifier generated for each billing transaction (e.g., ENT000217) |
Product | The subscribed plan or add-on purchased (e.g., AeroGCS Enterprise Business Monthly) |
Date & Time | The exact timestamp when the invoice was issued (date and time in IST) |
Amount | Total payable amount in INR for that invoice (e.g., ₹14,250) |
Status | Indicates the payment status: Paid or Pending |
Action | A Pay Now button appears for invoices with a Pending status |
Paying Pending Invoices
If an invoice is unpaid, the status will appear as Pending, and a Pay Now button will be displayed.
Steps to Complete Payment:
- Click the Pay Now button next to the pending invoice.
- A payment gateway window will open.
- Choose your preferred payment method (e.g., UPI, credit/debit card, net banking).
- Complete the payment securely.
- Upon successful payment:
- The status will update to Paid.
- A payment confirmation will be reflected in the invoice record.
⚠️ Note: You must clear pending invoices to avoid service disruptions or restrictions on subscription-related activities.
Tips & Best Practices
- Use Invoice Number as a reference when contacting support or accounting teams.
- Ensure the billing contact email in your profile is accurate to receive automated invoice alerts.
- Download or print invoices for compliance or internal auditing (if download option is enabled in future versions).
Summary Table
| Feature | Description |
| View Invoices | Displays full billing history in table format |
| Invoice Number | Unique transaction ID for each billing event |
| Status | Paid or Pending status per invoice |
| Pay Now | Instant payment option for unsettled invoices |
| Payment Timestamp | Includes date and time of invoice generation |
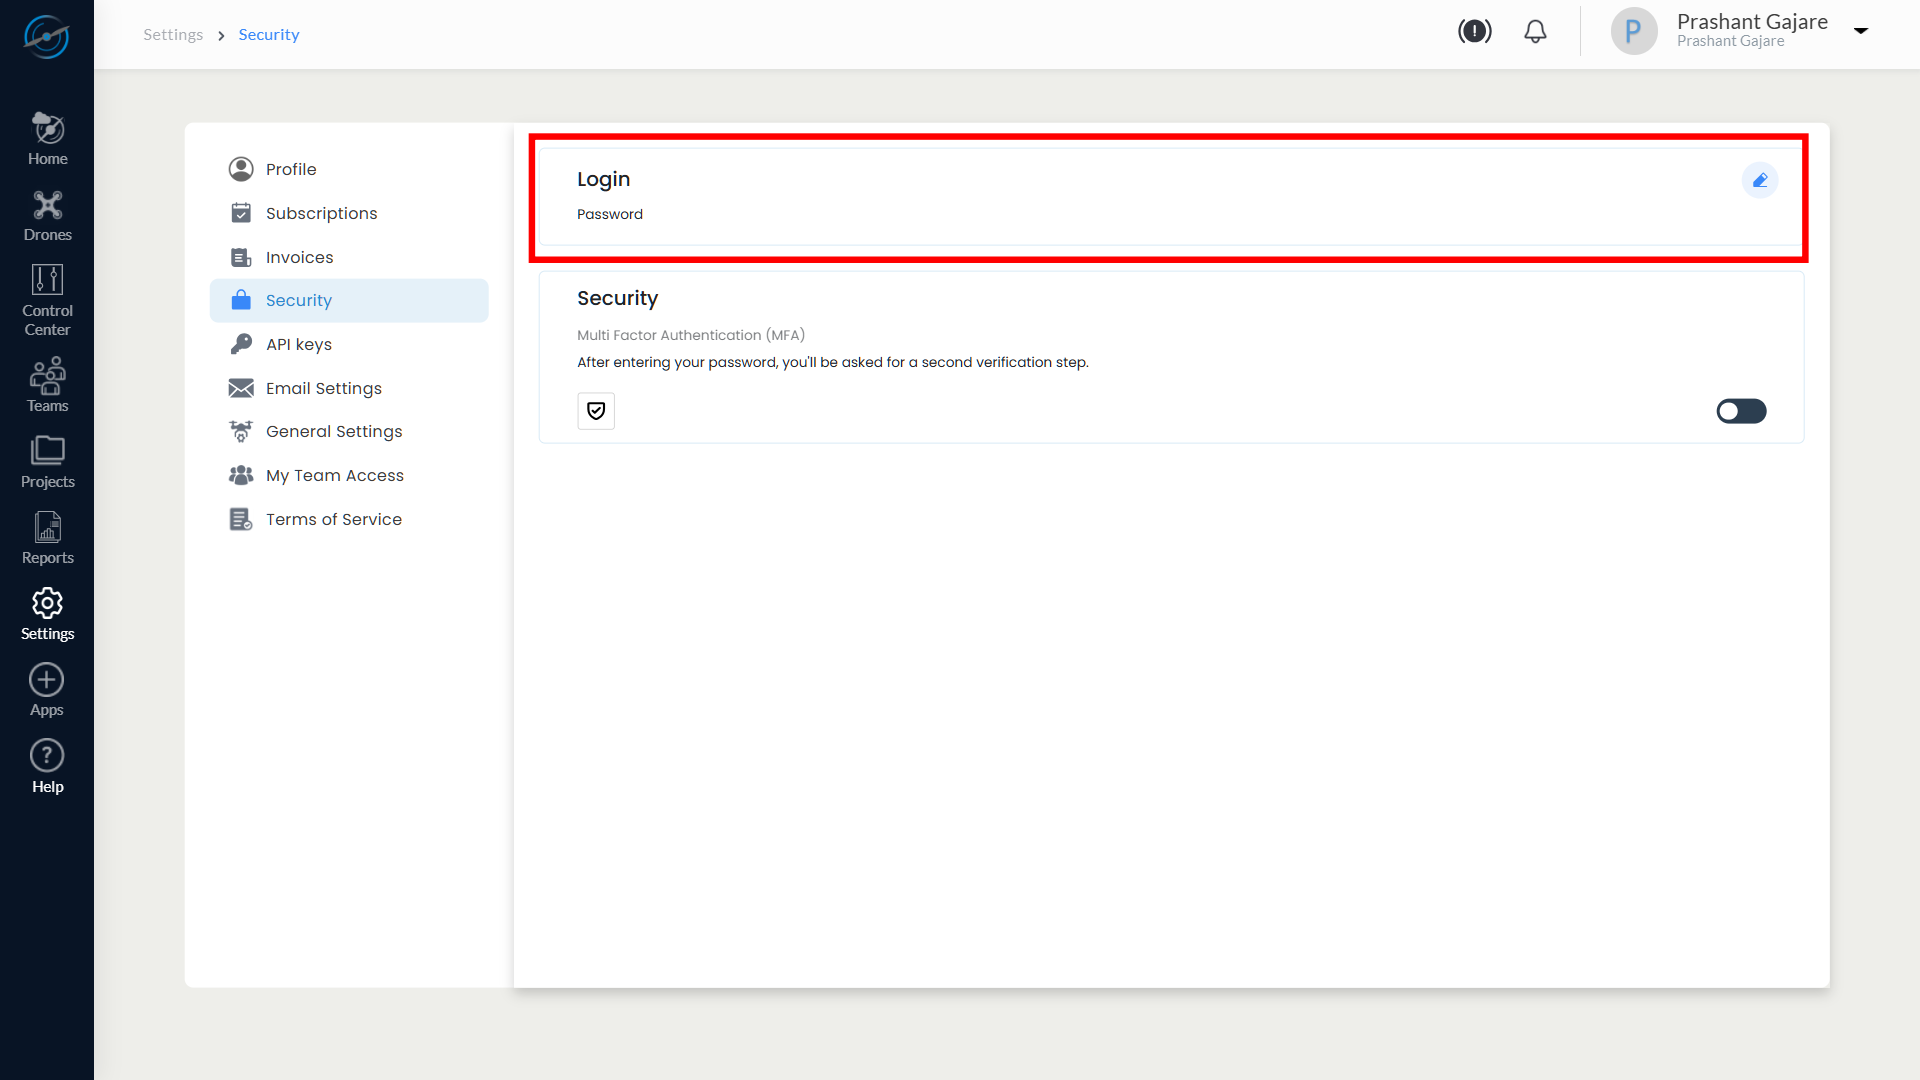
11.5 Security
Strengthen your account with password management and two-step authentication
The Security tab in the AeroGCS Enterprise Settings panel allows users to manage their login credentials and enable additional protection through Multi-Factor Authentication (MFA). These controls are designed to ensure that only authorised users can access their accounts, and provide additional protection from unauthorised logins.
This section is divided into two parts:
- Password Management
- Multi-Factor Authentication (MFA)
Steps to Change Password:
- Click the Edit
- The interface expands to show three input fields:
- Current Password
- New Password
- Confirm Password
- Each field includes a view/hide icon to toggle password visibility.
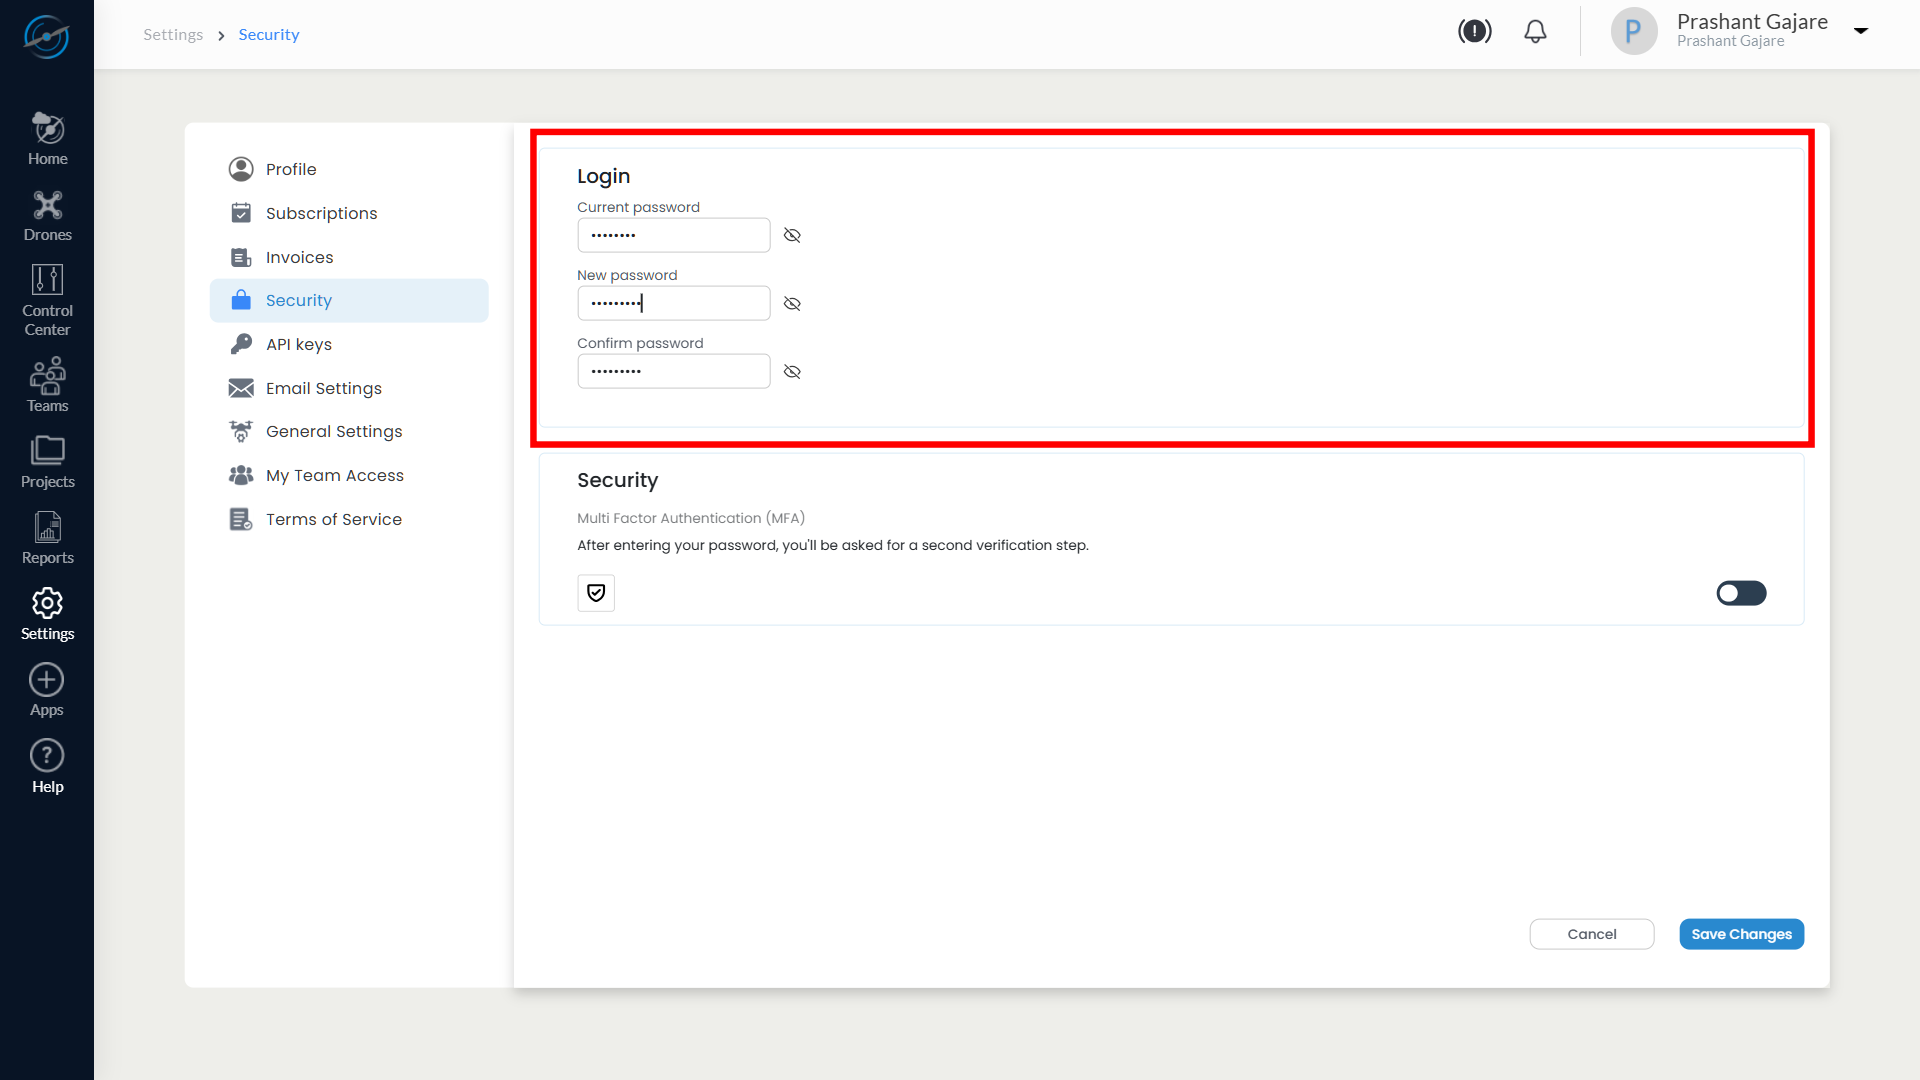
4. After entering all required values:
- Click Save Change to update the password.
- Click Cancel to discard the update.
Password Update Tips
- Choose a strong password containing uppercase and lowercase letters, numbers, and special characters.
- Avoid reusing previous passwords or using predictable sequences.
⚠️ Note: If the current password is entered incorrectly, the change will be rejected, and an error message will appear.
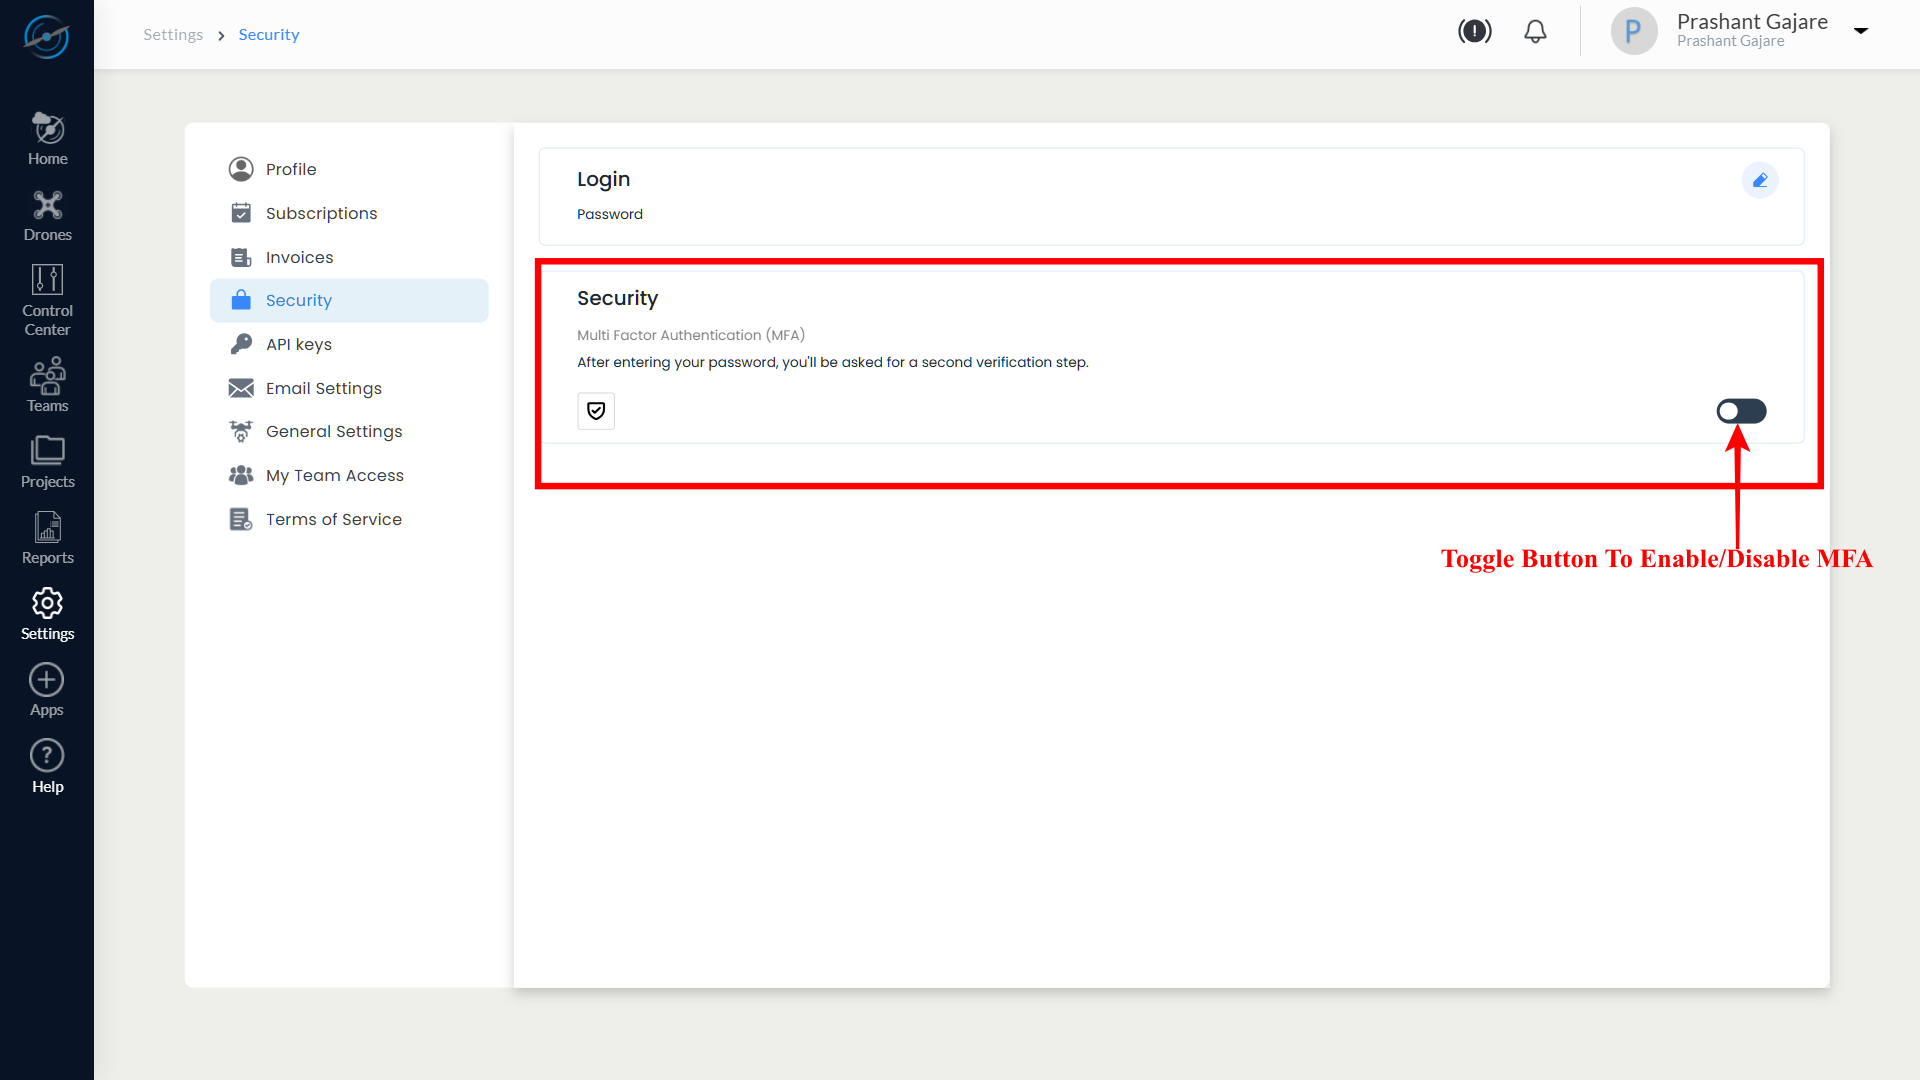
11.5.2 Multi-Factor Authentication (MFA)
Add an extra layer of security to your login process
Multi-Factor Authentication (also known as Two-Step Authentication) enhances security by requiring a second verification step during login.
You will see a section labelled Security: Multi-Factor Authentication (MFA) with an Enable/Disable toggle.
Steps to Enable MFA:
- Toggle the Enable
- You will be prompted to enter your current Mobile Number.
- Once verified, an OTP (One-Time Password) will be sent to your registered contact.
- Enter the OTP to complete activation.
Upon successful setup, a message will be shown:
“Two-step authentication is enabled.”
Disabling MFA:
- Toggle the switch back to Disable.
- Enter your password for confirmation.
- MFA will be deactivated.
⚠️ Important: Enabling MFA is strongly recommended to protect against unauthorised access. This setting applies to your login experience across all AeroGCS Enterprise interfaces.
💡 Tip: If you lose access to your OTP method, contact your admin or PDRL support to reset authentication settings.
Summary Table
| Feature | Action Required |
| Change Password | Enter current, new, and confirm password |
| View/Hide Password Fields | Toggle icon beside each input field |
| Enable Multi-Factor Authentication | Toggle switch → Password → OTP verification |
| Disable MFA | Toggle switch → Confirm password |
| Confirmation Message | “Two-step authentication is enabled.” |
11.6 API Keys
Securely generate and manage API access to integrate with AeroGCS Enterprise
The API Keys section allows users to generate and manage API credentials for programmatic access to AeroGCS Enterprise services. These keys enable integrations with third-party applications, automation scripts, and internal systems—while enforcing usage limits and access control.
All API keys are tied to the user’s account and should be handled securely.
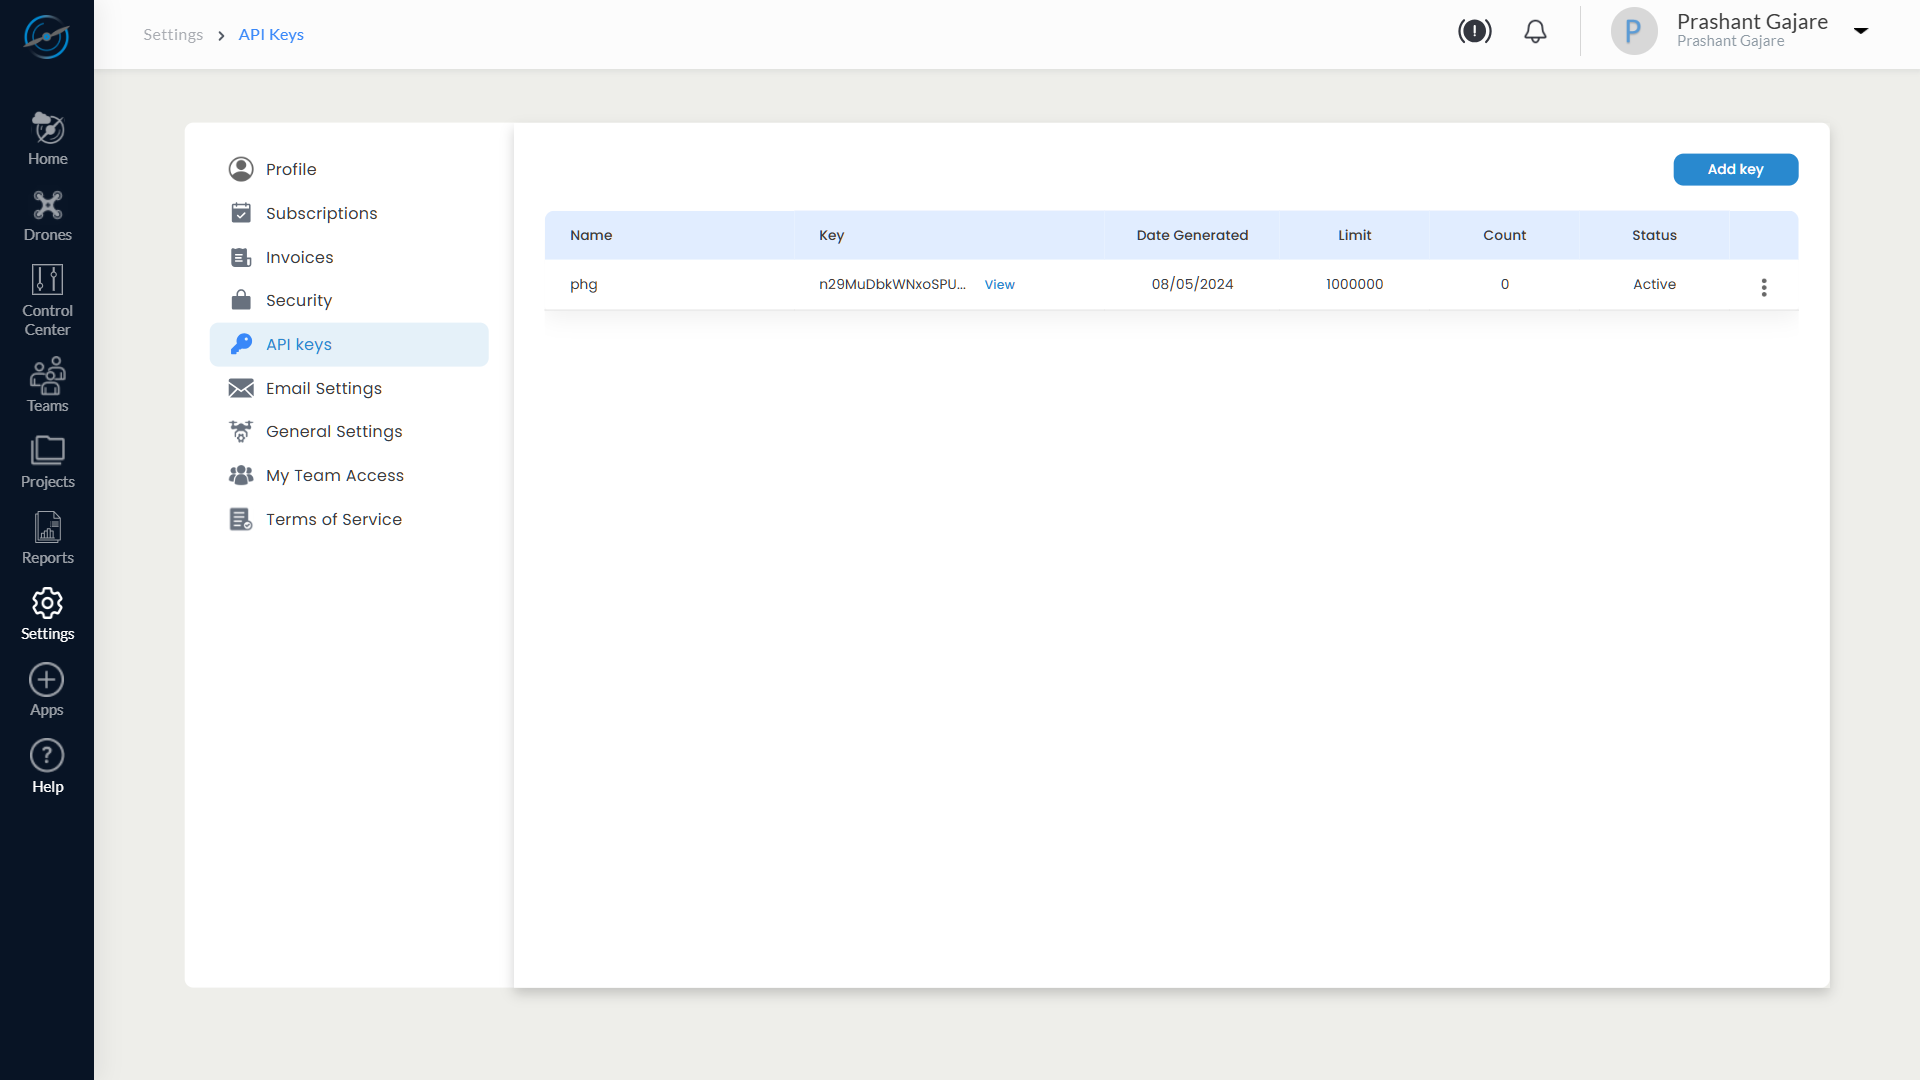
11.6.1 API Key Table Overview
Upon opening the API Keys tab, you will see a table displaying all previously generated keys associated with your account.
| Column | Description |
| Name | The label you assigned to the API key during creation |
| Key | A masked version of the actual API key with a View option |
| Date Generated | Timestamp when the key was created |
| Limit | Total allowed number of API calls |
| Count | Number of API calls made using the key |
| Status | Displays whether the key is Active |
| Actions | Three-dot menu with management options |
11.6.2 Generating a New API Key
To create a new API key:
- Click the Add Key button at the top of the screen.
- A pop-up titled Generate API Key will appear.
- Enter a meaningful name in the API Name field (e.g., test_123).
- Click Generate to create the key.
- The new API key will be added to the table with default usage limits.

⚠️ Warning:
Treat API keys like passwords. Do not share them publicly or embed them in unsecured code.
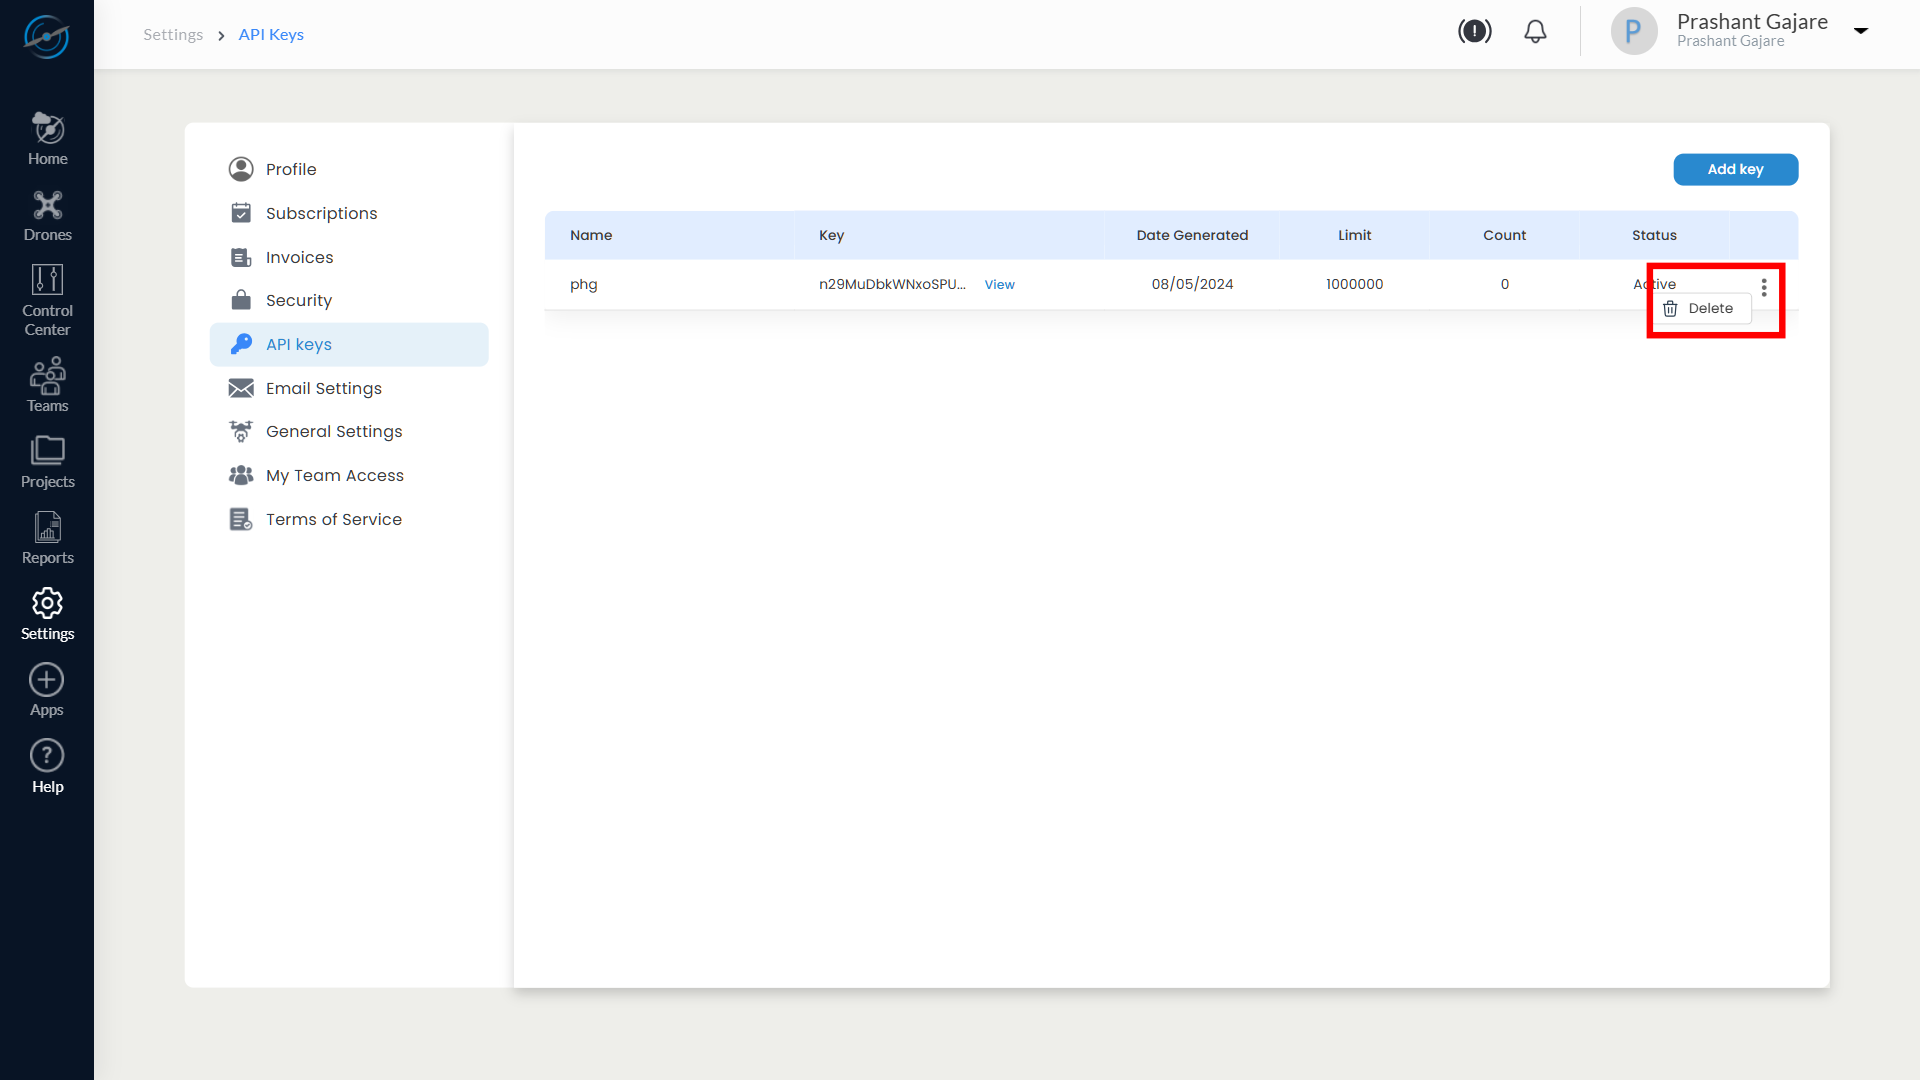
11.6.4 Deleting an API Key
To revoke access and delete an API key:
- Click the three-dot menu (︙) at the end of the row for the target key.
- Select Delete.
- Confirm the deletion when prompted.
The deleted key will be removed and cannot be used for future API calls.
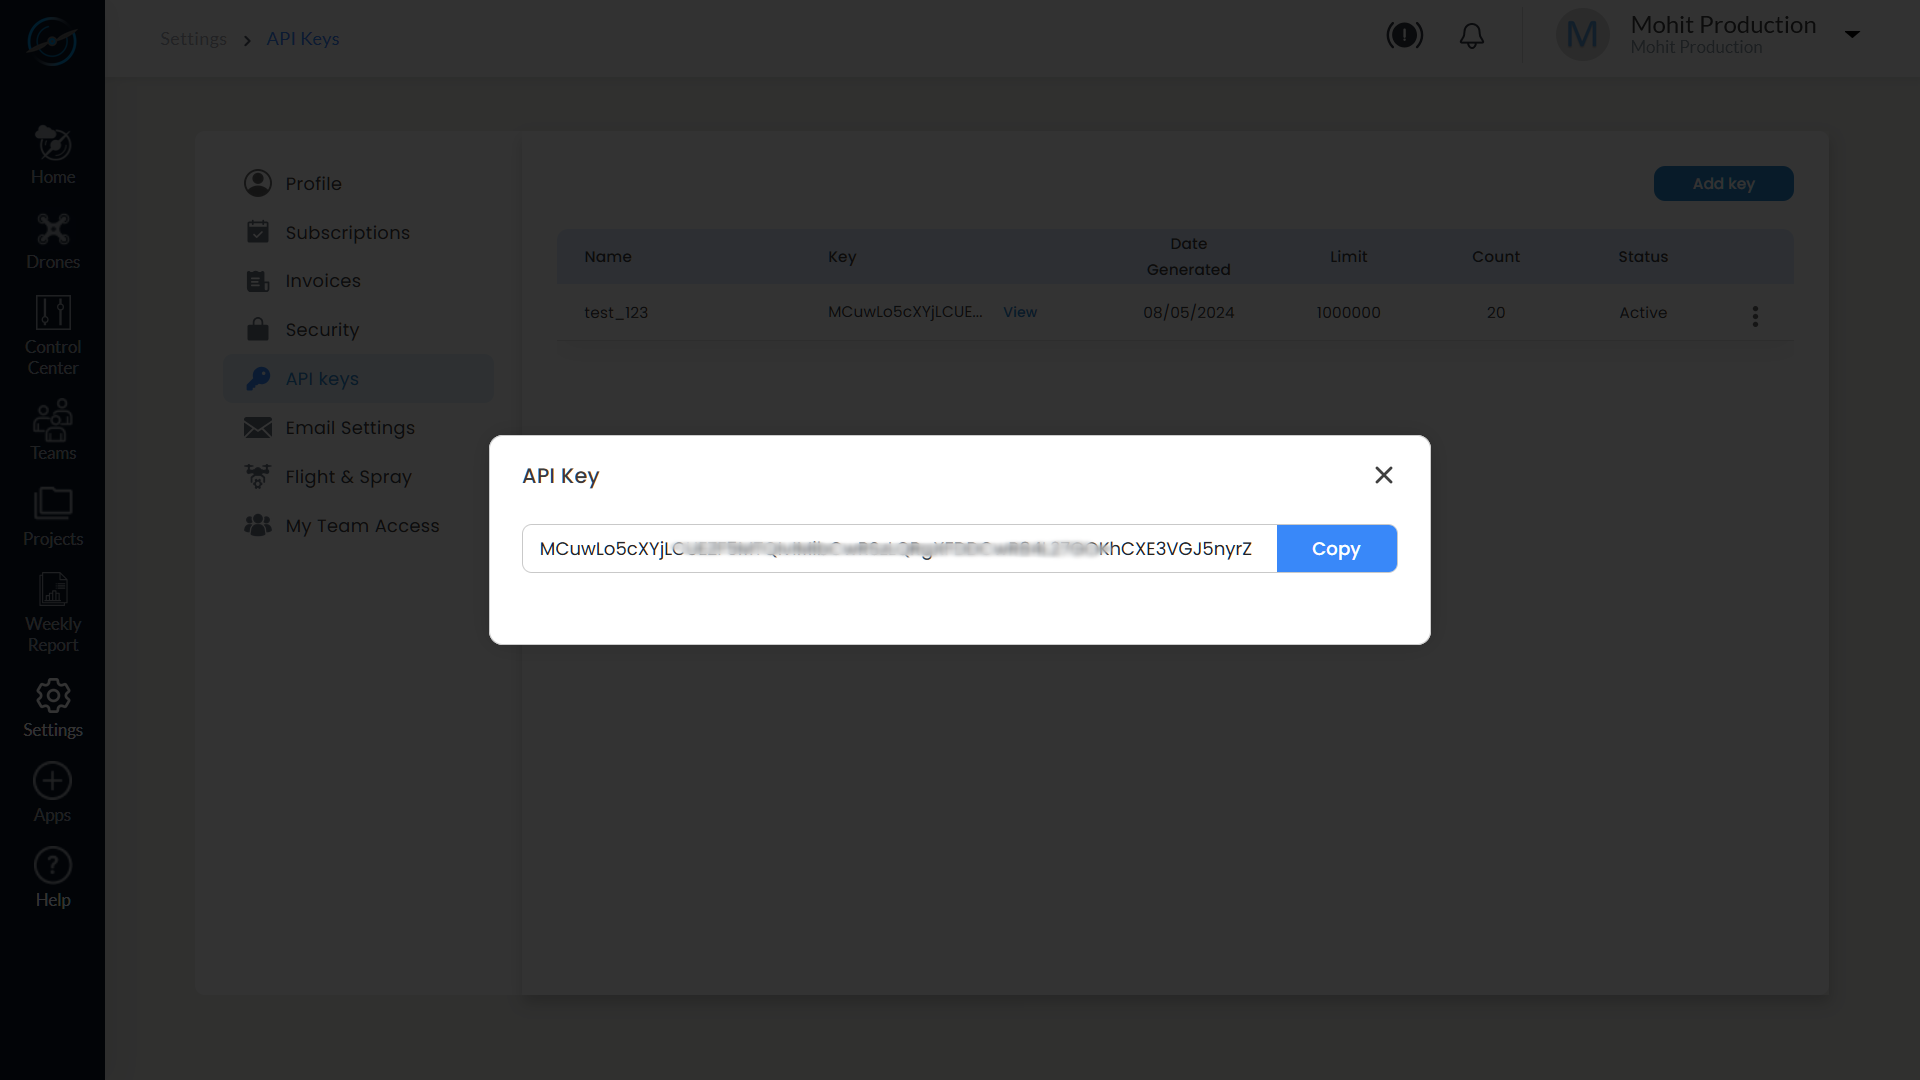
Summary Table
| Action | Steps |
| Add API Key | Click Add Key → Enter name → Click Generate |
| View API Key | Click View in key column |
| Copy API Key | Use Copy icon in view modal |
| Delete API Key | Click ︙ (three dots) → Select Delete |
| Track Usage | Monitor Count vs Limit in the API Key table |
11.7 Email Settings
Manage email recipients and configure notifications for system alerts and reports
The Email Settings section in AeroGCS Enterprise allows administrators and users to configure which email addresses receive automated notifications for important system events such as drone health reports, weekly summaries, software updates, and error logs.
This feature ensures that key stakeholders are kept informed of operational status, performance metrics, and potential issues.
11.7.1 Overview of Email Settings Table
Upon accessing the Email Settings tab, you will see a table listing the currently configured email addresses and their selected notification types.
| Column | Description |
| The recipient email address | |
| Drone Health Report | Checkbox to enable/disable health report notifications |
| Weekly Report | Checkbox to receive summary emails on a weekly basis |
| Software Update | Checkbox to receive alerts for software releases or patches |
| Error Logs | Checkbox to receive logs when errors are detected in mission or platform |
| Action | Contains a Delete icon to remove the email entry from the list |

You can toggle the checkboxes to enable or disable specific types of email notifications for each address.
Once changes are done Click “Update” to save and apply the changes for email notifications for the users.
5. The new email will be added to the table with all notification types initially unchecked.
6. Select the desired checkboxes for the types of emails the new recipient should receive:
- Drone Health Report
- Weekly Report
- Software Update
- Error Logs
⚠️ Note: Emails added must be valid and accessible. Incorrect addresses will not receive notifications.
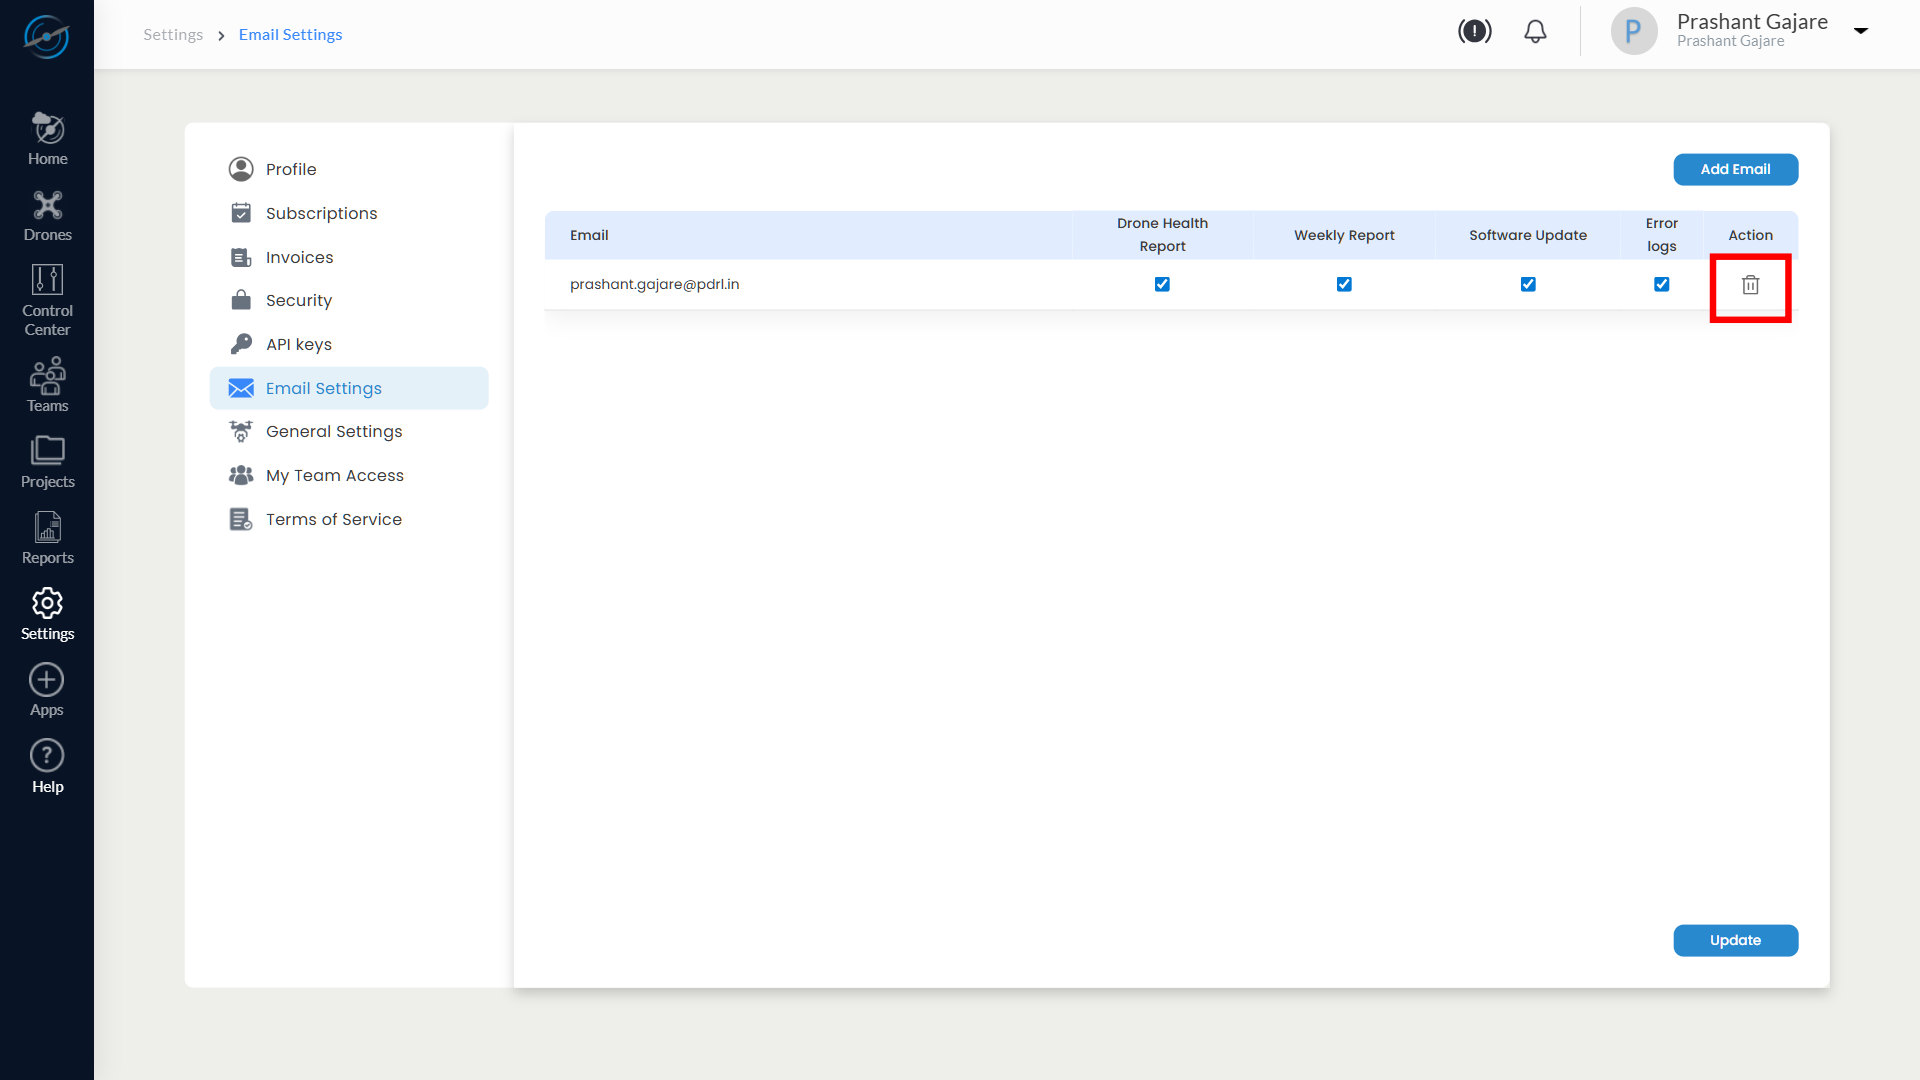
Once deleted, the recipient will no longer receive any automated notifications from the system.
Summary Table
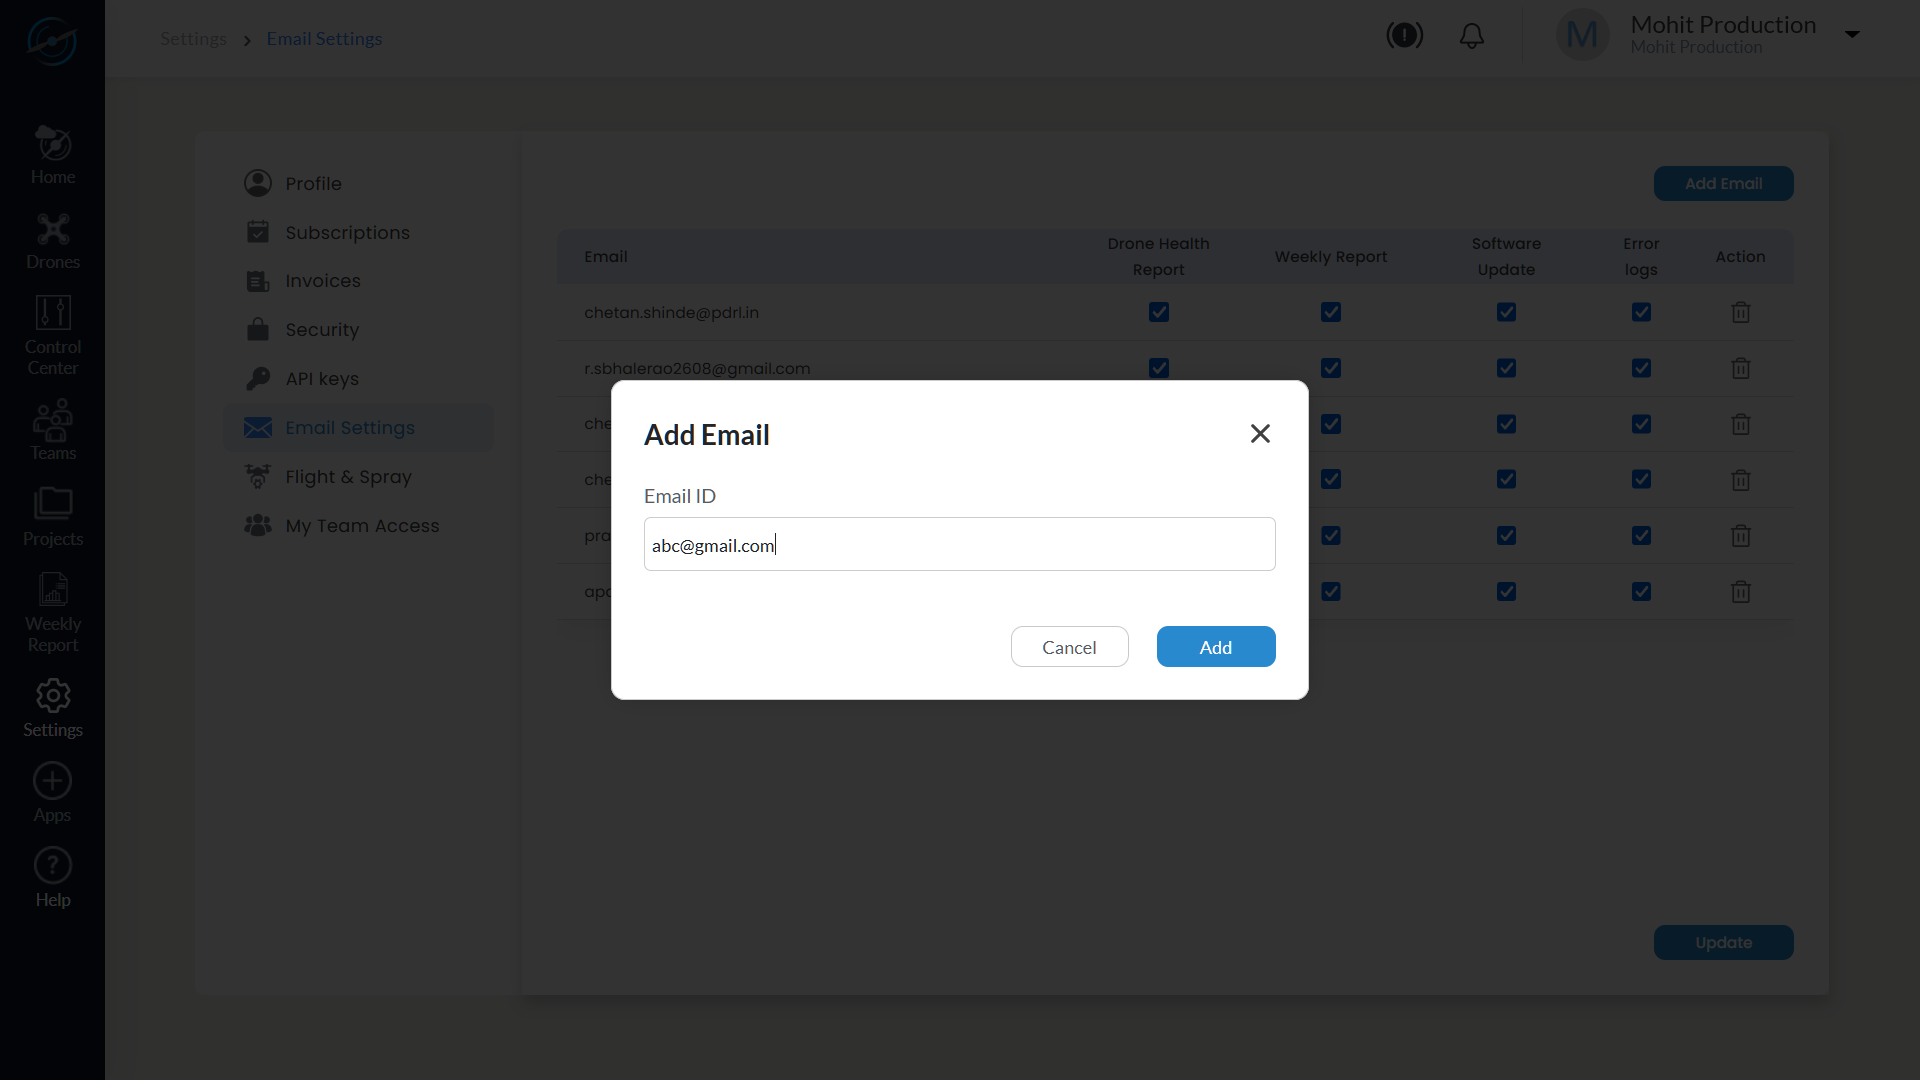
| Feature | Action |
| Add Email | Click Add Email → Enter ID → Add |
| Configure Types | Use checkboxes to toggle report types per email |
| Delete Email | Click Delete icon next to the target email |
| Notification Types | Drone Health, Weekly Report, Software Update, Error Logs |
⚠️ Security Note: Only authorised users should have permission to add or remove emails to maintain control over sensitive system communications.
Understood. Below is the same drafted section, unchanged in wording and structure, with only the section numbering corrected to 11.8 as requested.
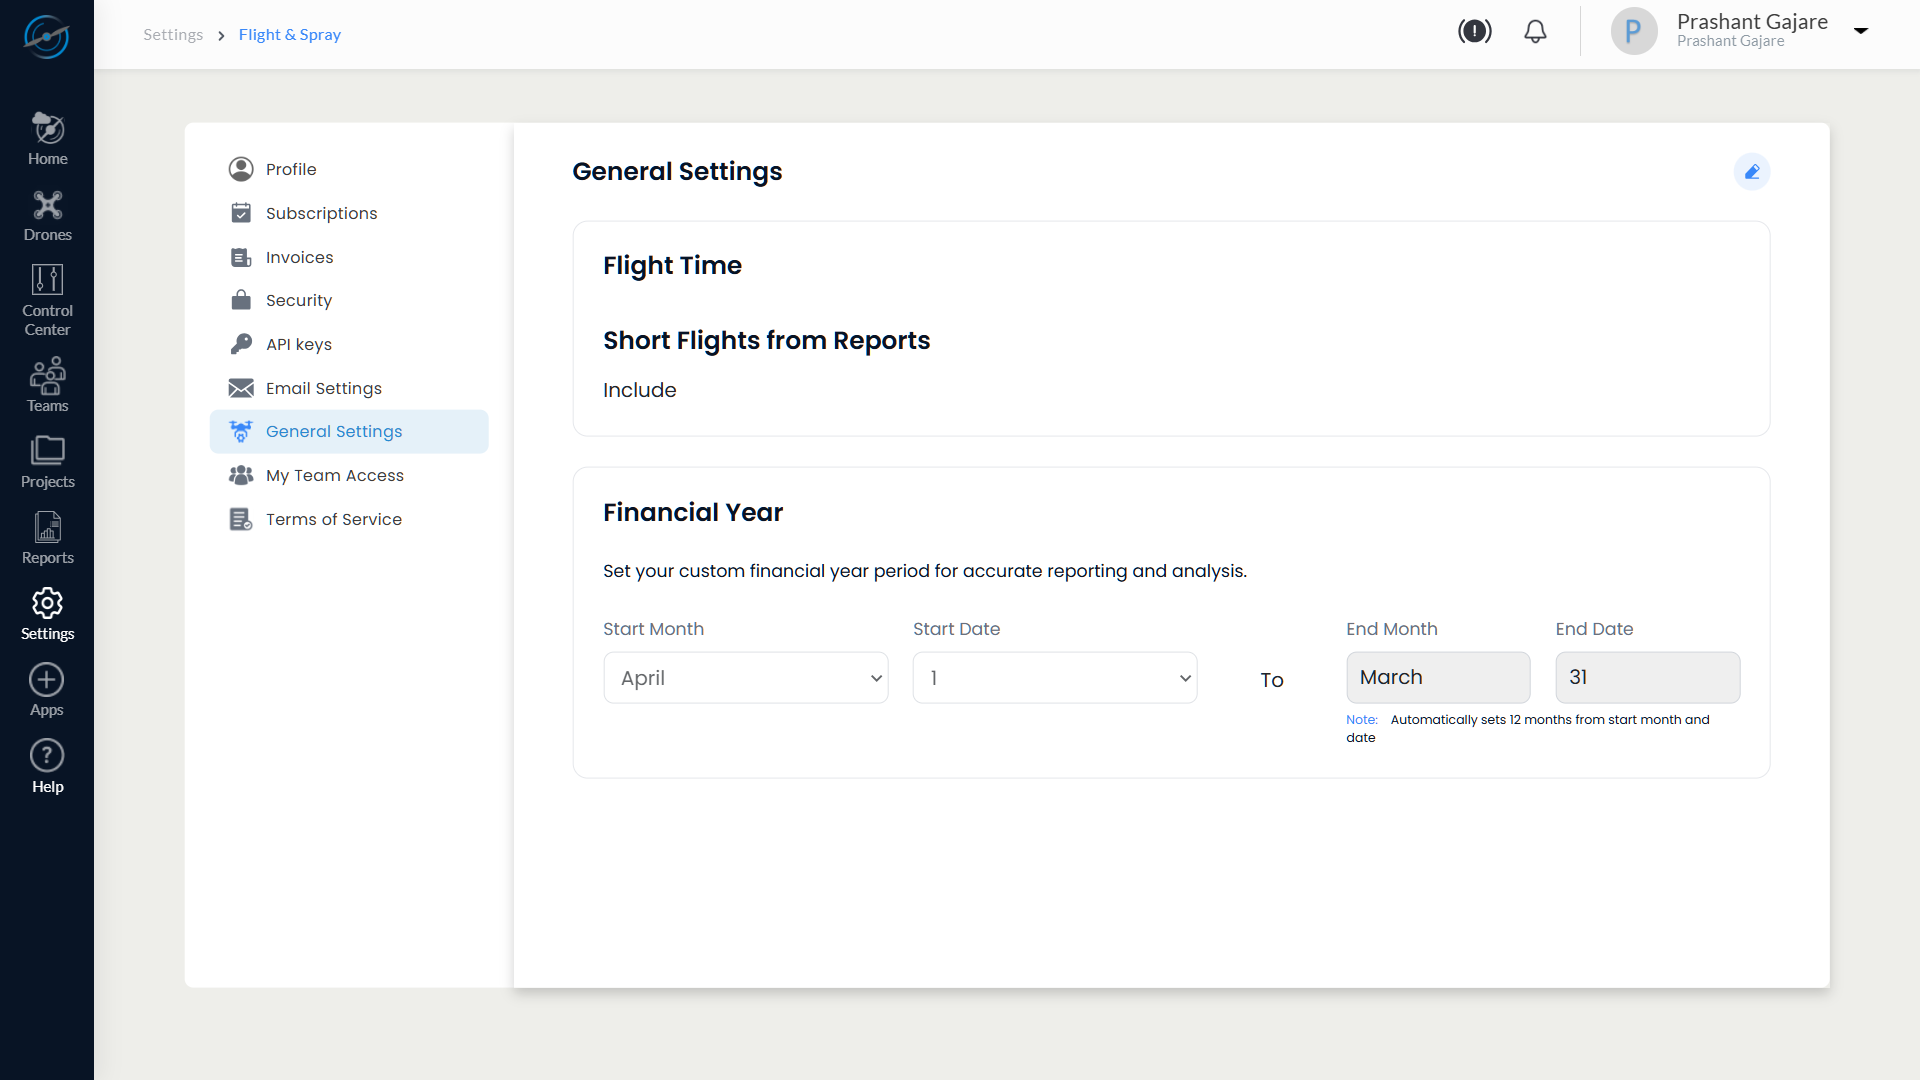
11.8 General Settings
The General Settings section allows administrators and authorized users to configure global system preferences that directly affect report generation, analytics accuracy, and financial-year–based data aggregation.
These settings apply across reports, dashboards, and analytical views within AeroGCS Enterprise.
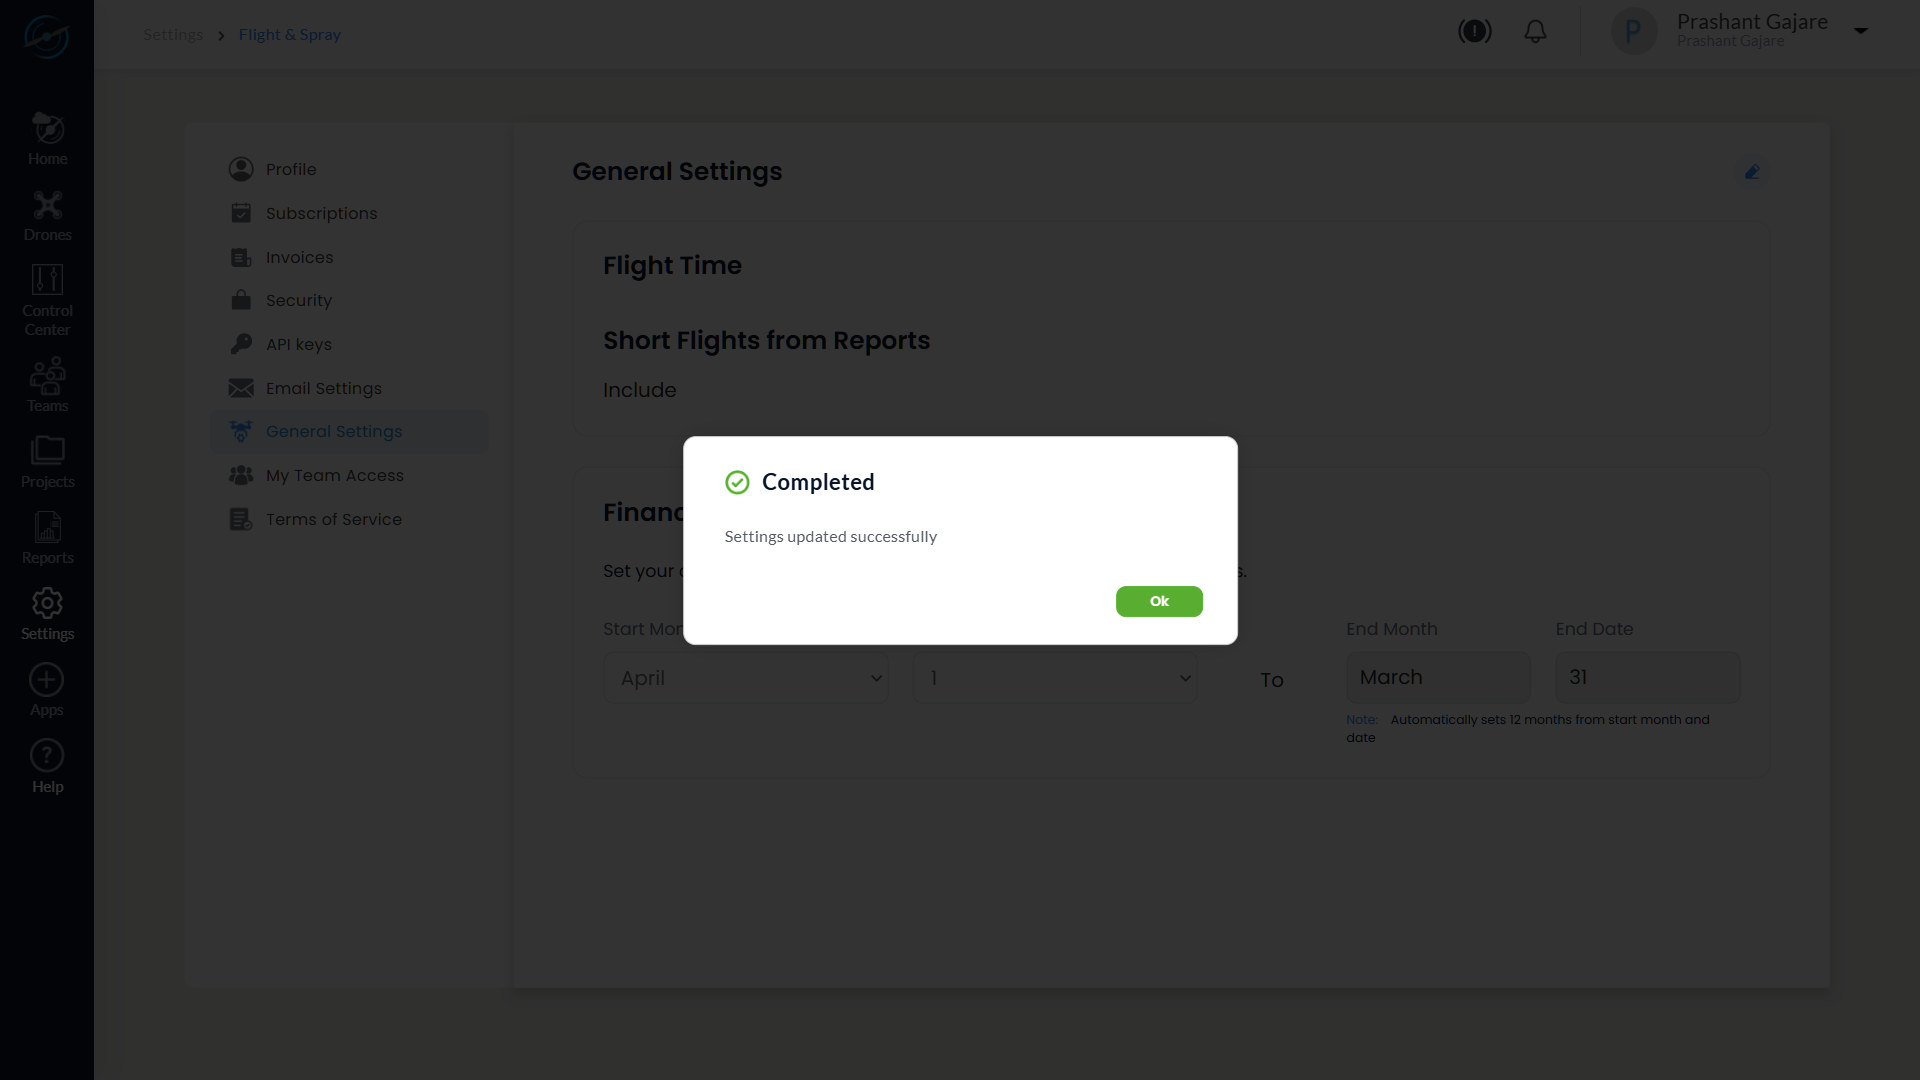
After successful update, a confirmation dialog is displayed:
Completed
Settings updated successfully.
Select OK to close the dialog.
11.8.3 Flight Time Configuration
The Flight Time section controls how short-duration flights are handled in reports and analytics.
Default Behavior
- By default, short flights are included in reports.
- The Short Flights from Reports option is set to Include.
- No duration threshold is applied unless the user explicitly switches to Exclude.
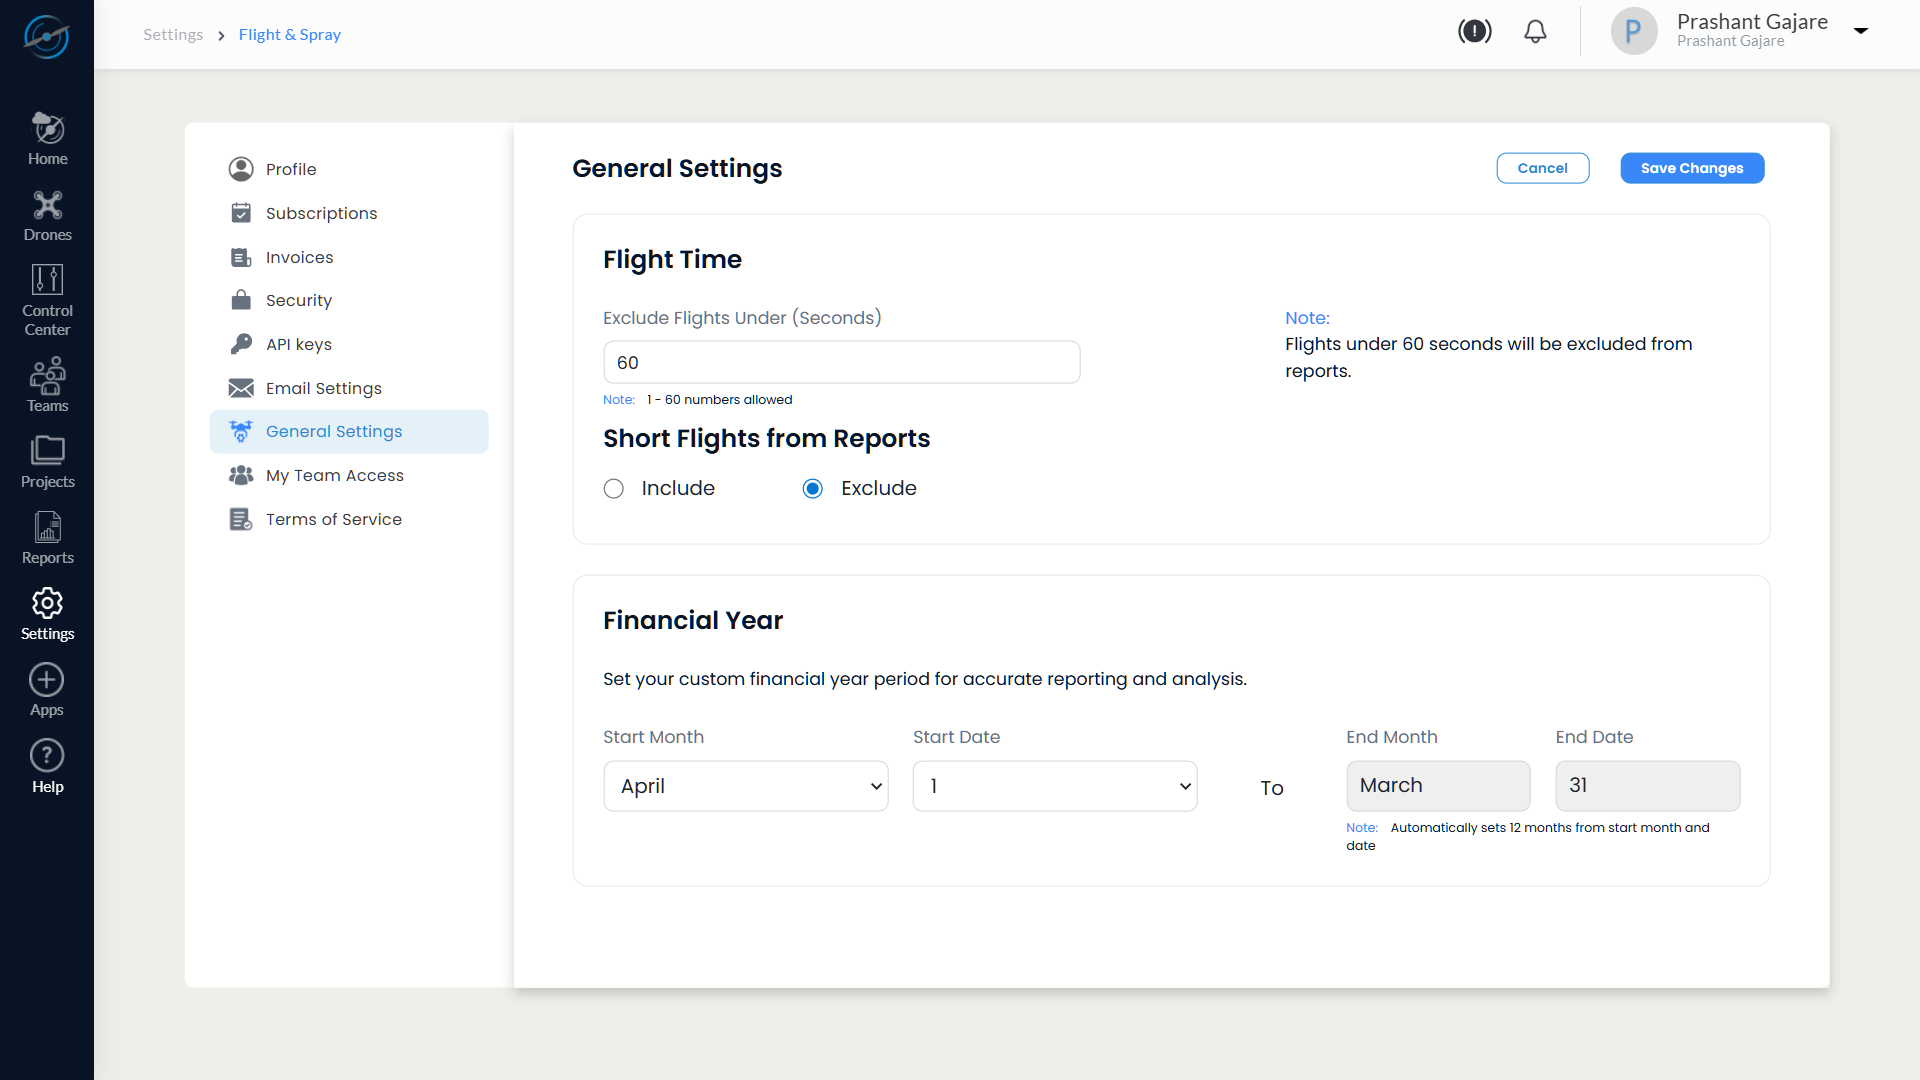
Exclude Flights Under (Seconds)
This field is applicable only when short flights are excluded from reports.
- Enter a duration value in seconds.
- Supported range: 1 to 60 seconds.
- Flights with a duration less than or equal to the specified value are excluded from reports.
System Note (displayed on screen):
Flights under the specified duration will be excluded from reports.
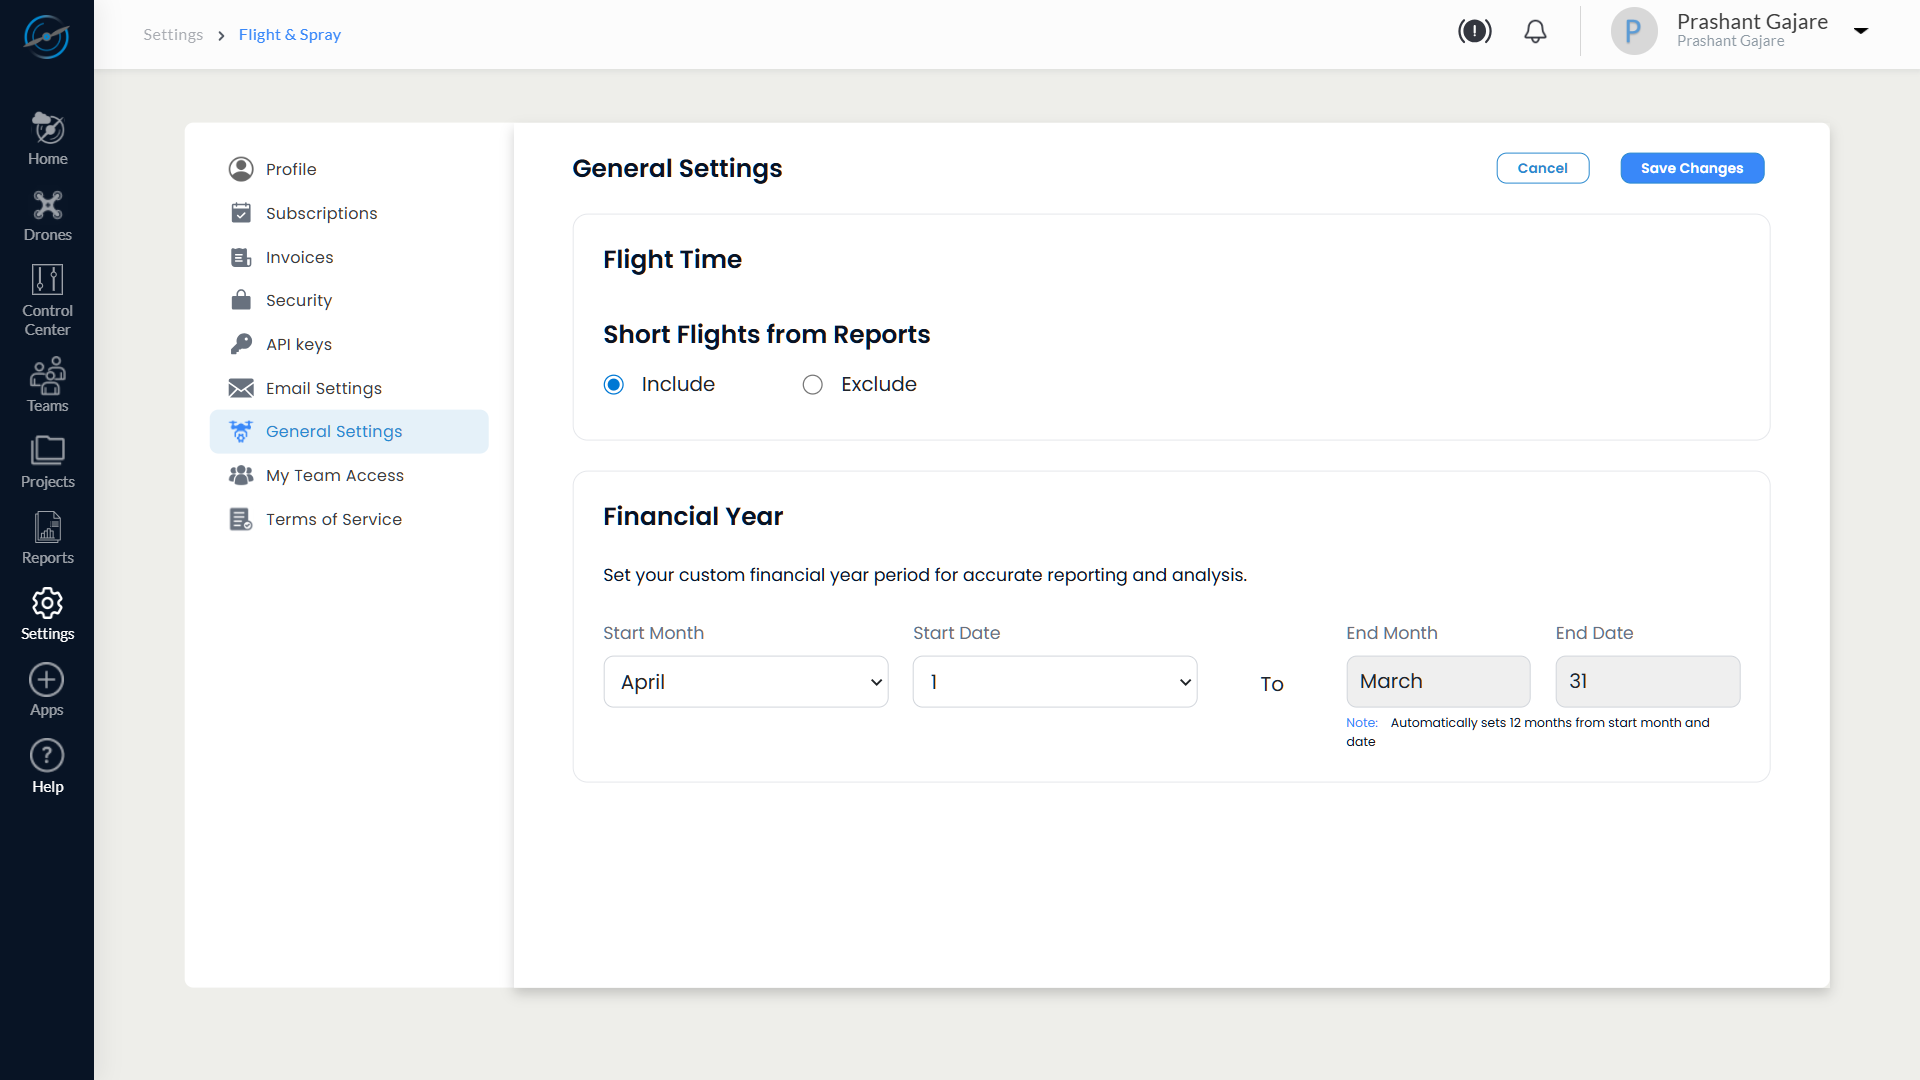
11.8.4 Short Flights from Reports
This option determines whether short-duration flights are included or excluded from reporting.
Available Options
- Include (Default)
All flights are included in reports, regardless of duration.
The Exclude Flights Under (Seconds) value is ignored. - Exclude
Flights with a duration less than or equal to the configured seconds value are excluded from reports.
The Exclude Flights Under (Seconds) field becomes mandatory.
Example Configuration
- Short Flights from Reports: Exclude
- Exclude Flights Under: 60 seconds
➡ All flights of 60 seconds or less are excluded from reports and analytics.
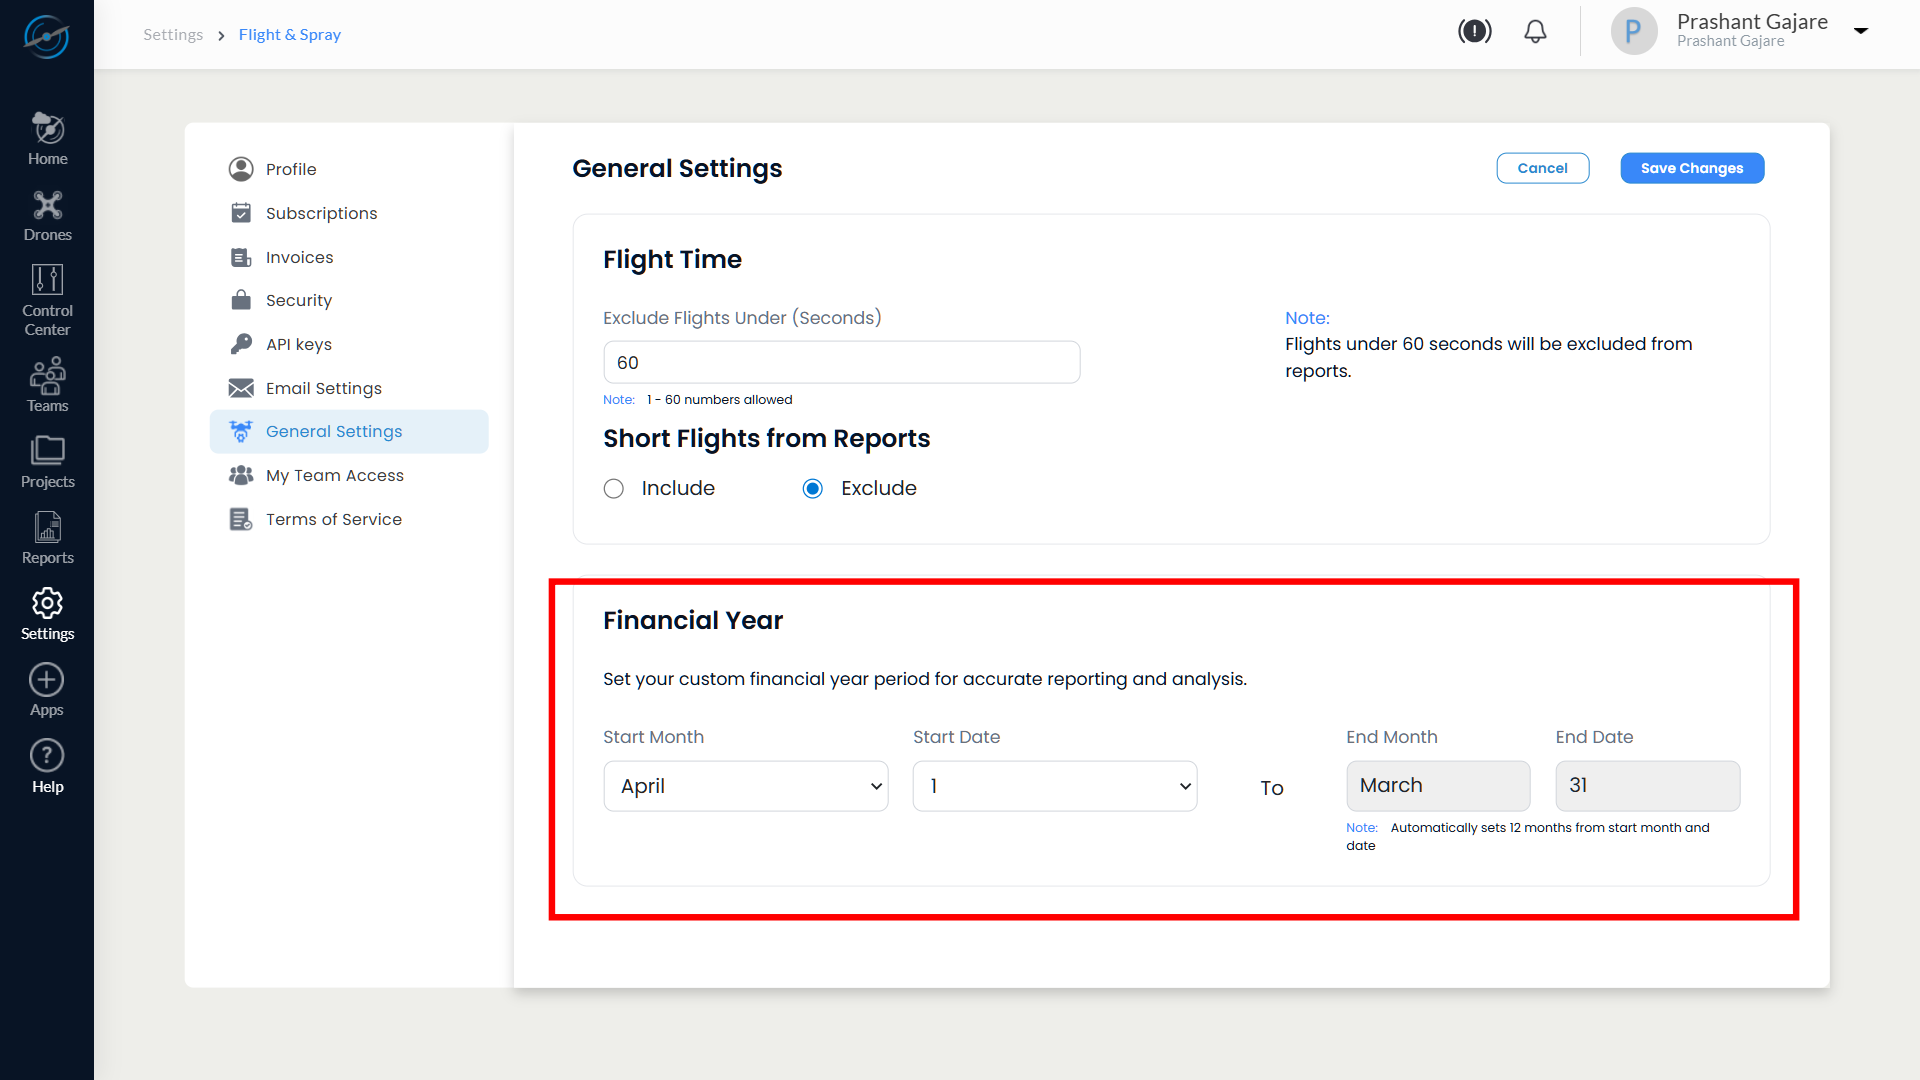
11.8.5 Financial Year Configuration
The Financial Year section allows you to define a custom financial year period used for reports, analytics, billing summaries, and performance tracking.
Configurable Fields
| Field | Description |
| Start Month | Month in which the financial year begins |
| Start Date | Date within the selected start month |
| End Month | Automatically calculated |
| End Date | Automatically calculated |
- The system automatically sets the end month and end date to complete a 12-month financial year.
- Manual editing of end month and end date is not allowed.
- The financial year updates dynamically based on the selected start month and date.
11.8.8 Summary
The General Settings module provides centralized control over:
- Default inclusion or optional exclusion of short-duration flights.
- Flight duration thresholds for report filtering.
- Financial year alignment for analytics and reporting.
Correct configuration ensures clean reports, accurate analytics, and consistent financial insights across AeroGCS Enterprise.
11.9 My Team Access
View your access roles across teams, projects, and drones
The My Team Access section provides a user-specific overview of team affiliations and assigned roles within projects and drones across the AeroGCS Enterprise platform. It offers visibility into who owns which team and what level of access (e.g. Pilot, Viewer) you hold across various resources.
This is a read-only view designed to enhance transparency and simplify role tracing across collaborative environments.
The interface consists of three collapsible data panels:
- Owners
- My Project Access
- My Drone Access
11.9.1 Owners
This section lists the teams you are a member of and displays the corresponding team owners.
| Column | Description |
| Team Name | Name of the team you are part of |
| Owner | Email ID of the team owner |
11.9.2 My Project Access
Shows a breakdown of your access across projects within various teams.
| Column | Description |
| Project Name | The name of the project you are part of |
| Role | Your assigned role in that project (e.g. PILOT) |
| Team Name | The team to which the project belongs |
| Owner | Owner of the team who controls access |
11.9.3 My Drone Access
Displays your assigned roles on specific drones within teams (if any). If there are no drone roles assigned, this section will remain empty.
| Column | Description |
| Drone ID | Unique identifier of the drone |
| UIN | Unique Identification Number (if available) |
| Role | Assigned role on the drone (e.g. Operator) |
| Team Name | Team to which the drone is assigned |
| Owner | Owner of the team or drone |
Summary Table
| Section | Purpose |
| Owners | Displays team owners for teams you belong to |
| My Project Access | Shows your project-level roles across teams |
| My Drone Access | Lists drones where you have operational access (if assigned) |
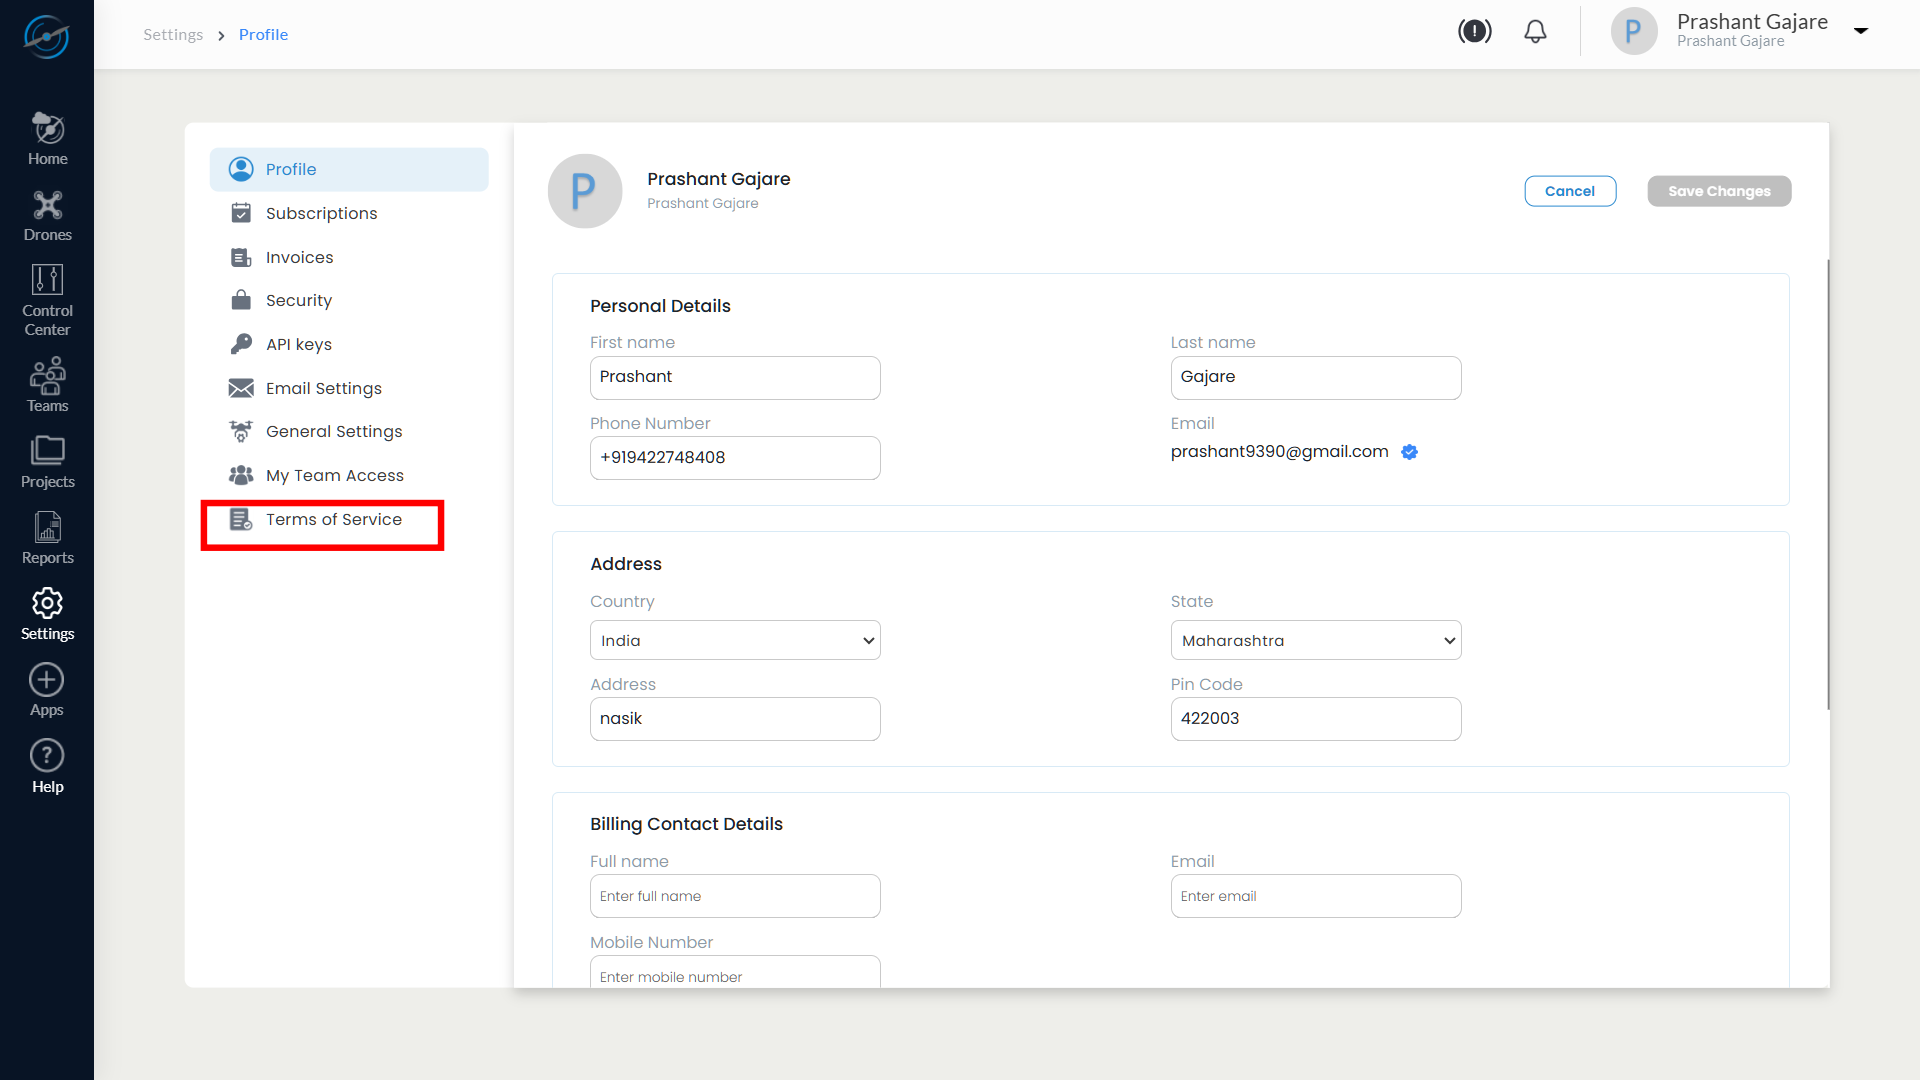
11.10 Terms of Service
The Terms of Service section provides users with access to the official legal terms and conditions governing the use of the AeroGCS Enterprise platform. These terms define user responsibilities, permitted usage, data handling policies, and service limitations.
The Terms of Service are provided for reference and compliance purposes and are read-only.
Viewing Behavior
- The Terms of Service are displayed in read-only mode.
- No changes or acknowledgements are required within the application.
- The content opens externally and does not affect the current session or unsaved settings.
- Closing the browser tab returns the user to the AeroGCS Enterprise application.
11.11 Summary
A quick reference to all configurable settings in AeroGCS Enterprise
The table below provides a consolidated overview of all sub-sections available under the Settings module. Use this as a reference to understand the purpose, key actions, and scope of each configuration area.
| Settings Tab | Purpose | Key Actions |
| Profile | View and update personal information, address, billing contact, and billing details | Edit personal details, address, billing contact, and billing information; Save or Cancel changes |
| Subscriptions | Manage subscription plans, add-on drones, and resource usage | View subscription cost and validity; Buy additional drones; Modify or cancel subscription; Monitor storage and drone usage |
| Invoices | View billing history and settle pending payments | View invoice records; Pay pending invoices |
| Security | Manage login credentials and strengthen account security | Change password; Enable or disable Multi-Factor Authentication (MFA) |
| API keys | Generate and manage API credentials for integrations | Add new API key; View, copy, or delete keys; Monitor API usage count |
| Email Settings | Configure recipients for system notifications and reports | Add or remove email recipients; Enable or disable notification types |
| General Settings | Configure global reporting and financial year preferences | Include or exclude short flights from reports; Set flight duration threshold; Configure financial year |
| My Team Access | View assigned roles across teams, projects, and drones | Review team ownership, project roles, and drone access (read-only) |
| Terms of Service | View platform legal and usage terms | Review applicable terms and conditions (read-only) |
⚠️ Note: Some Settings tabs or actions may be restricted based on your assigned role or authentication method. For example, users logged in via SSO may not be able to modify email or password details.