-
AeroGCS GEEN User Manual
10. Map Calibration
The Map Calibration feature aligns the drone’s displayed position on the map with its actual position in the field.
This ensures precise spraying, efficient coverage, and optimal resource utilization during drone-assisted agricultural operations.
Map Calibration helps correct any visible offset between the map display and the drone’s real location caused by GPS drift or environmental interference.
Digital map services such as Google Maps may include a small map-projection error (typically 3 – 5 meters). Map Calibration compensates for this projection difference to align on-screen positions with the drone’s actual field location.
10.1 Why Map Calibration Is Needed
During spraying or field operations, a small map-projection error may cause the drone’s icon on the map to appear slightly away from its real position.
This can lead to:
- Inaccurate spraying (missed or overlapping areas).
- Wasted resources (pesticide, water, or battery).
- Extra operational time due to repeated coverage.
Map Calibration resolves this by realigning the map reference so the drone icon accurately reflects the drone’s true field position.
Note: Map calibration only affects the visual alignment of the map display and does not modify GPS coordinates, flight controller data, or the actual flight behavior of the drone.
10.2 When to Perform Map Calibration
- When the drone’s on-screen position doesn’t match its actual physical position.
- After changing locations or operating in areas with varying terrain.
- After reconnecting to the drone if the offset appears.
- Whenever GPS signal conditions have changed significantly.
10.3 Accessing Map Calibration
You can start the calibration process from:
- The Dashboard, or
- The Create Plot screen.
Steps:
- Tap the three-dot menu (⋮) at the top-right corner.
- Select Map Calibration.

When the Map Calibration option is selected, a Map Calibration information dialog is displayed. The dialog shows the message:
“Map calibration enhances map accuracy. You may proceed if you’re familiar with this feature, or See details to learn more.”
The dialog provides the following options:
- See details – Opens a Map Calibration help video on YouTube.
- Not Now – Closes the dialog and returns to the map screen.
- Proceed – Opens the map calibration screen.
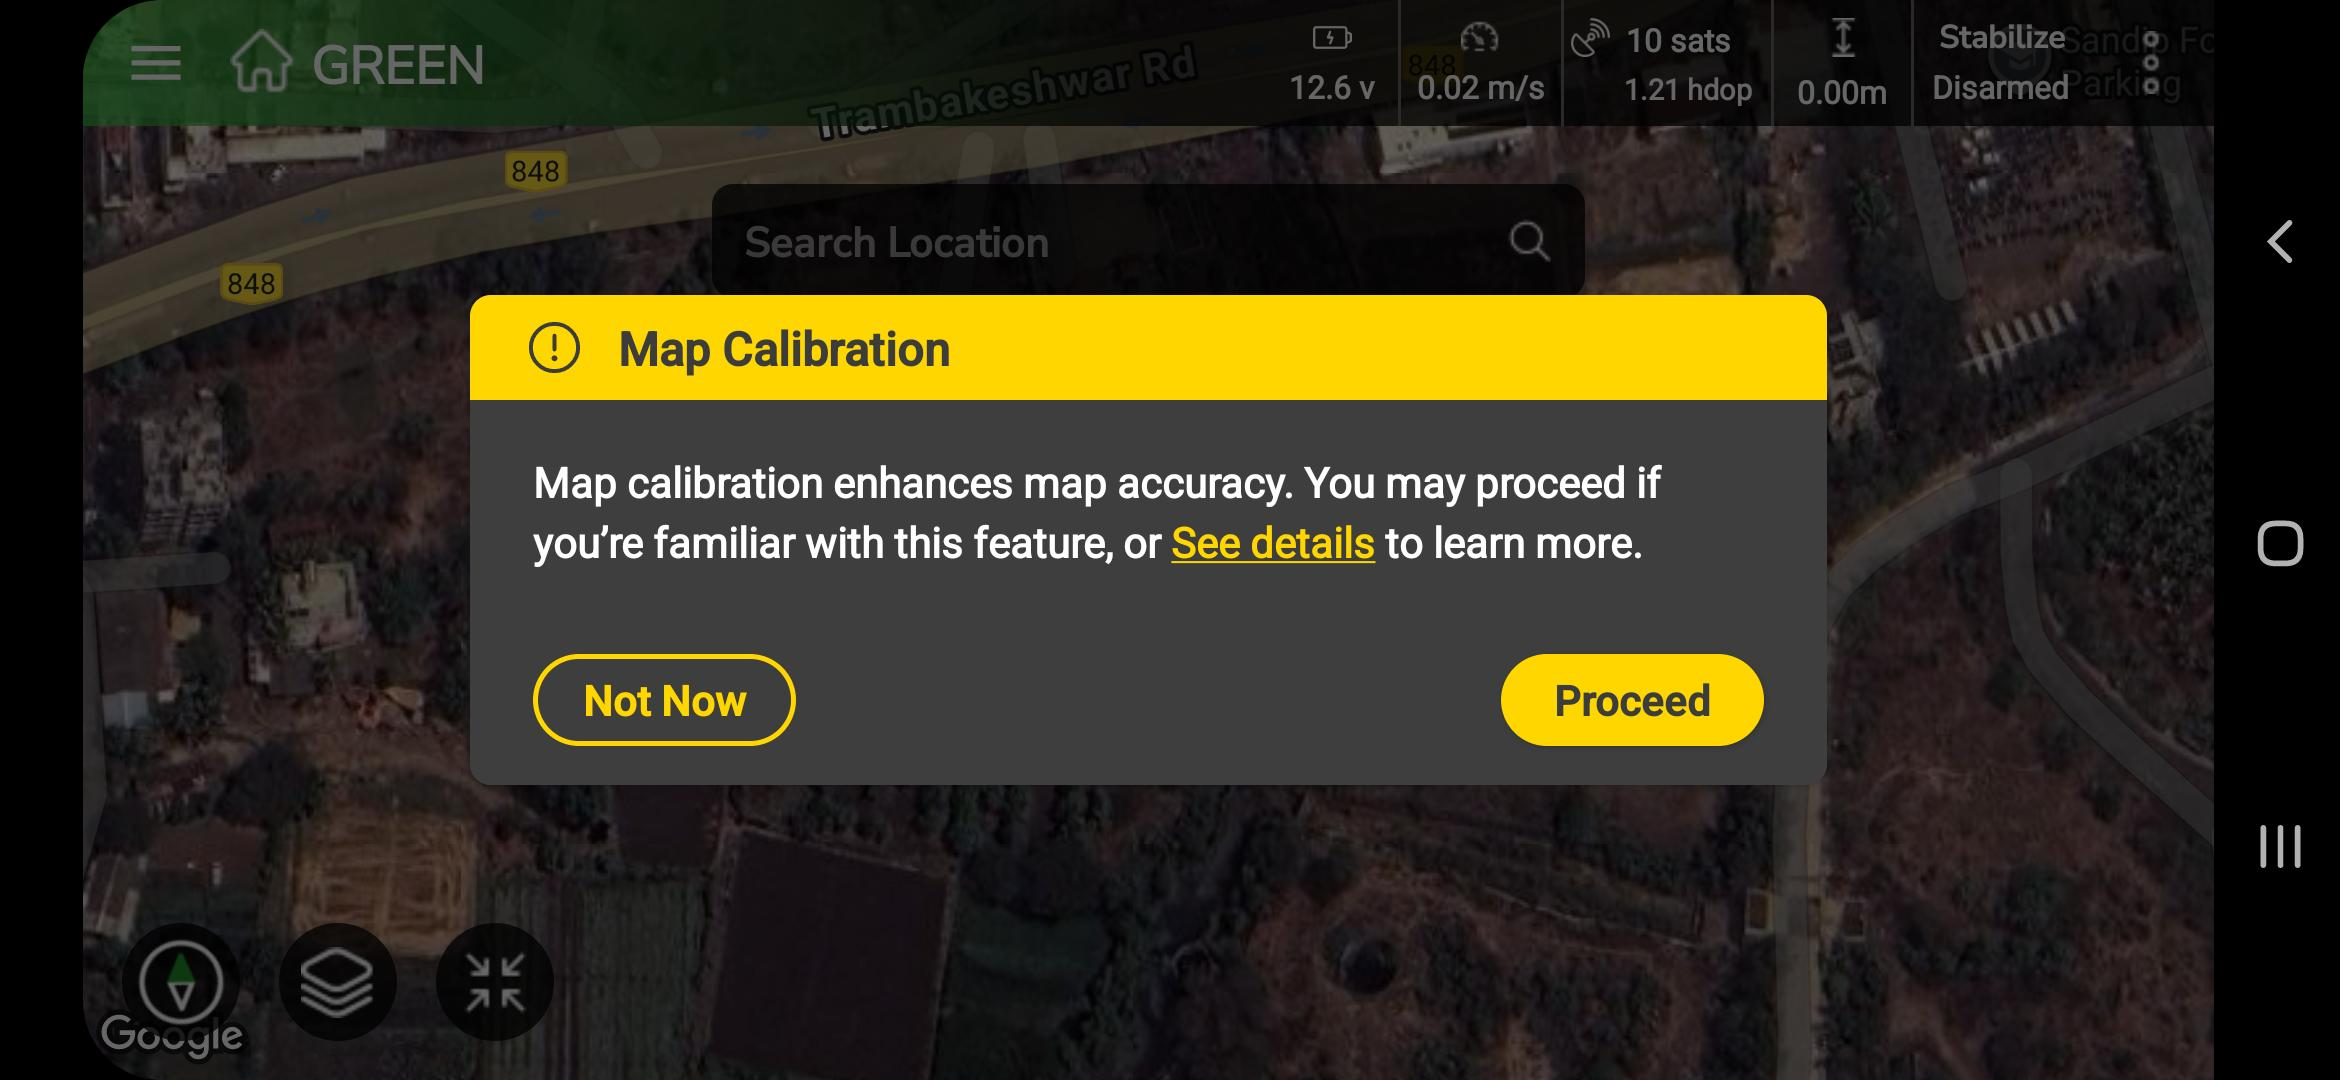
Map calibration starts only after the user selects Proceed.
3. A pop-up appears with the message:
“Would you like to calibrate your location by selecting exact position on the map to improve accuracy?”
4. Choose Start Calibration to begin, or Cancel if no calibration is needed.

10.4 Cancel and Reset Confirmation
If Cancel is selected, the system checks for an existing offset and asks:
“Would you like to reset the previous Map calibration offset?”
- Tap YES to clear the existing calibration and restore GPS alignment.
- Tap NO to retain the current offset.

10.5 Performing Map Calibration
1. Start Calibration
Once Start Calibration is tapped, the map switches to calibration mode:
- A circular calibration marker appears fixed at the center of the screen.
- The message “Kindly adjust to expected location” is displayed.

2. Adjust Map Position
- Move the map (not the marker) so that the marker aligns exactly over the drone’s true field position.
- Use zoom gestures to increase precision.
- Reference visible landmarks such as roads, trees, or boundaries visible both on the map and in the field.

3. Save Calibration
- Once aligned, tap Done at the bottom of the screen.
- The application calculates and applies an offset to synchronize the map coordinates with the real-world position.

10.6 After Calibration
Once the calibration is completed:
- The map calibration is applied only for the current application session.
- The visual calibration remains active until:
- You manually reset it, or
- The application is closed completely, including from the background.
- During the active session, the map view reflects the calibrated alignment to help visually match the drone’s position with the field.
Calibration behavior across plans and plots:
- Plans or plots created and saved after map calibration store calibration information as metadata and display the Map Calibration status as Calibrated in the Project view.
- Plans or plots created before calibration, or without calibration, display the Map Calibration status as “–”.
- After restarting the application, the visual calibration is cleared from the map view, but the stored calibration status remains visible in the Plan and Plot information.
Important:
When opening an already calibrated plan or plot in a new application session, make sure to perform map calibration again, using the same field reference point as used earlier. This helps maintain visual consistency between the map and the drone position while executing previously calibrated plans or plots.
Note: Map Calibration affects only the visual display of the drone and plotted points on the map. It does not modify GPS coordinates, stored plan data, or any flight-controller parameters.
10.7 Cancelling or Resetting Calibration
To reset a calibration:
- Open Map Calibration again.
- Tap Cancel.
- When prompted, choose:
- YES to clear the offset and restore default GPS alignment.
- NO to retain the offset.

Tips for Accurate Calibration
- Ensure Strong GPS Signal: Perform calibration in open areas with minimal interference.
- Use Landmarks: Identify easily recognizable objects (buildings, trees, road edges).
- Recalibrate as Needed: Especially when operating in a new location or if GPS drift occurs.
- Test Before Operation: After calibration, perform a short hover or test run to verify map accuracy.
| Situation | Before Calibration | After Calibration |
| Drone position appears 10 meters away from crop line | Drone icon displayed in wrong location | User performs calibration by adjusting map under the marker |
Post-Condition
After successful calibration:
- The drone’s displayed position matches its real-world location.
- The offset ensures precise plotting and spraying accuracy.
- The calibration resets automatically after app closure or manual reset.
Cross-References
- From Chapter 6 -> Section 6.1.1 – Set Location: Perform calibration immediately after location setup.
- Chapter 9 – Field Plotting: Verify calibration before marking plots.
- Chapter 11 – Mission Planning: Ensure correct calibration for accurate waypoint alignment.