-
AeroGCS GEEN User Manual
8. RPA Settings
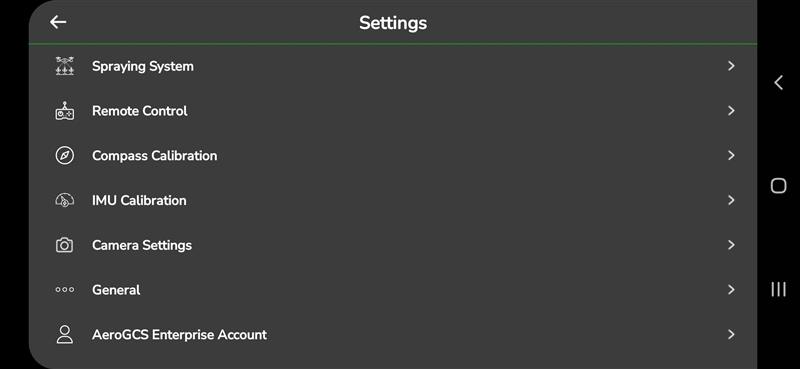
RPA settings are important for configuring and operating your Remotely Piloted Aircraft (RPA). To access these settings, tap the three dots in the upper-right corner of the dashboard and then tap Settings from the menu.
The RPA settings screen will appear as shown below.
Important Requirement: Connect the Aircraft Before Changing Settings
Before you can view or modify any RPA settings, your drone must be connected to AeroGCS GREEN.
If the drone is not connected, the application will display the following message:
“You need to connect the Aircraft to change the settings.”
You will see two options:
- Cancel – Returns to the previous screen.
- Connect Aircraft – Opens the Connect Aircraft screen where you can establish the drone connection.
Once the drone is connected successfully, all RPA settings will be accessible.
Let’s go through each setting category one by one.
8.1 Aircraft Settings
These settings allow you to configure aircraft-related parameters for your drone. The available options are shown below.
Follow the steps below to configure the settings on this screen.
8.1.1. Spraying Complete
This setting determines what the drone should do after completing the spraying mission. You can choose one of the following actions:
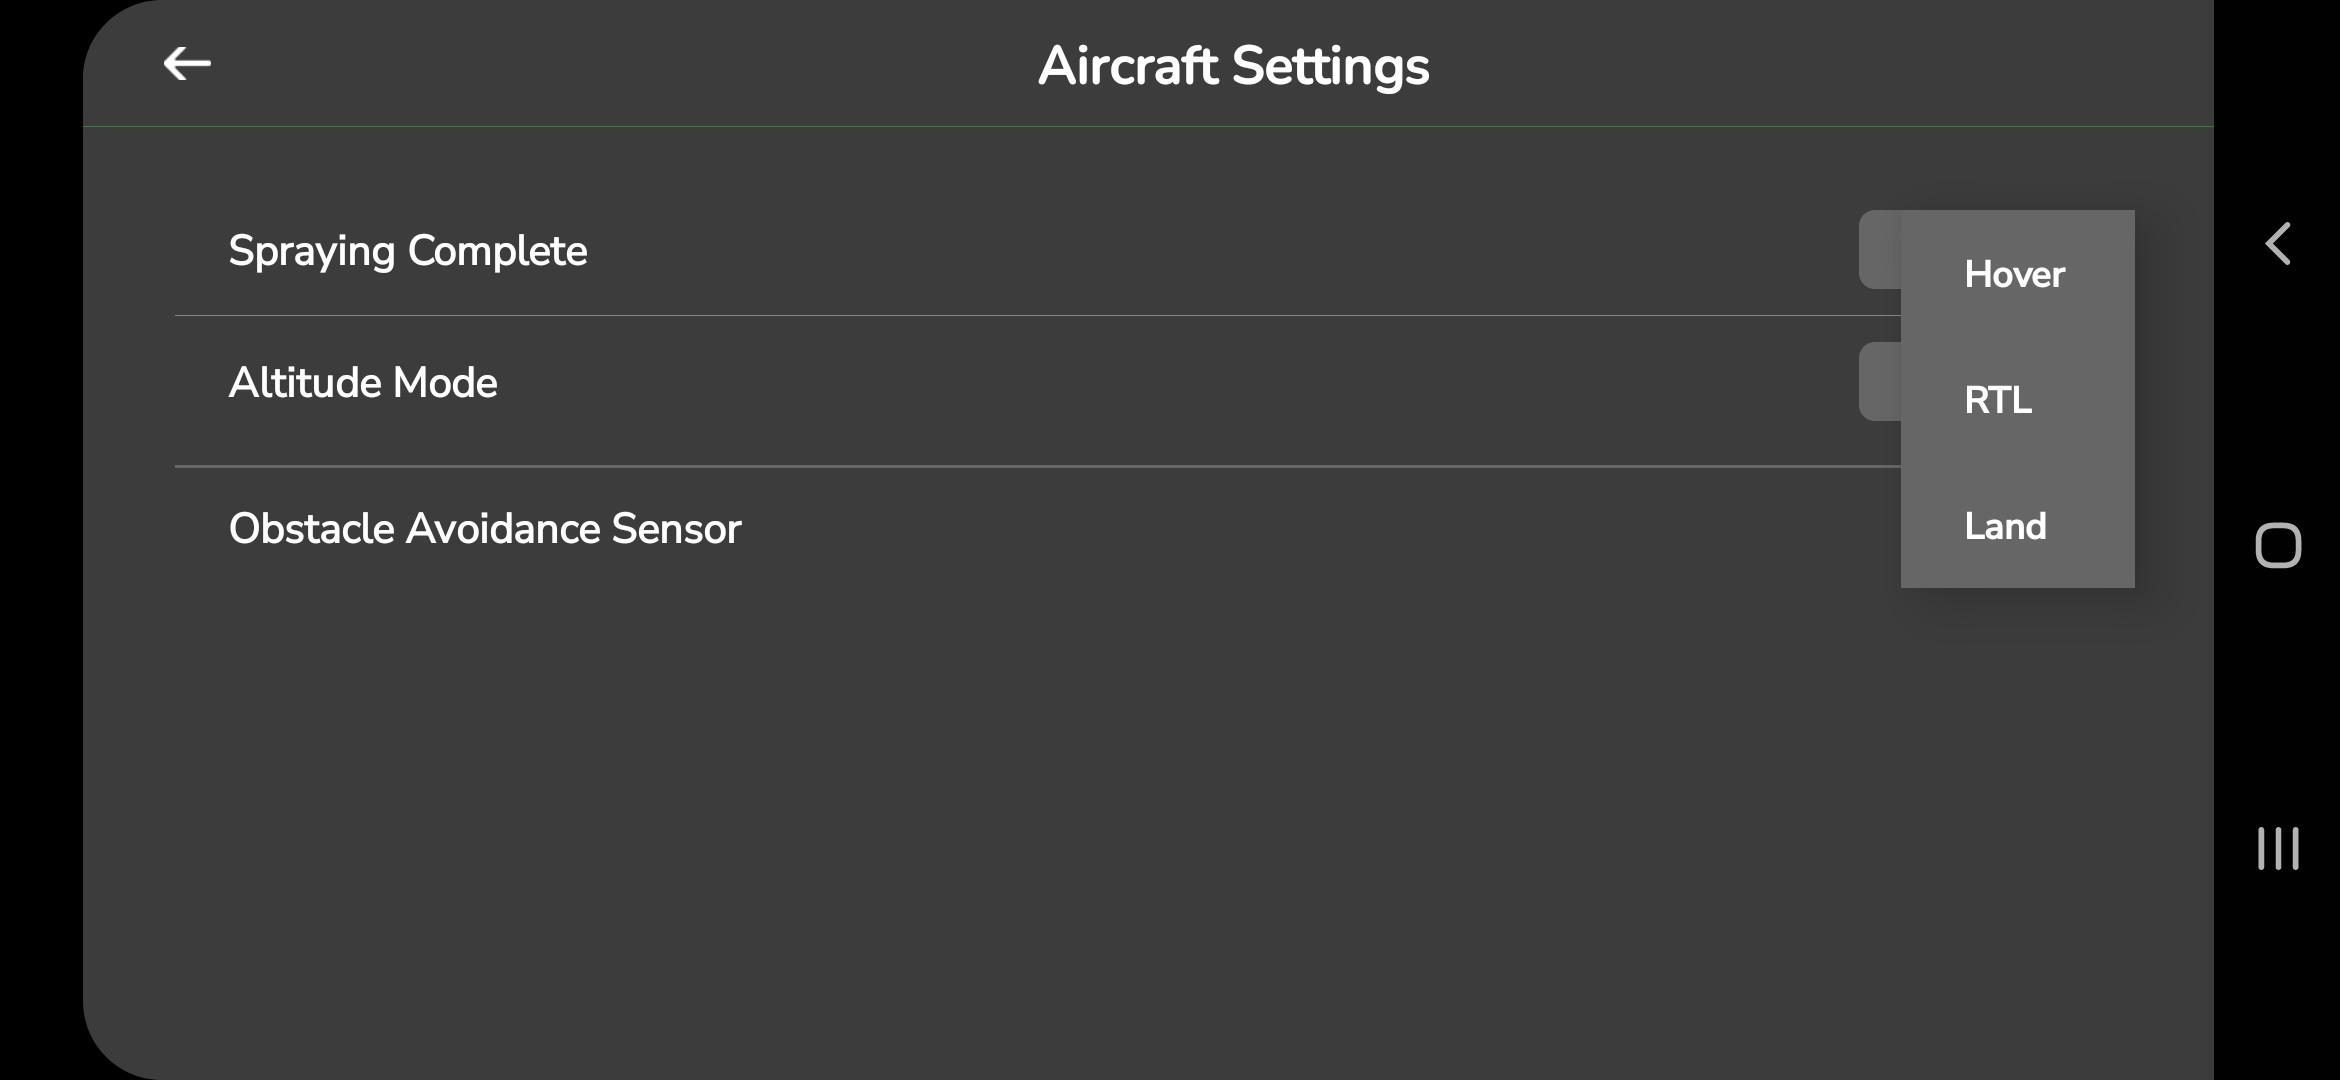
- Hover: When this option is chosen, the drone will hover at the endpoint of the spray plan upon completing the spraying.
- RTL (Return to Launch): If this option is selected, the drone will return to the launch point after finishing the spraying.
- Land: If this option is chosen, the drone will land at the endpoint of the spray plan after completing the spraying.
8.1.2. Altitude Mode Selection
This option allows you to choose how the drone manages its altitude during flight.
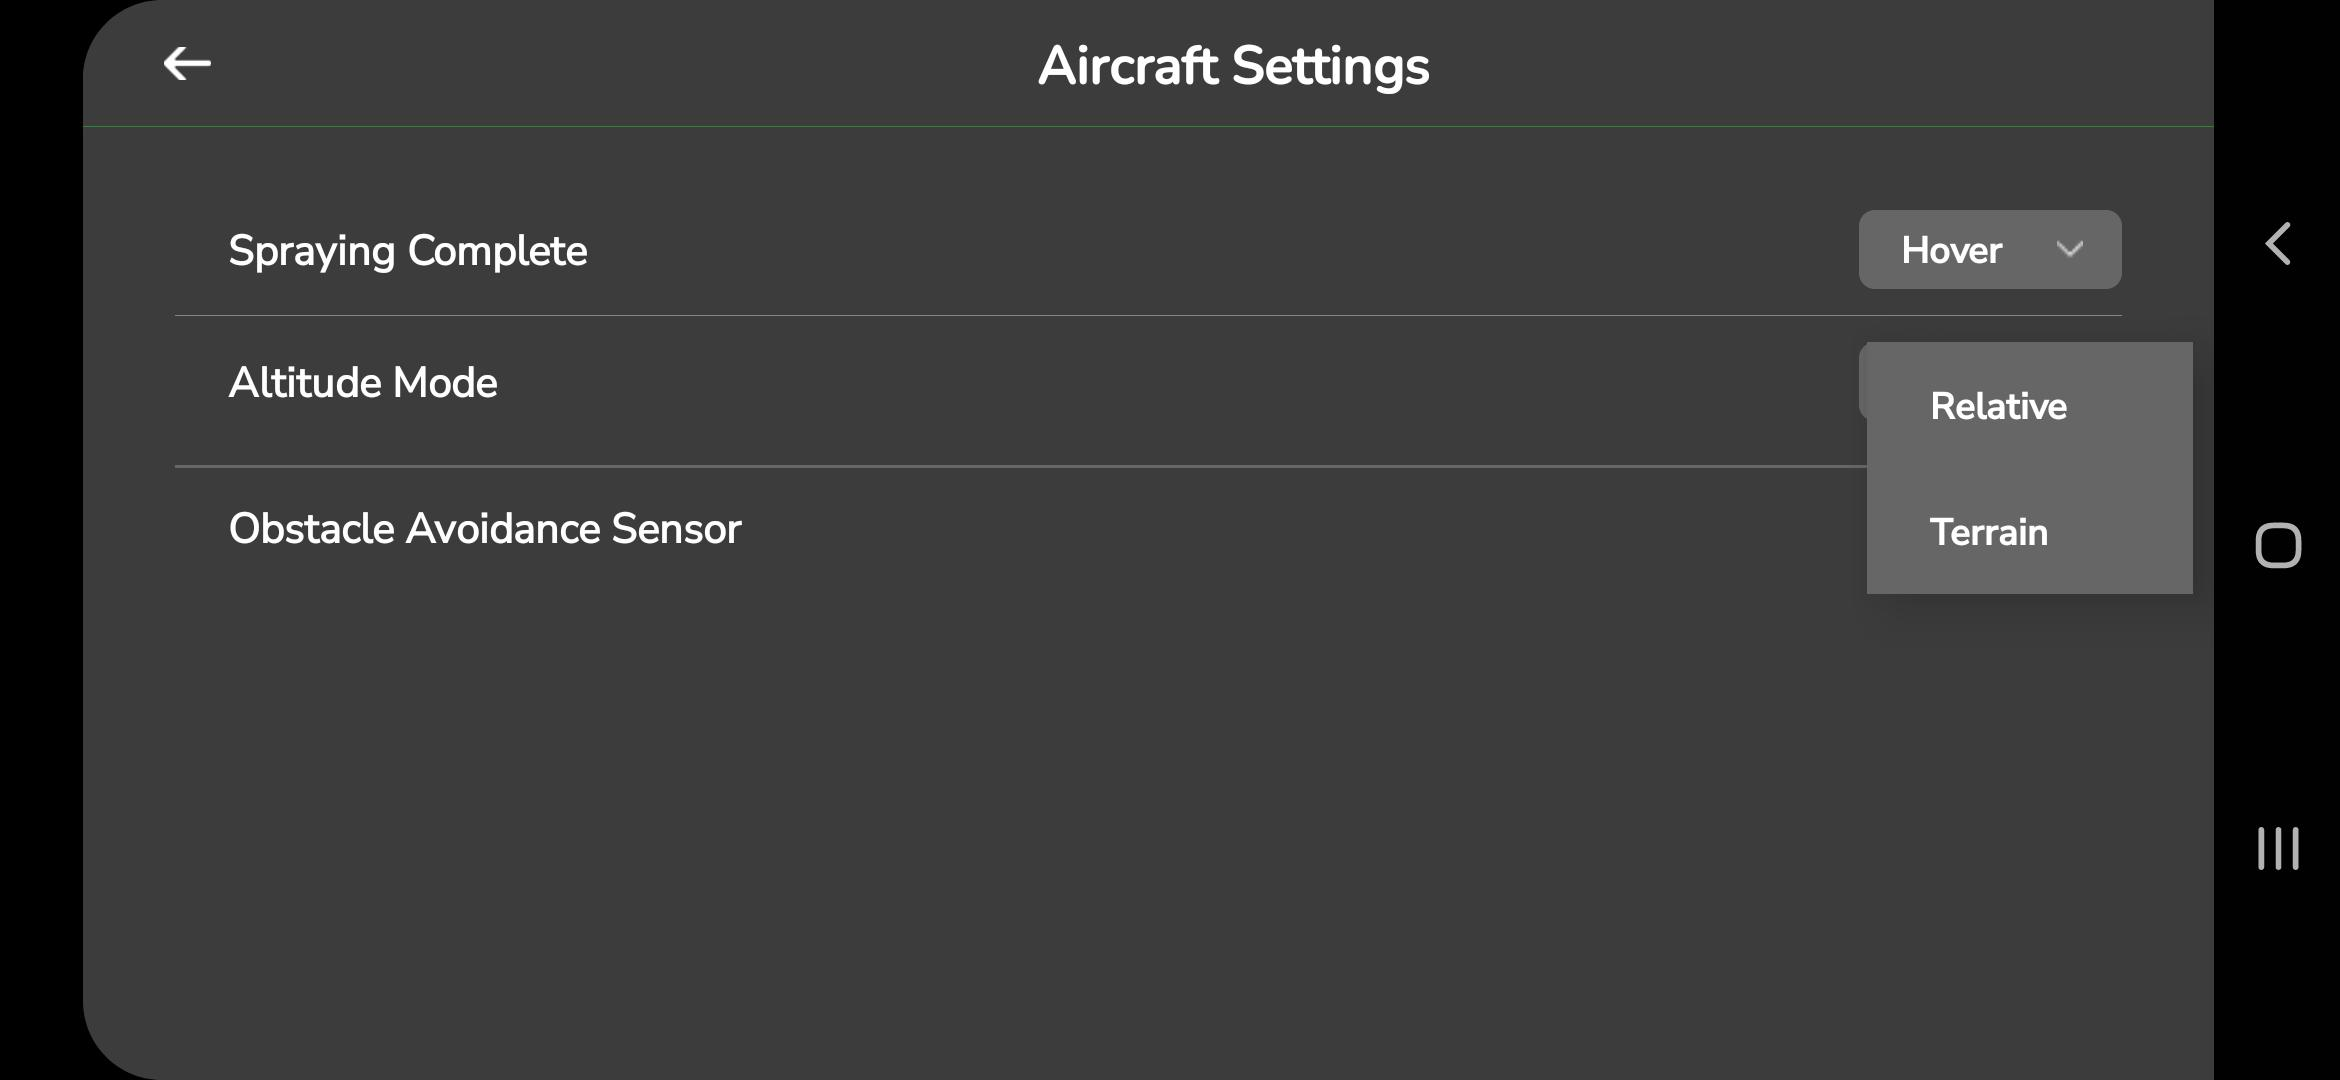
You can select between the following modes:
- Relative Altitude Mode:
The drone maintains altitude relative to a set reference value. This is commonly used for maintaining a uniform flight height above a fixed point. - Terrain Mode:
The drone adjusts its altitude based on the terrain below. This helps the drone maintain a consistent height above ground level using available map data.
To use terrain mode, enable the following options:- Enable Terrain – Creates a terrain data folder on the flight controller’s SD card.
- Terrain Follow – Makes the drone use terrain data during RTL and landing.
You can also set a radius for downloading terrain data.
When Follow Terrain Data is enabled, the Ground Control Station (GCS) downloads and stores terrain information on the SD card.
After selecting the drone’s location and downloading the required data, the drone will use this terrain information for altitude control.
| Note: The spray width is now auto-calculated for improved accuracy. |
8.1.3. Obstacle Avoidance Sensor
The obstacle avoidance sensor helps keep your drone safe by detecting objects in its flight path and adjusting its movement to avoid collisions. This is especially useful for operations near trees, poles, power lines, or buildings.
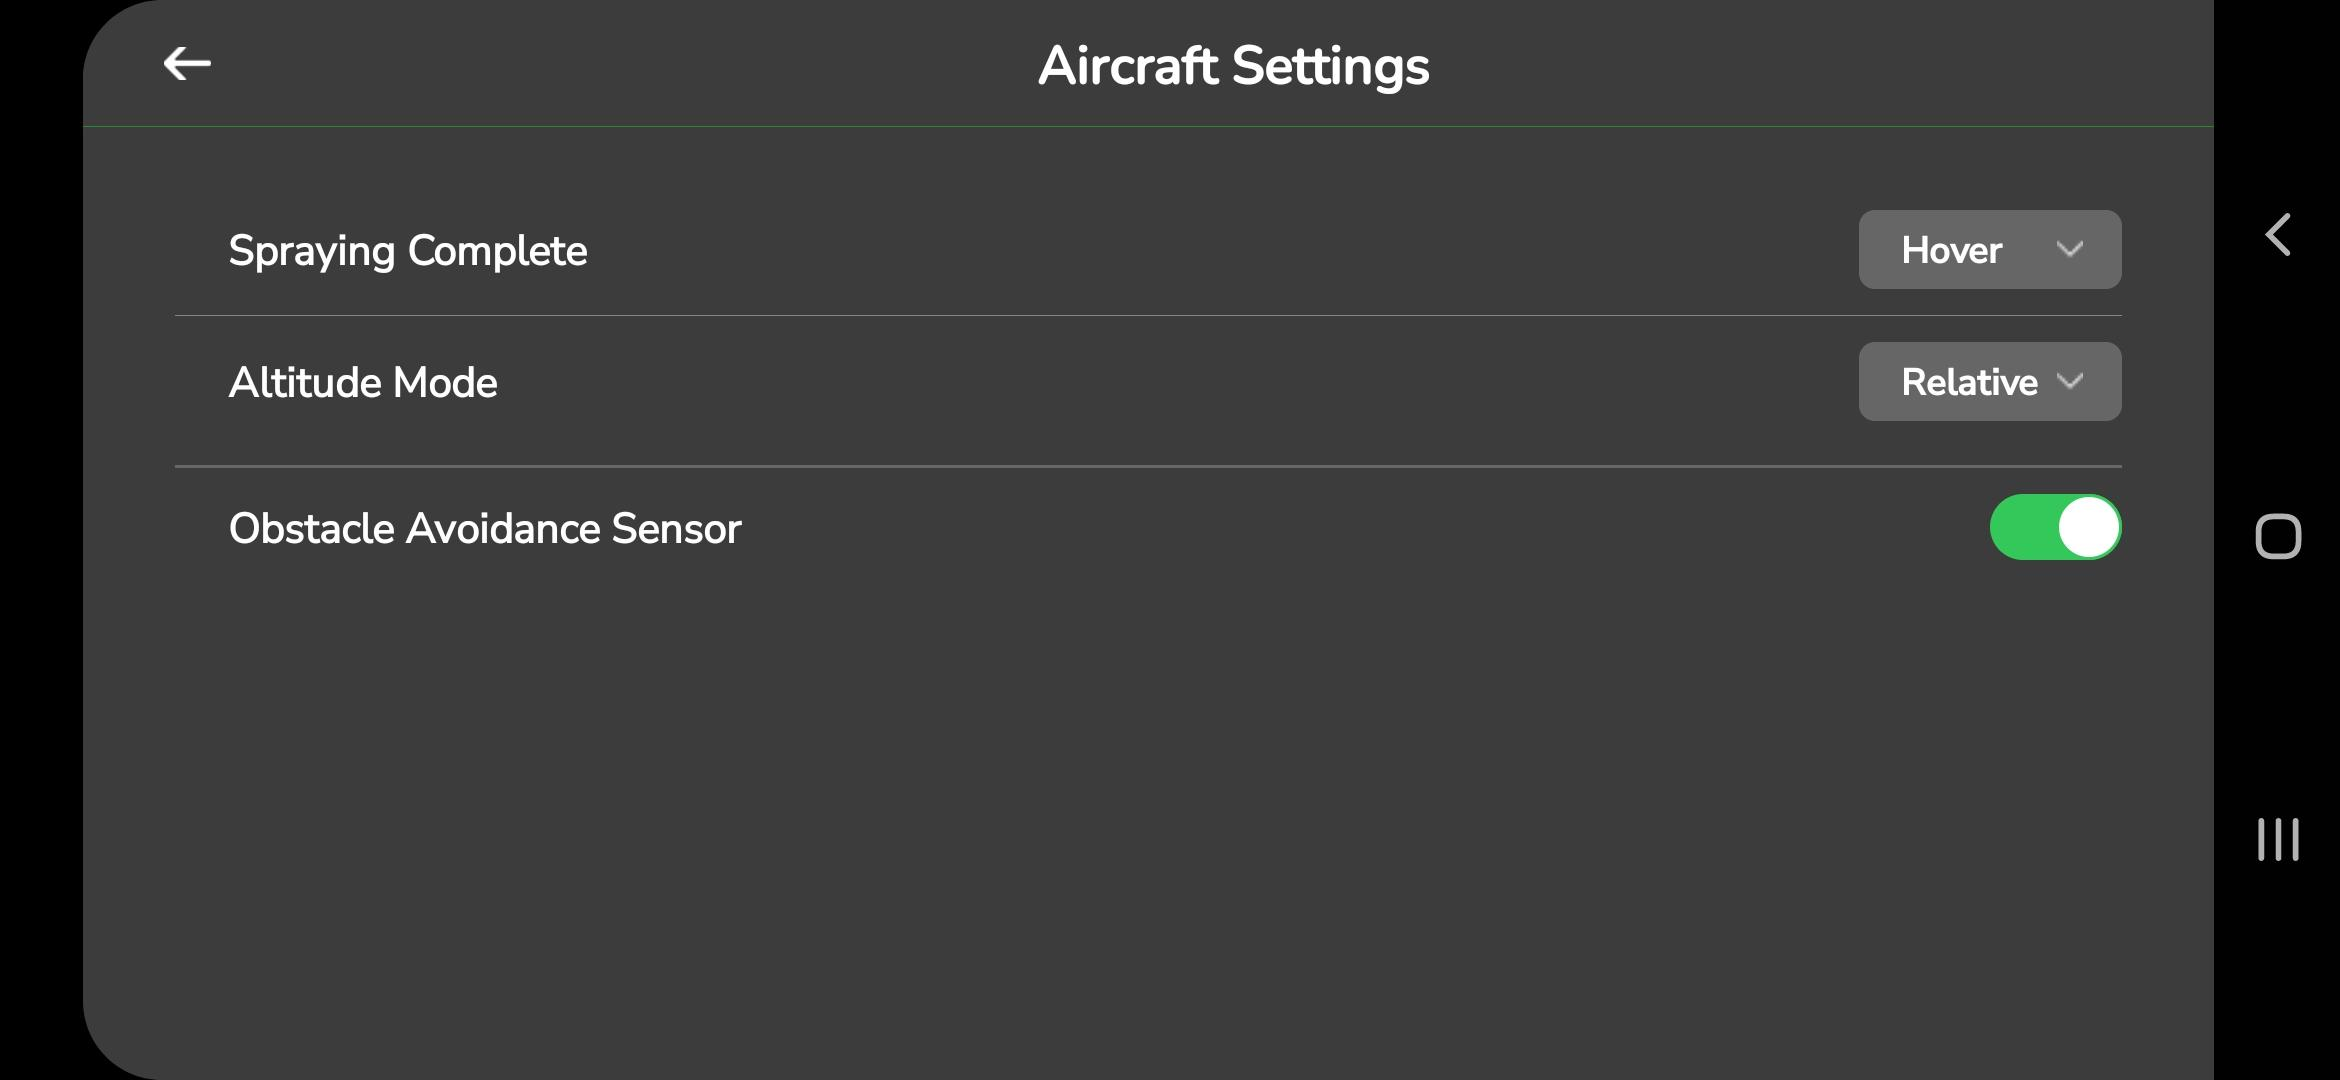
You can turn this sensor on or off using the toggle button in the Aircraft Settings screen.
When the sensor is enabled, the drone will modify its flight path if it detects an obstacle.
Benefits of using the obstacle avoidance sensor:
- Safety: Helps reduce the chance of collisions during operation.
- Efficiency: Limits the need for constant manual adjustments, allowing for smoother flights.
- Reduced Pilot Effort: You can focus more on monitoring spraying and less on obstacle handling.
- Confidence: Adds an extra layer of protection, especially in complex field environments.
Things to keep in mind:
- Detection Limitations: Some objects may not be detected, especially very small or thin obstacles. Always stay aware of your surroundings.
- Lighting Conditions: The sensor may be less effective in low-light conditions. Daytime flights are recommended.
- Manual Override: You can turn the sensor off when needed, but extra caution is required since obstacle protection will be disabled.
8.2 Spraying system
The Spraying System settings allow you to configure parameters related to the pump, tank, and spraying operations. These settings appear as shown below:
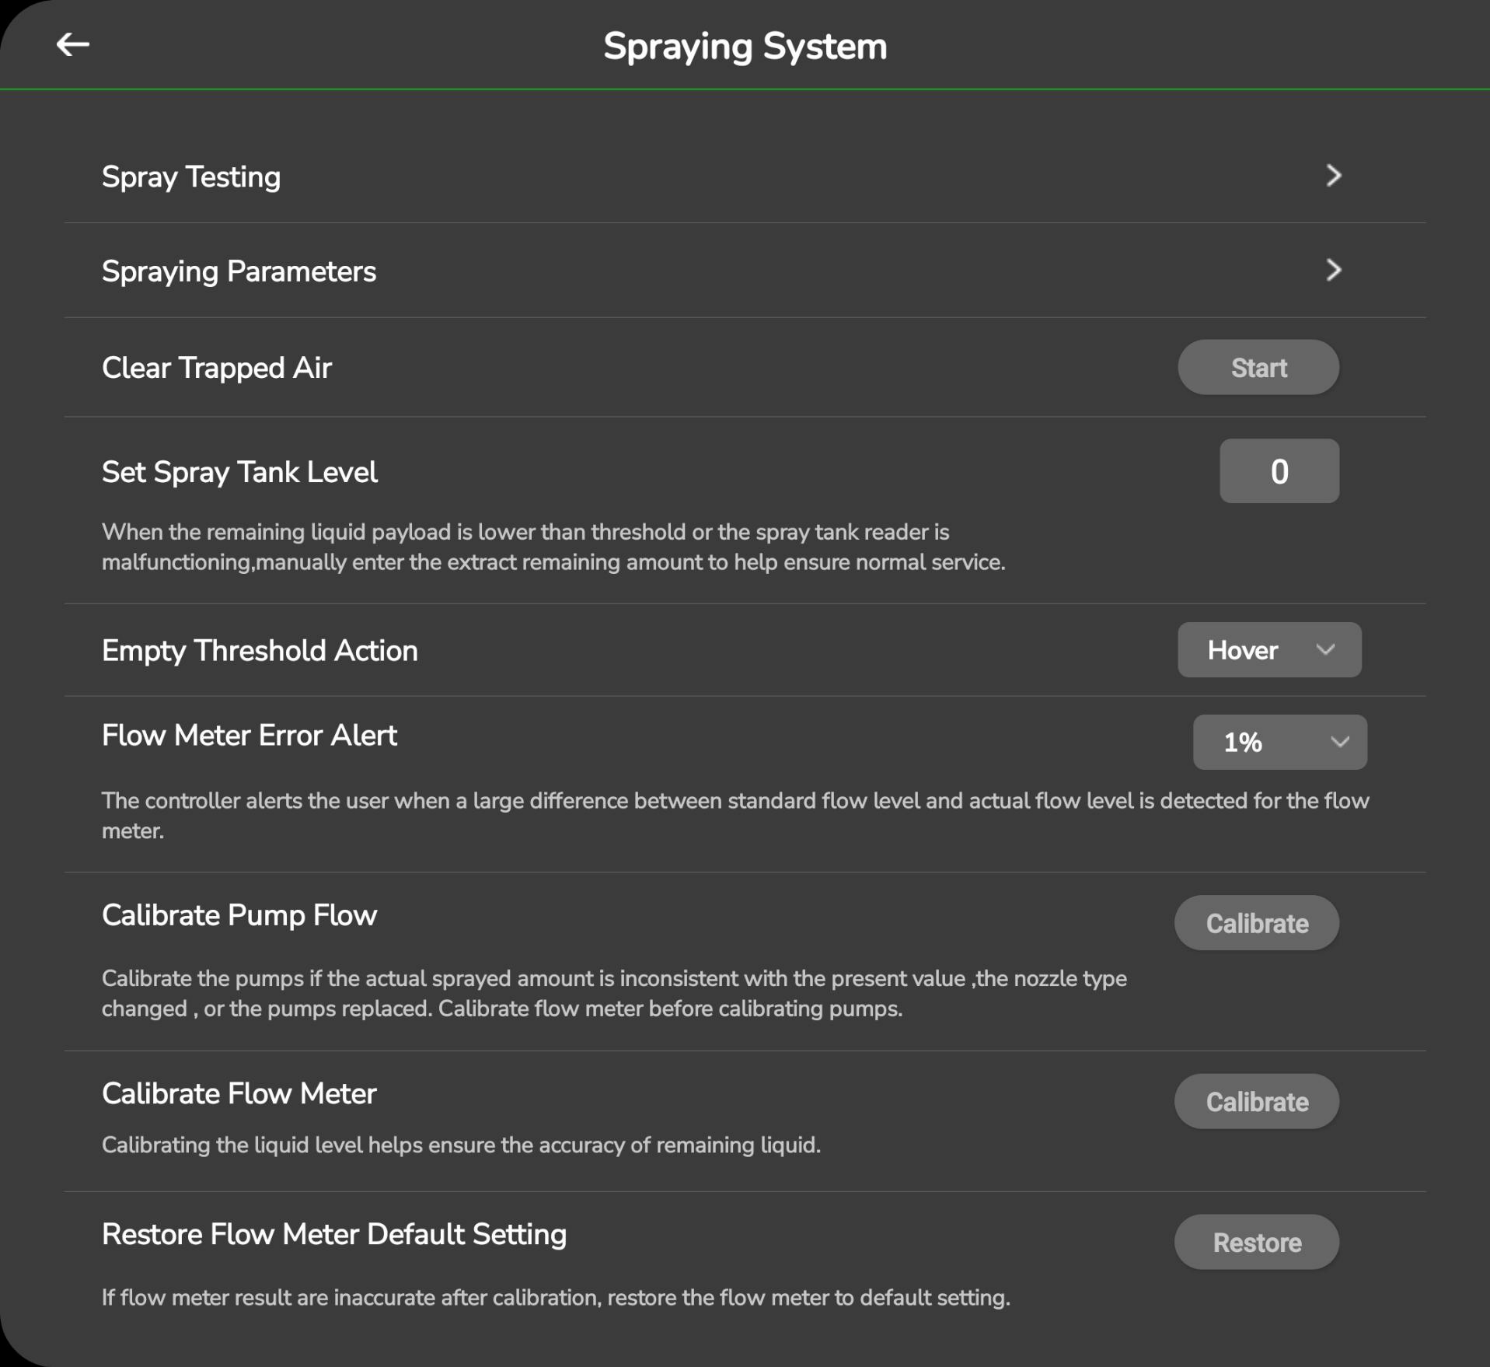
You can configure each setting using the instructions provided in the following sections.
8.2.1 Spray testing
The Spray Testing feature lets you test the spraying speed before an actual flight. Tap Spray Testing on the Spraying System screen. The following screen will appear:
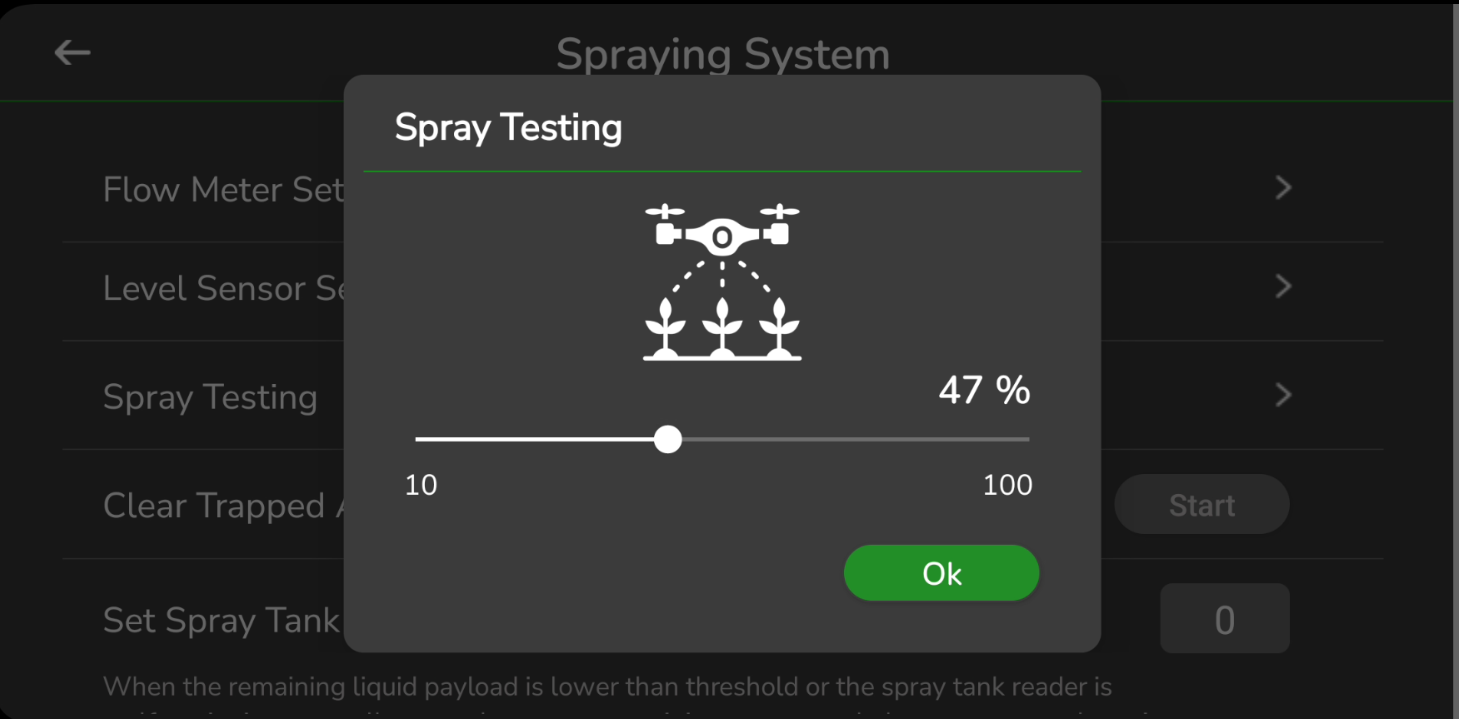
Adjust the spray percentage using the slide bar, then tap OK to perform a test.
Make sure the tank has liquid and the pumps are turned on before starting the test.
8.2.2 Spraying Parameters
Tap Spraying Parameters to configure liquid spraying settings. The screen will appear as shown below:
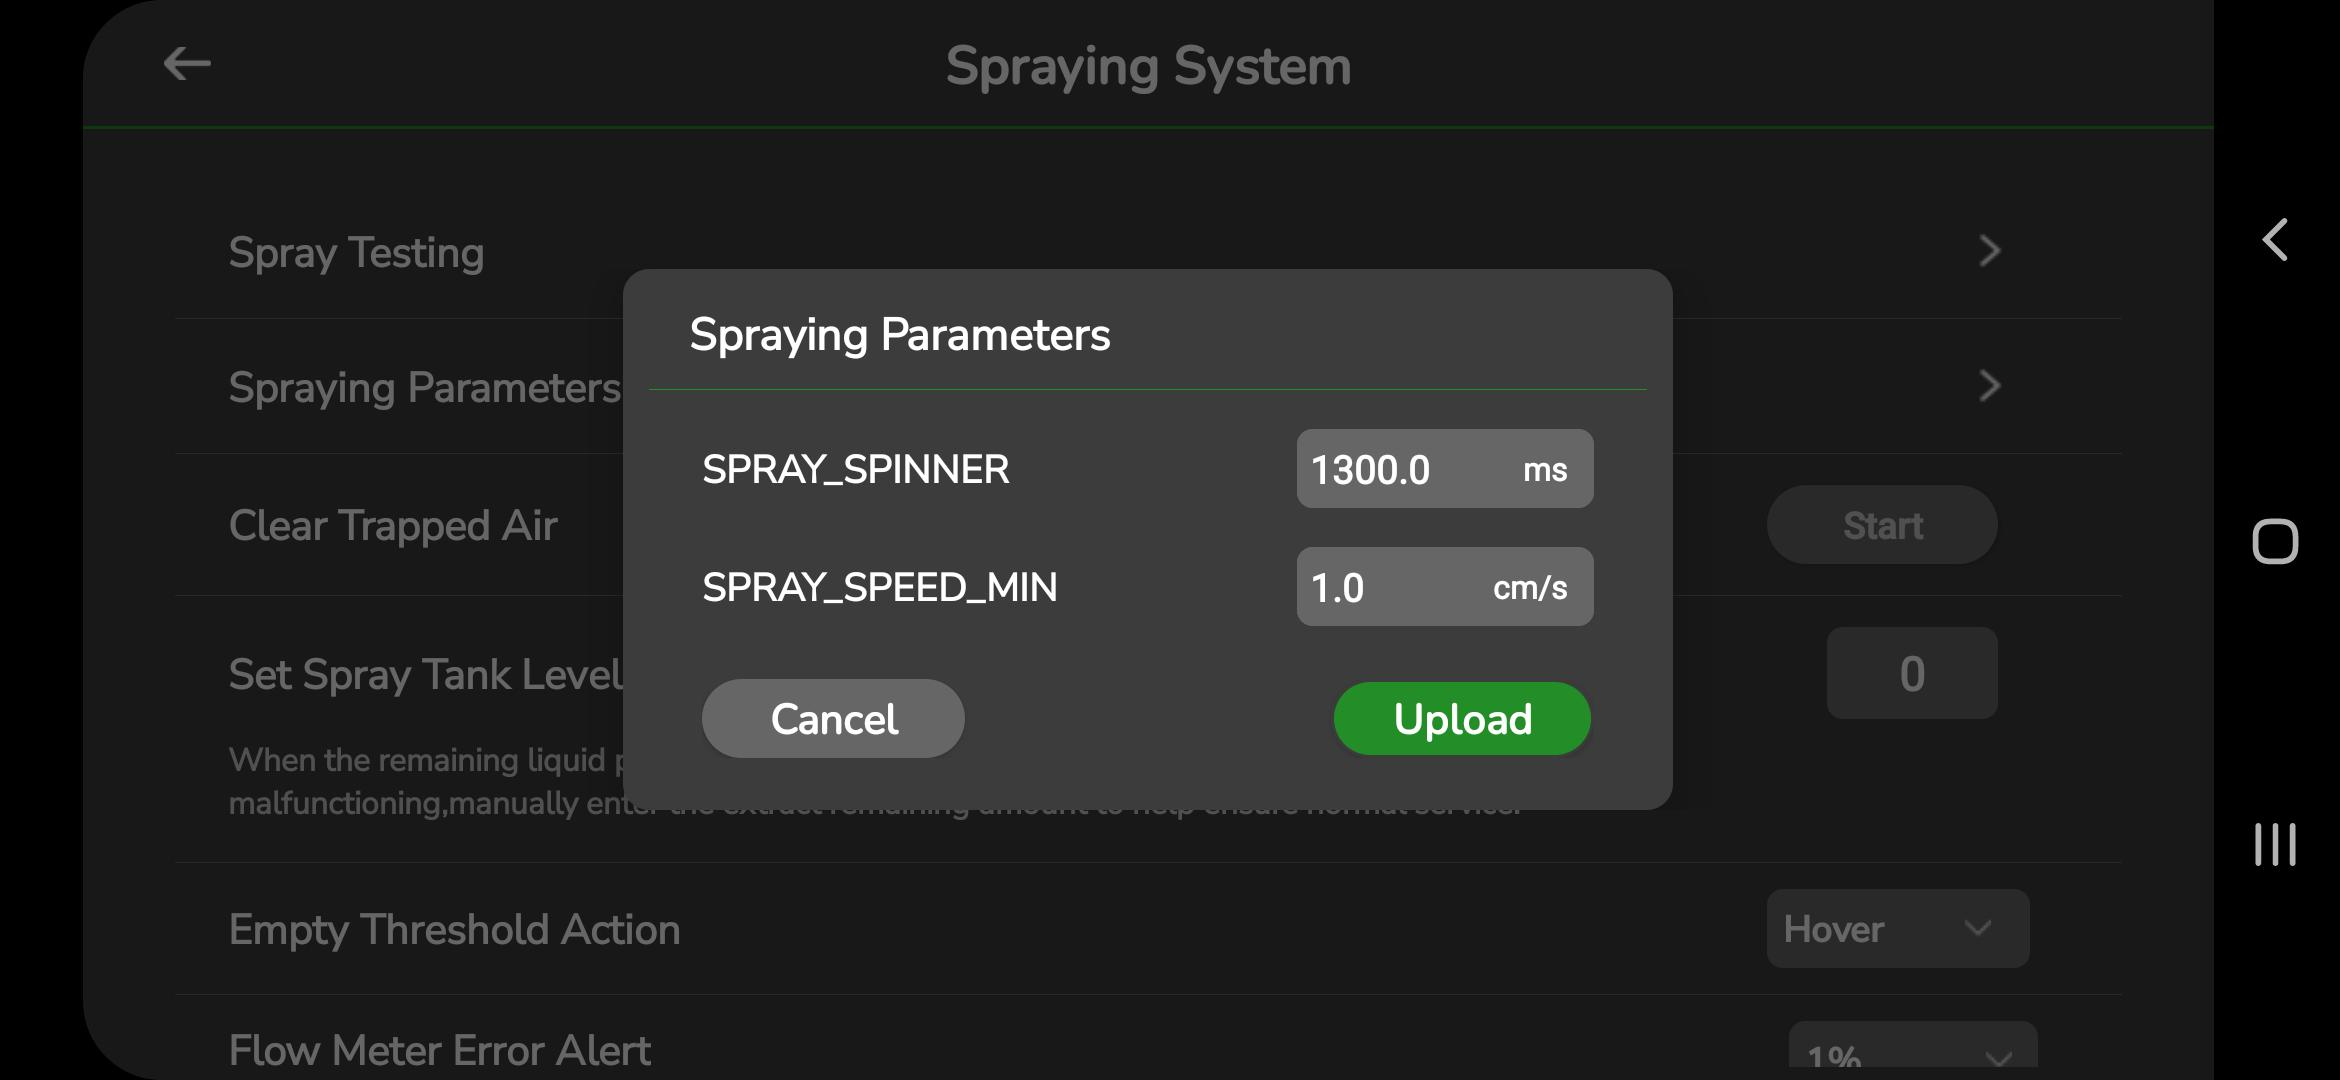
You can configure the following parameters:
- SPRAY_SPINNER: Adjusts the spinning speed of the spray mechanism (m/s).
- SPRAY_SPEED_MIN: Sets the minimum spraying speed (cm/s).
After setting the values, tap Upload to send these parameters.
8.2.3 Clear Trapped Air
Tap Start next to the Clear Trapped Air option. The following screen will appear:

This feature helps remove trapped air that may interrupt the spraying flow.
Turn on the pump before starting. Tap Start to begin the clearing process.
A message saying “Spraying started” will appear once the operation begins.
When process is complete and trapped air is cleared tap “Stop” to stop the spraying.
8.2.4 Set Spray Tank Level
To set the spray tank level, tap the input field on the Spraying System screen and enter the required value.
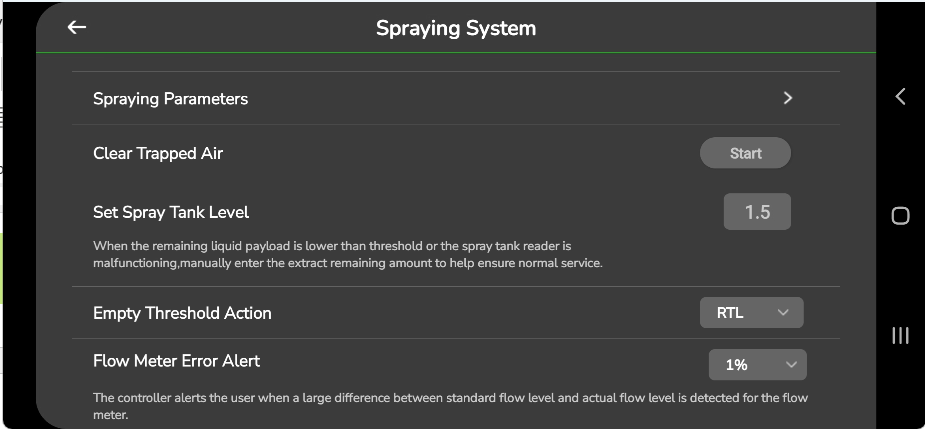
Use this option when the tank level sensor is not reading correctly or when the remaining payload needs to be entered manually.
8.2.5 Empty Threshold Action
To configure the Empty Threshold Action, choose an option from the dropdown menu shown below:
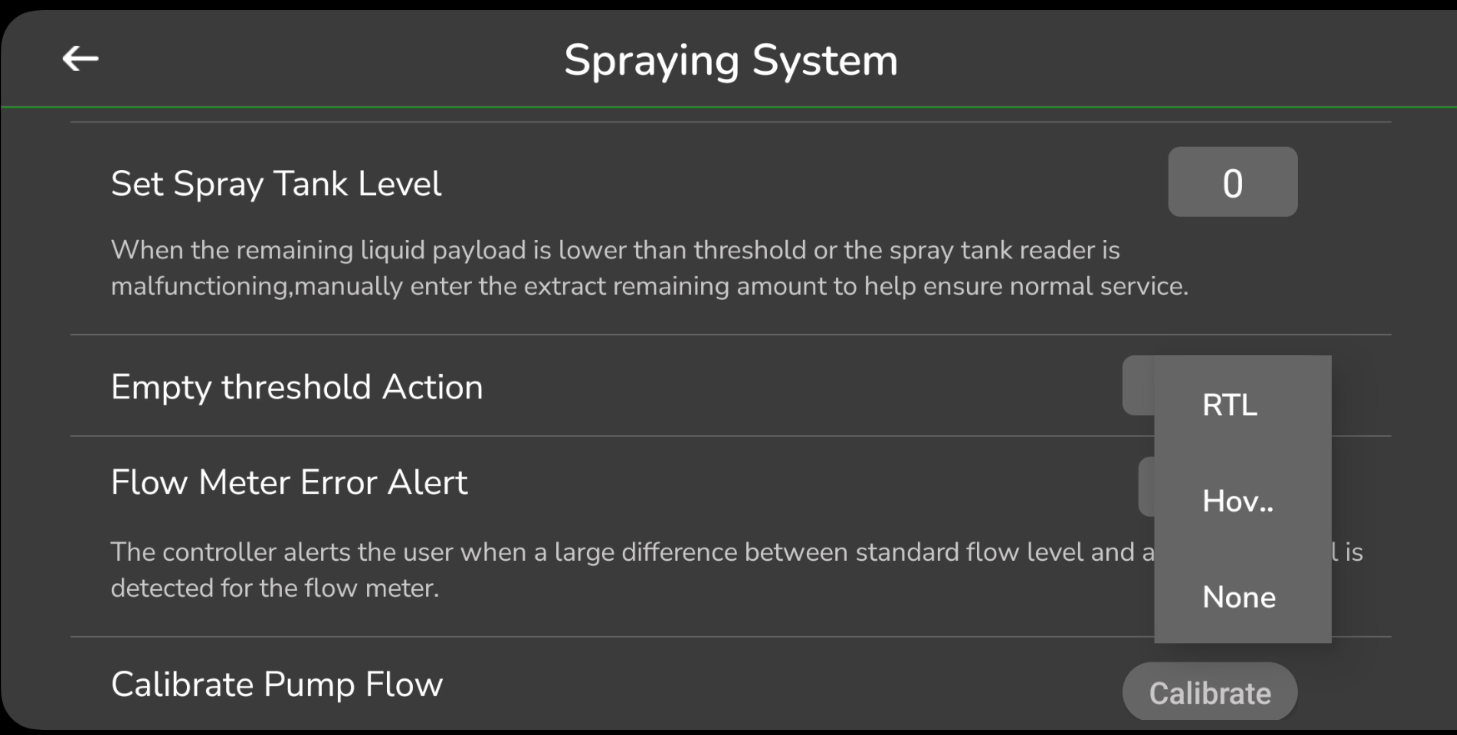
- RTL (Return to Launch): The drone returns to the launch point.
- Hover: The drone hovers in its current position.
- None: No action is performed.
8.2.6 Flow Meter Error Alert
This alert triggers when there is a noticeable difference between the expected and actual flow levels.
You can configure the alert sensitivity between 1% and 20%.
Open the screen and select the desired value from the dropdown:
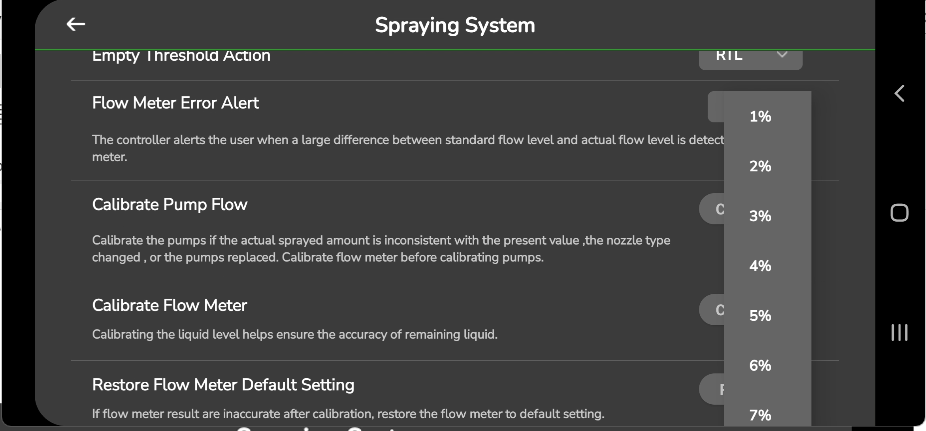
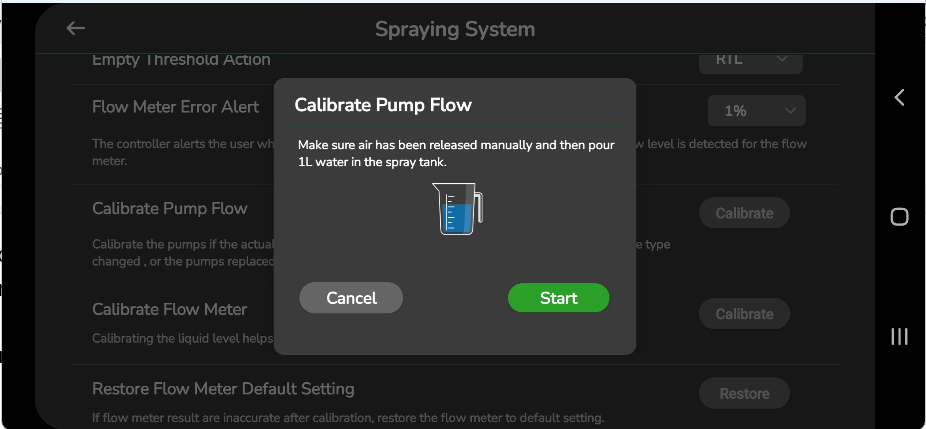
8.2.7 Calibrate Pump Flow
Perform pump calibration if you notice irregular spraying, change the nozzle model, or replace the pump.
Step 1: Start Pump Calibration
Tap Calibrate next to Calibrate Pump Flow. The following screen appears:
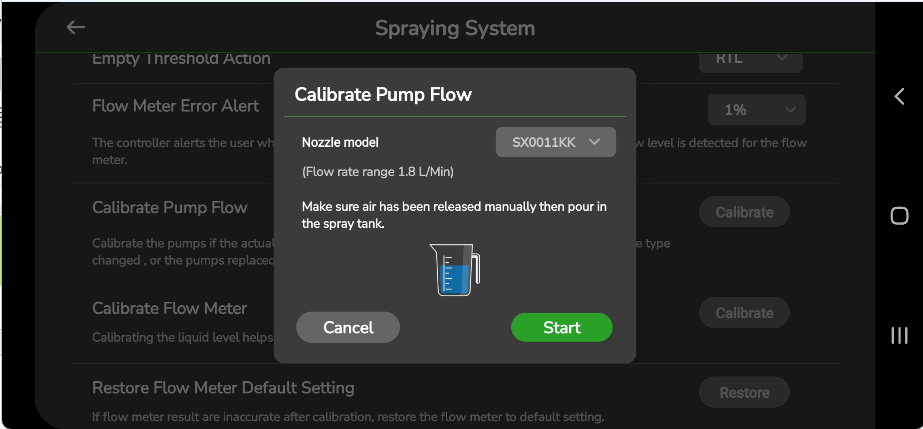
Follow these steps:
- Select the nozzle model.
- Ensure any remaining air is manually released from the tank and pipes.
- Add 1 litre of water to the spray tank.
- Tap Start to begin the calibration.
You will be prompted to add 1 litre of water:
Step 2: Enter Water Level
After adding the water, tap Start. The next screen appears:

Enter the measured water level and tap Start again.
Calibration will begin and the following screen will be shown:
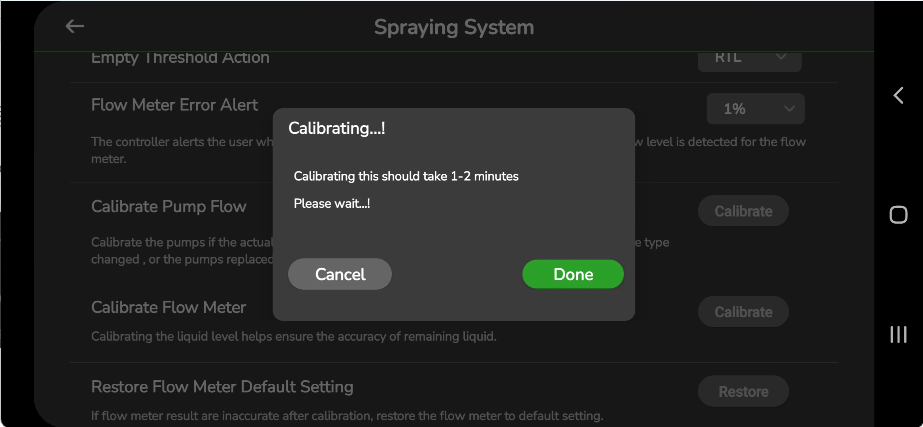
Wait until the calibration completes, then tap Done.
Step 3: Confirm Residue
A prompt will appear asking:
“Do you see any residue?”
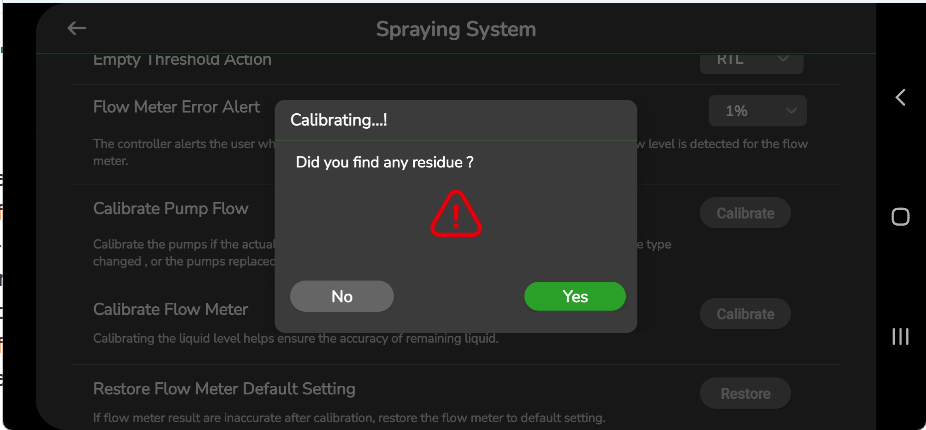
- Tap Yes if residue is present. You will be asked to repeat calibration.
- Tap No if the tank is clear.
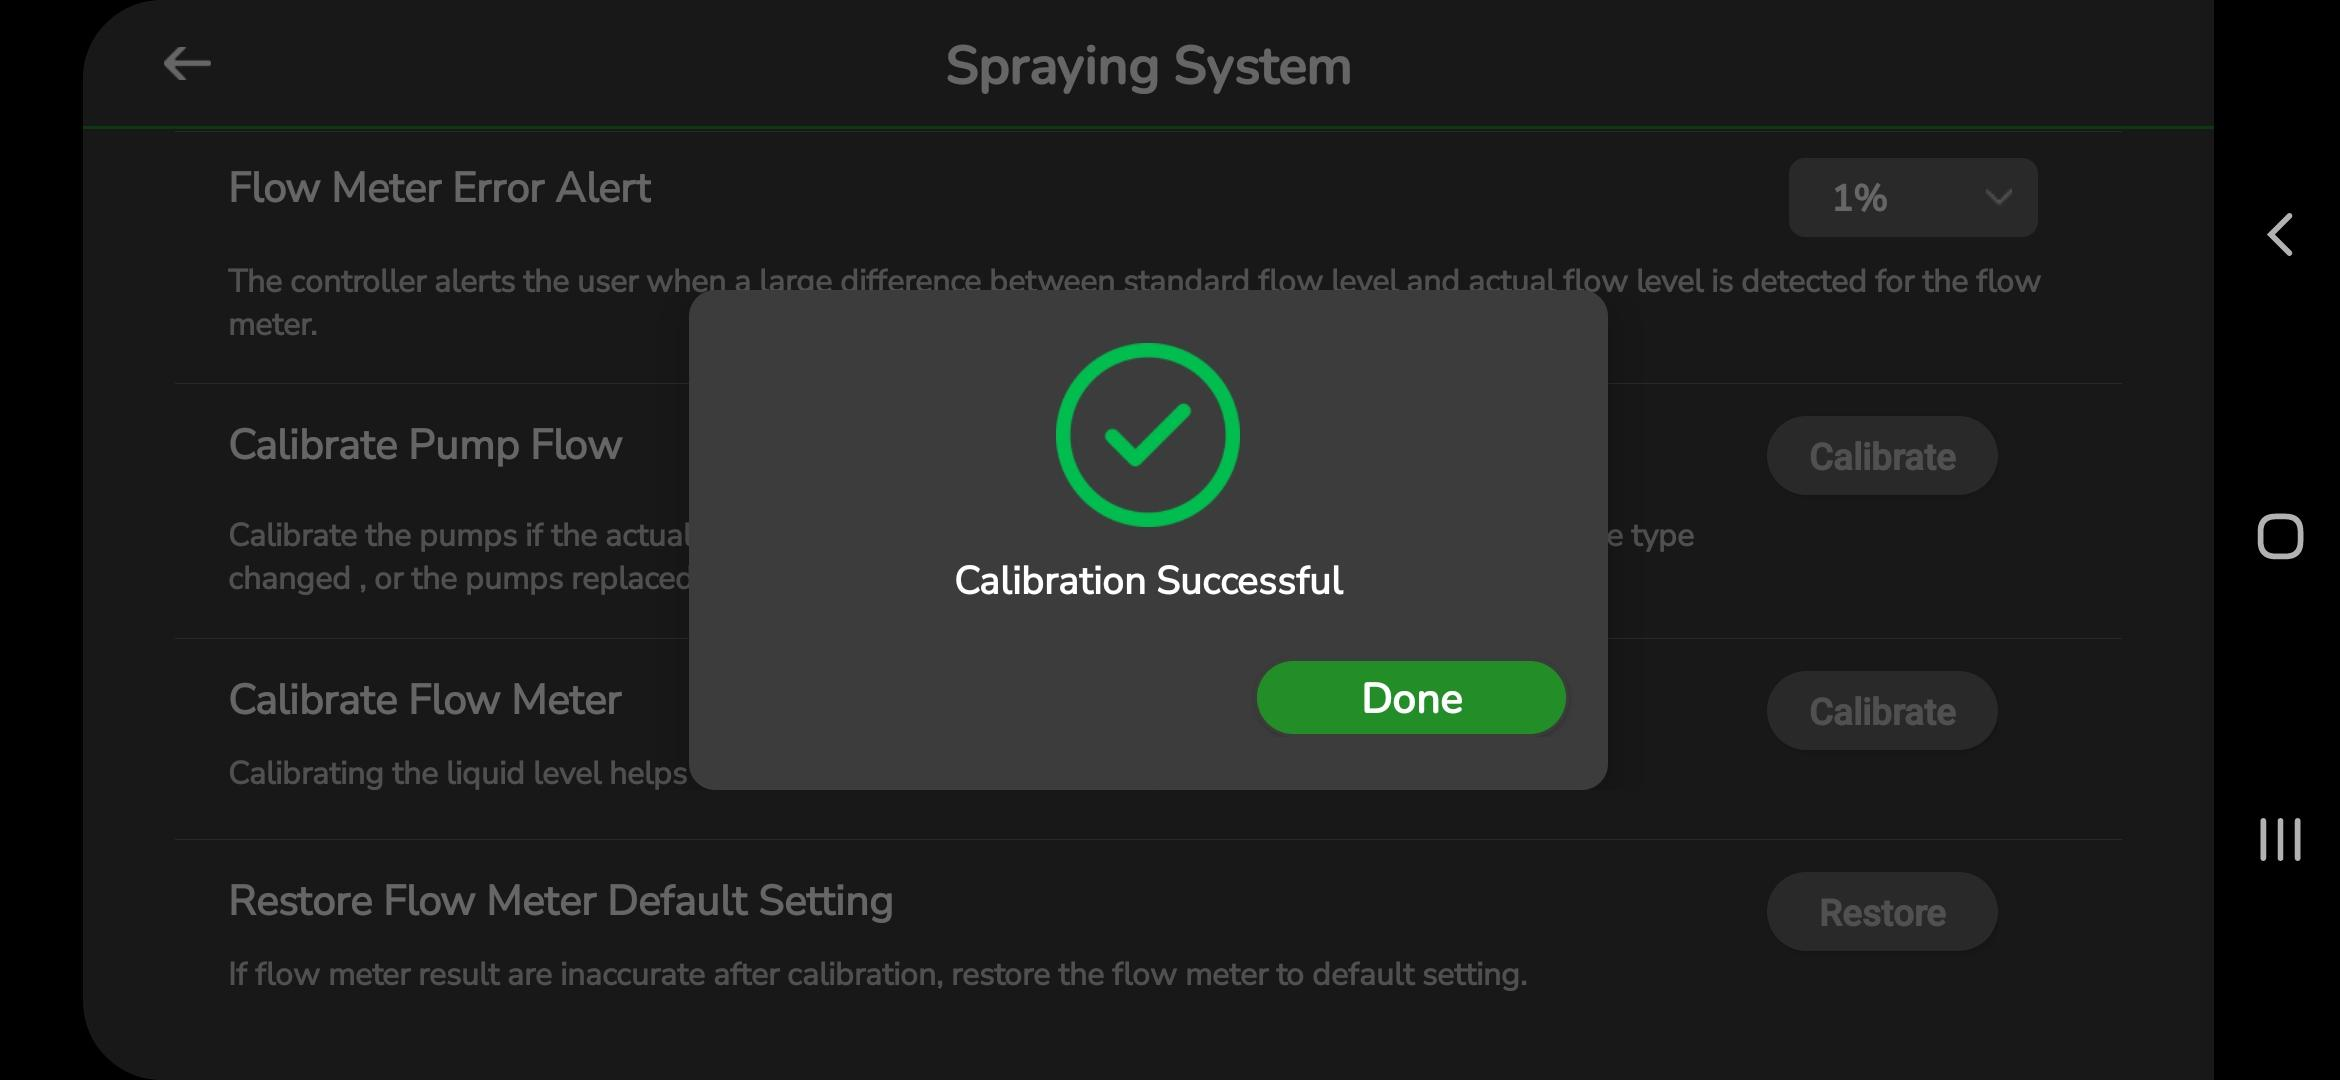
A message confirming successful calibration will be shown:
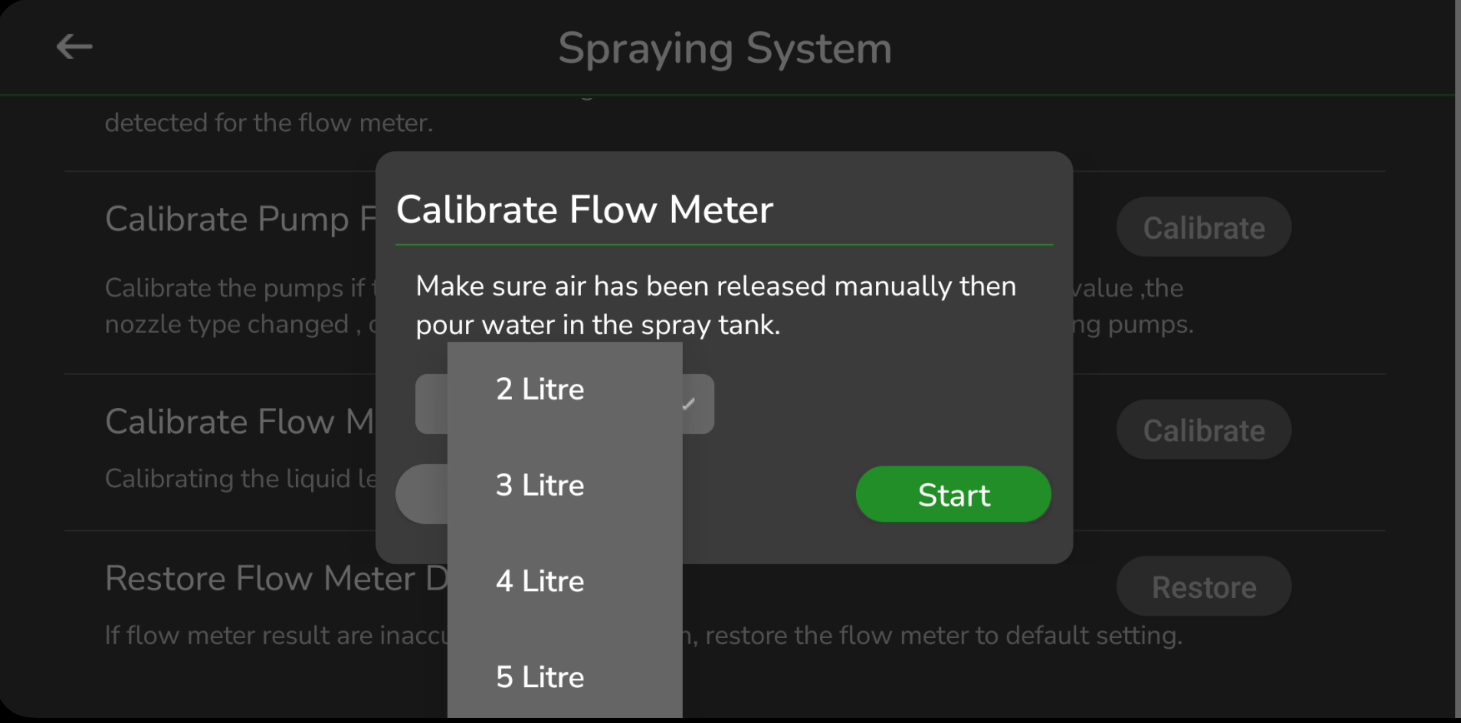
8.2.8 Calibrate Flow Meter
Flow meter calibration helps maintain accurate readings of the remaining liquid payload.
Tap Calibrate next to Calibrate Flow Meter. The following screen appears:

Follow these steps:
- Release air from the pipes and tank.
- Fill the tank with water.
- Select the tank capacity from the dropdown.
- Tap Start to begin calibration.
Follow the instructions displayed on the screen to complete the calibration process.
When the tank becomes empty, tap Stop to finish calibration.
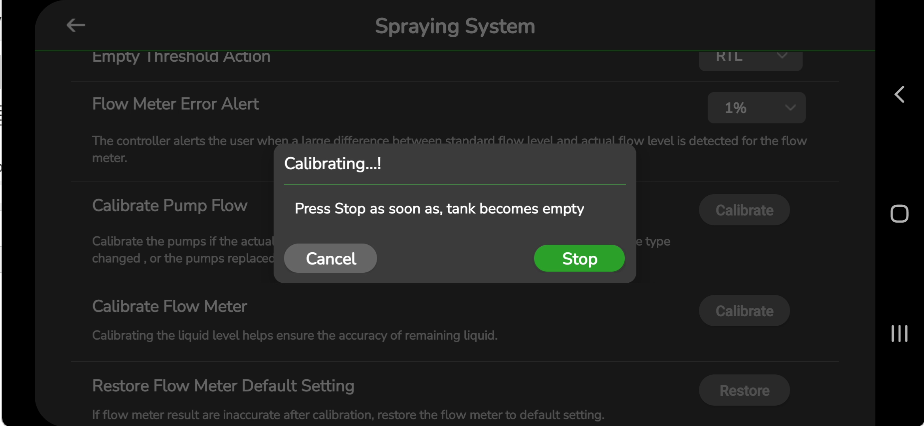
A message confirming successful calibration will be displayed.
8.2.9 Restore flow Meter to Factory Setting
If the flow meter continues to show incorrect values even after calibration, you can restore it to factory settings.
Tap Restore next to this option on the Spraying System screen. This resets all flow meter parameters to default.
8.3 Remote Controller
Remote Controller Settings allow you to calibrate and configure your RC for roll, pitch, yaw, and throttle functions.
To access these settings, open the Settings menu in AeroGCS GREEN and tap Remote Control.
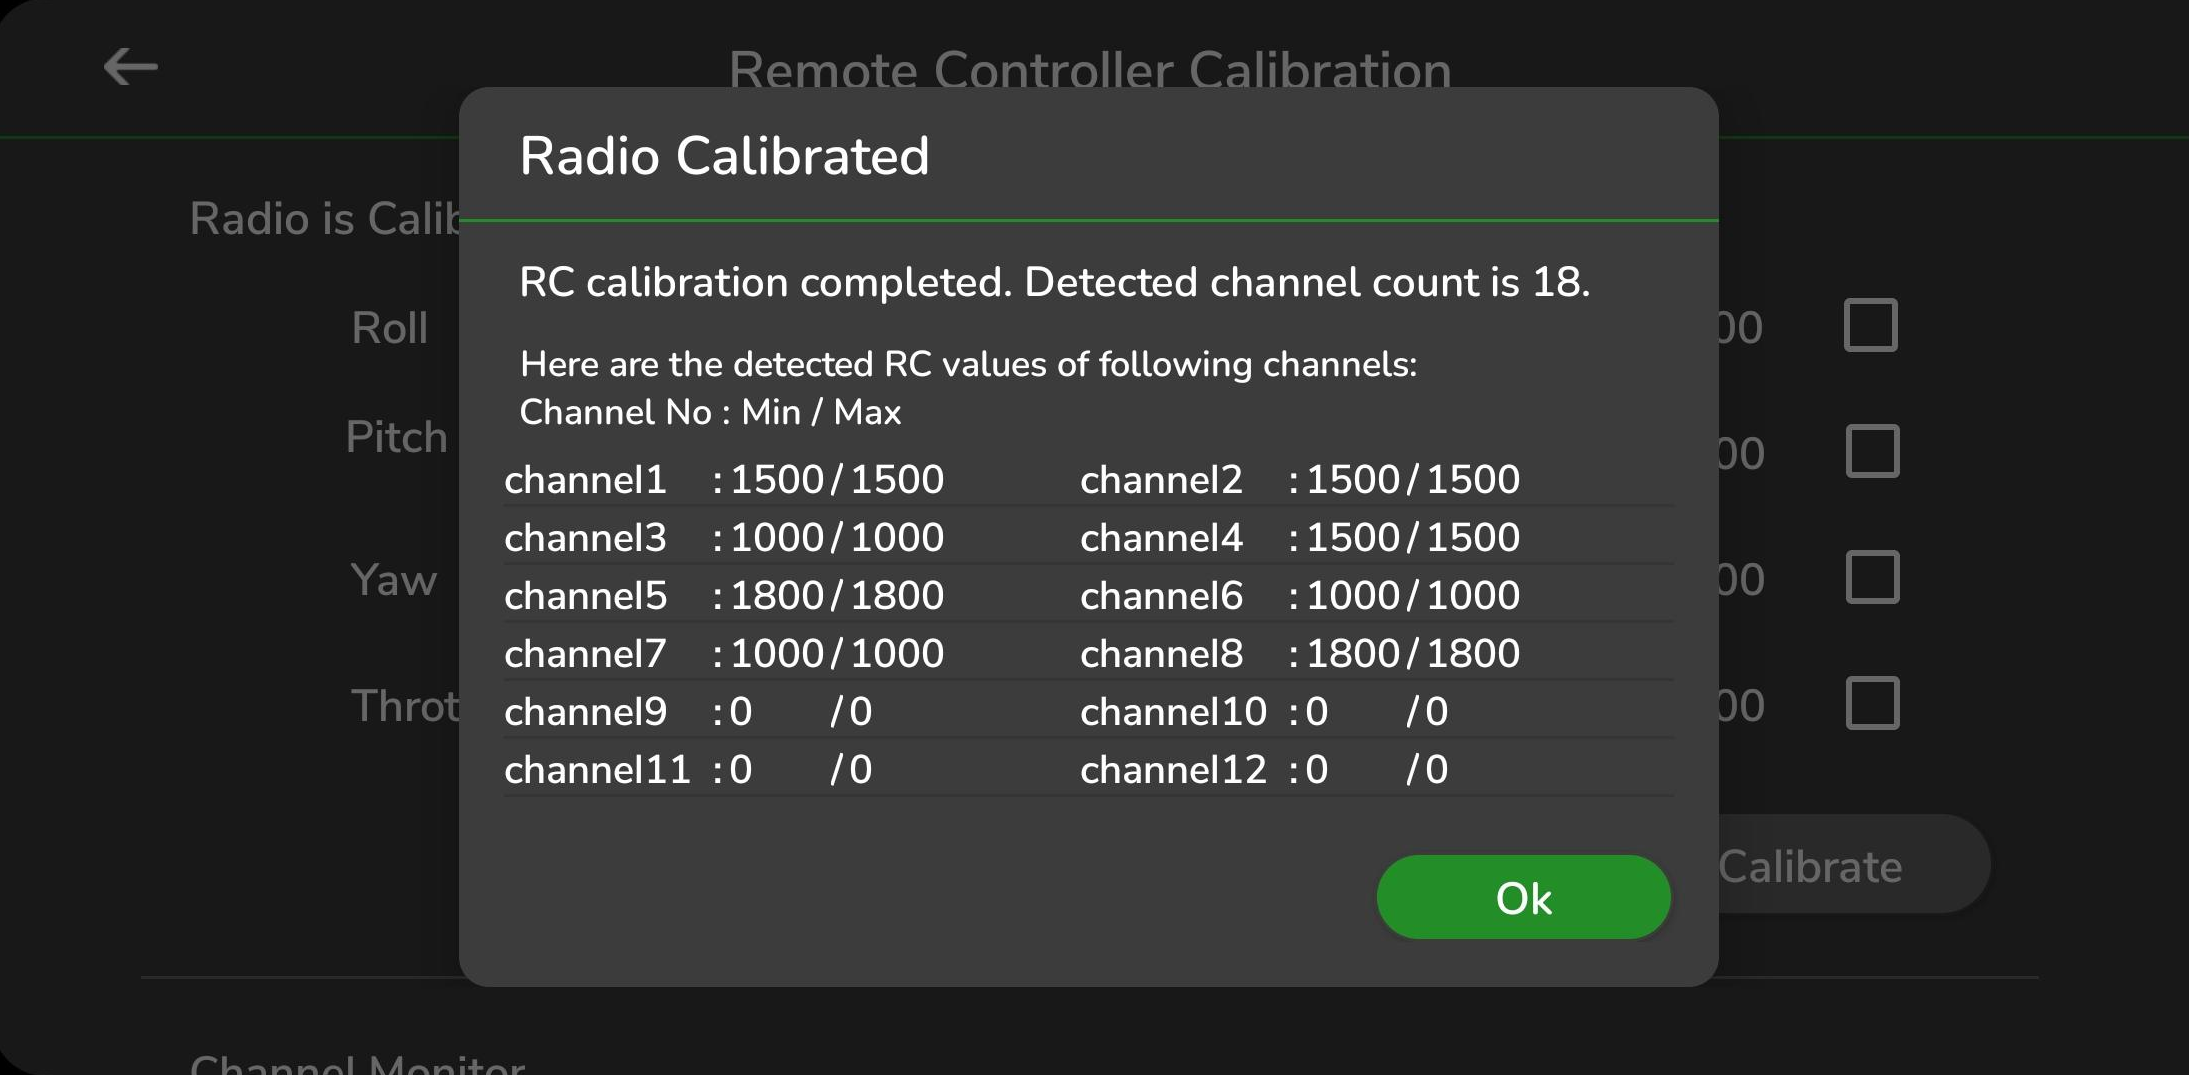
8.3.1. Radio calibration
The Remote Controller Settings screen will appear as shown below:
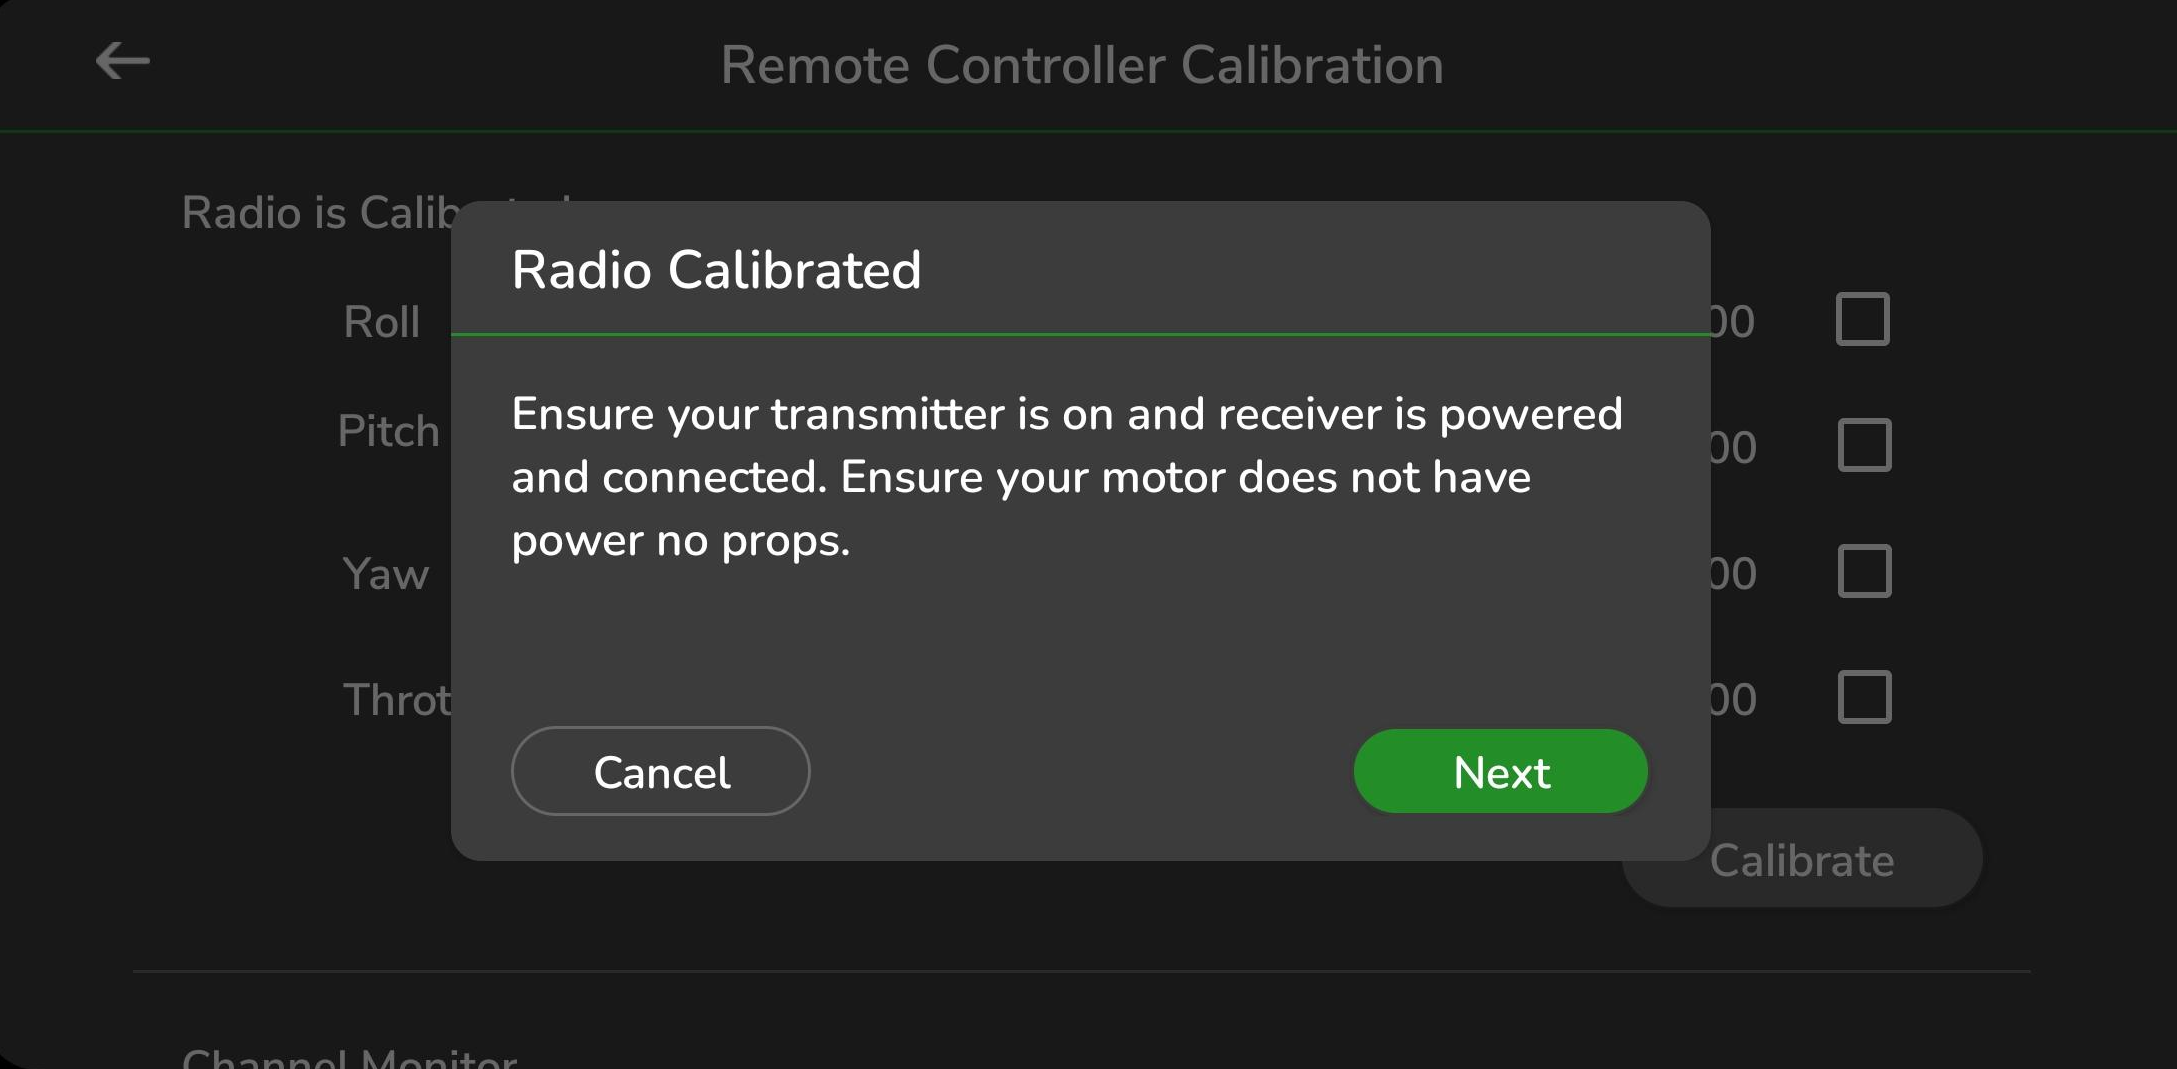
Before continuing:
- Ensure the transmitter is turned on.
- Ensure the receiver is powered and connected.
- Confirm the motor is not powered.
- Remove all propellers for safety.
Tap Next and follow the steps displayed on the screen.
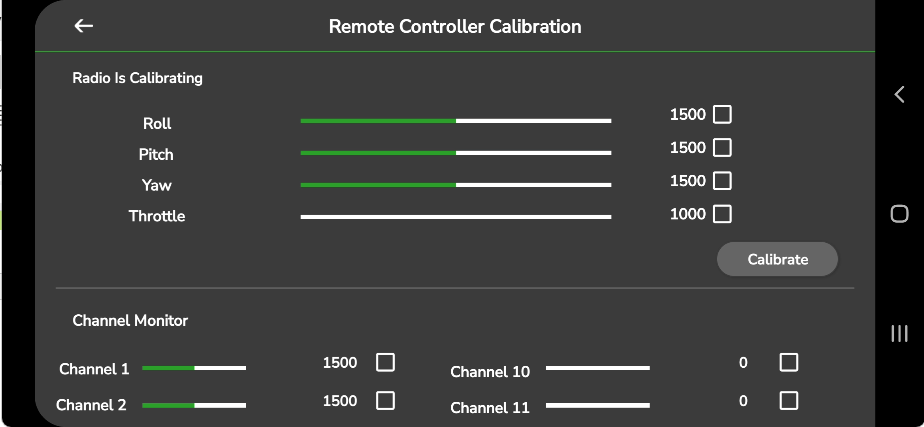
When calibration finishes, all channel values will be shown together, as illustrated below:
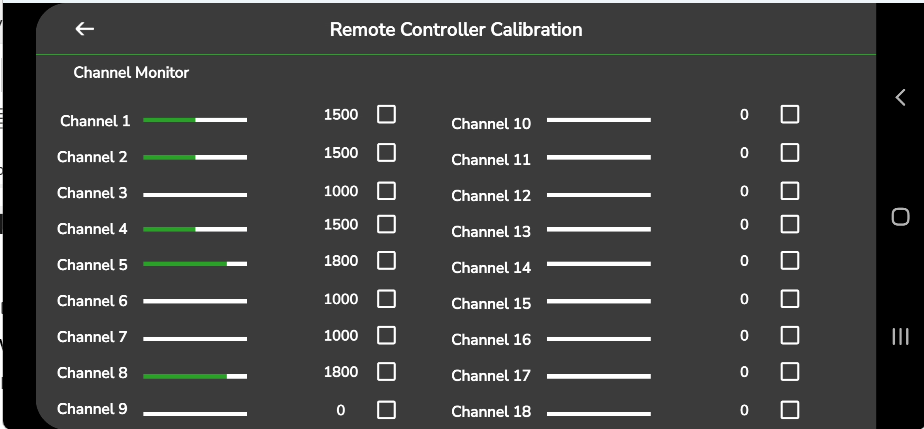
8.3.2. Channel Monitor
This screen shows live input values for the selected channel as you move the RC sticks.
The display updates in real-time and reflects the current signal coming from your remote controller.
8.3.3. Advance Settings
The Advanced Settings allow you to configure channel assignments and customize RC buttons.
You can:
- Assign channels for roll, pitch, yaw, and throttle using the dropdown lists.
- Customize the remote controller buttons by selecting an action from each dropdown.
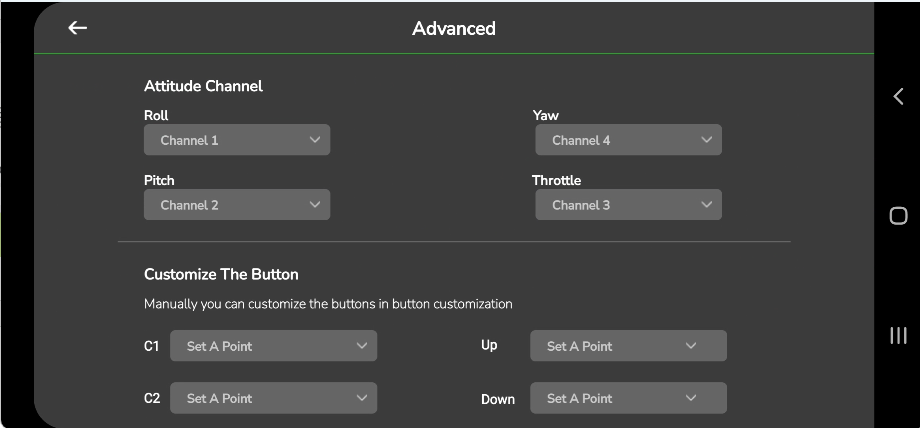
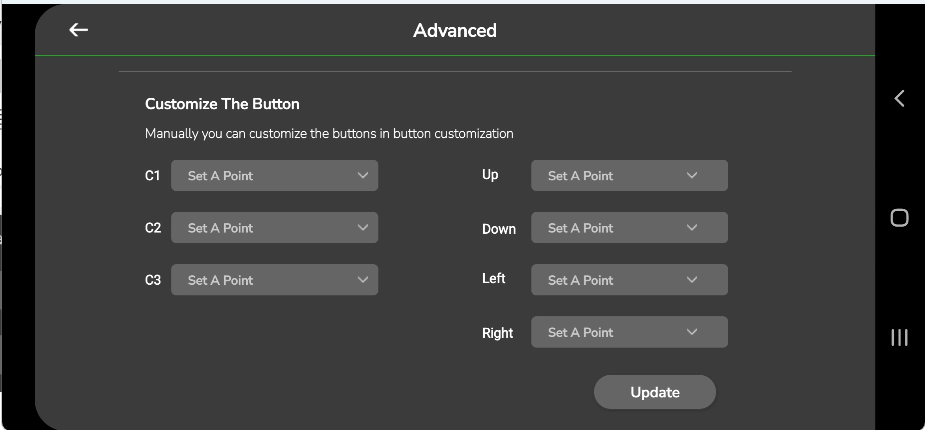
After selecting all required values, tap Update to send the configuration to your remote controller.
A confirmation message will appear once the values are successfully transmitted.
These options complete the Remote Controller configuration process.
8.4 Compass Calibration
Compass calibration ensures that your drone’s heading information is accurate during flight.
The compass, along with the gyroscope and accelerometer, helps the flight controller determine the drone’s orientation.
Calibration must be completed before flying the aircraft to avoid heading errors.
The updated Compass Calibration screen s shown below:
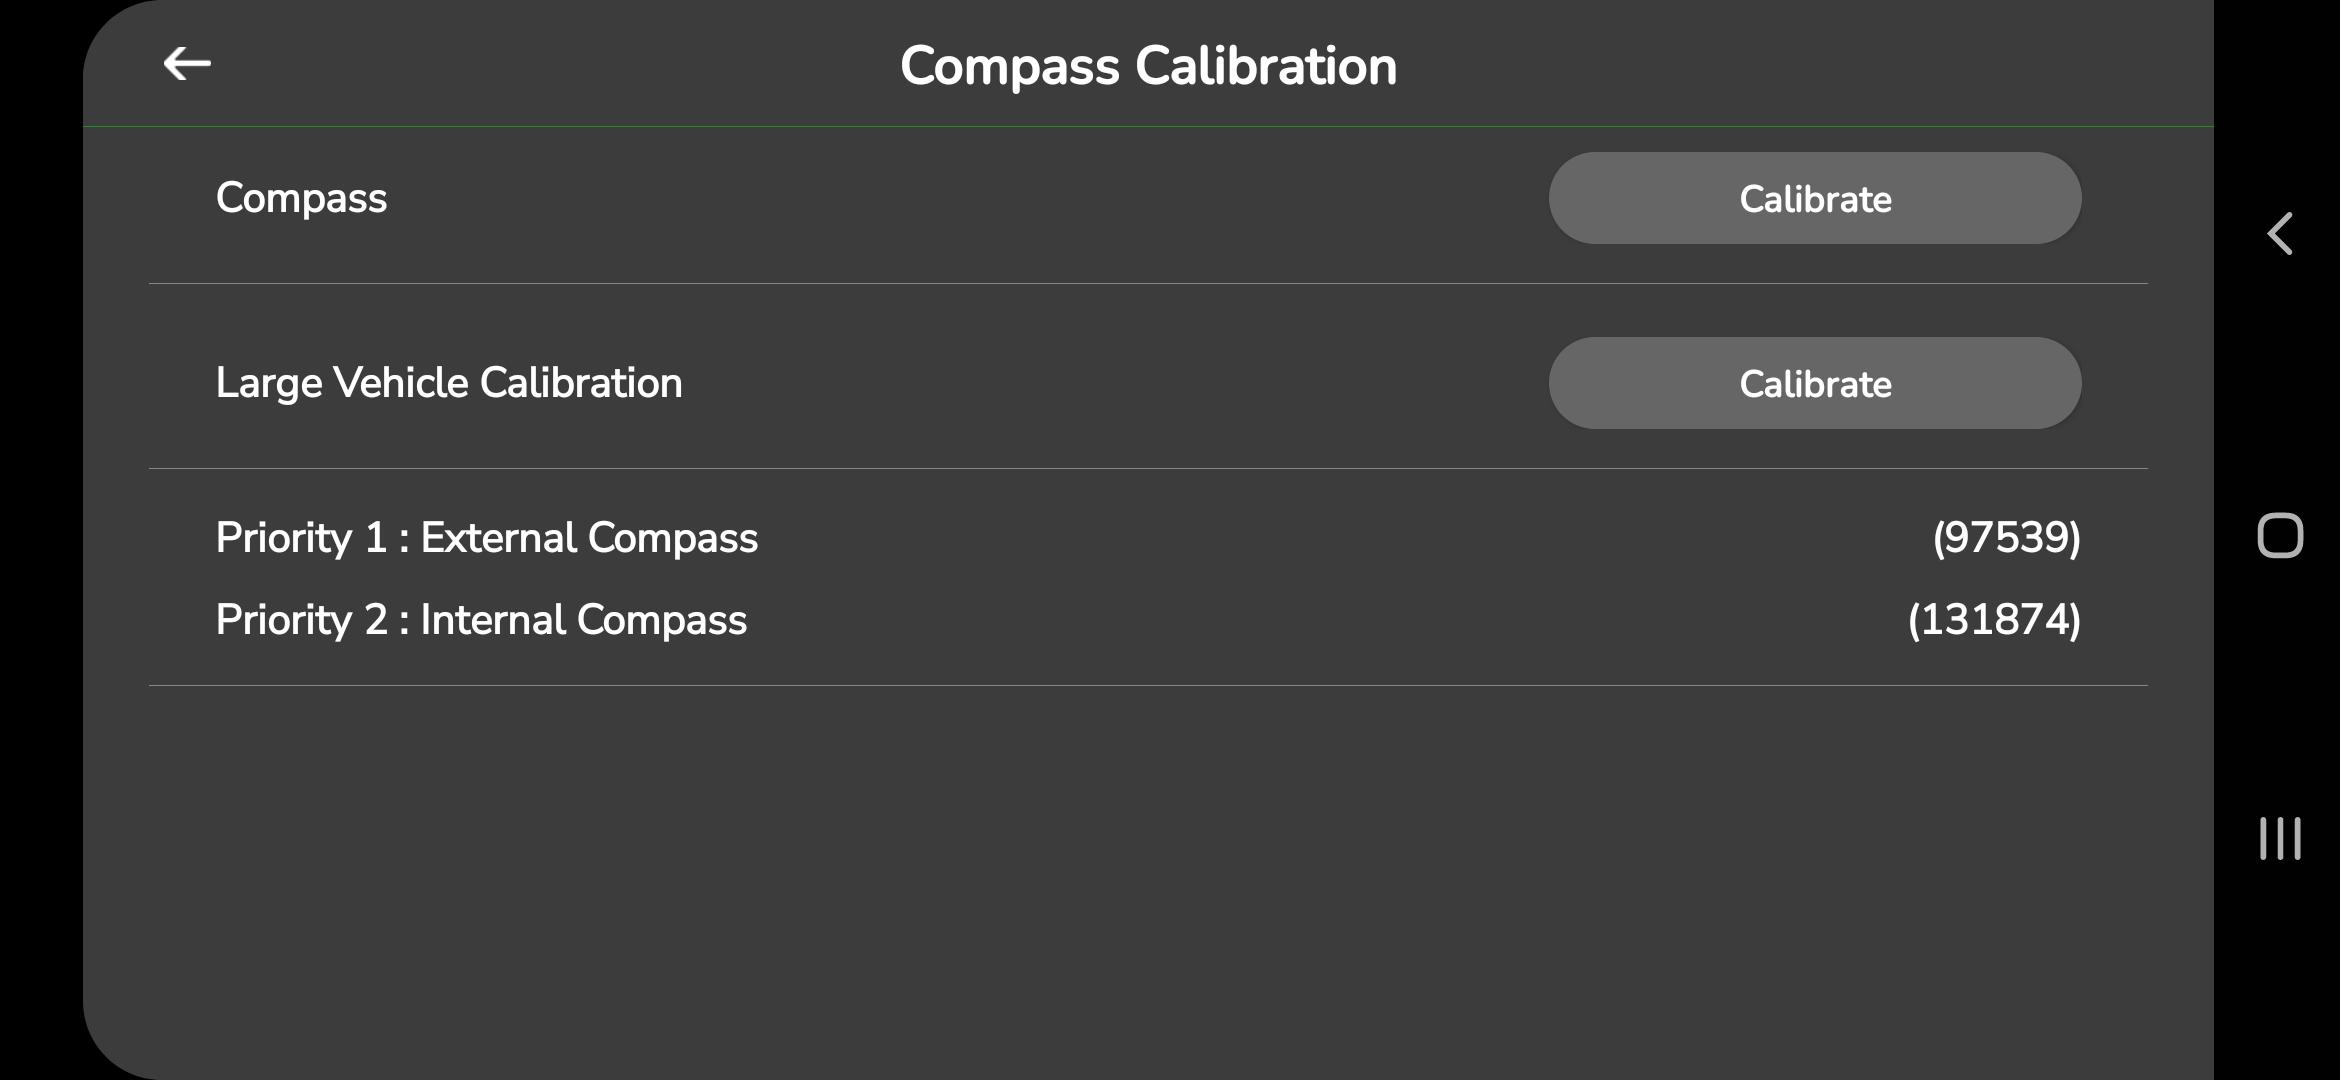
The screen includes:
- Compass – Calibrate main compass
- Large Vehicle Calibration – For platforms requiring magnetic declination input
- Priority 1: External Compass (ID/Value displayed)
- Priority 2: Internal Compass (ID/Value displayed)
Follow the steps below to calibrate the compass.
8.4.1. Compass
Follow the steps below to calibrate the compass.
Step 1: Open Compass Calibration
Open Settings → Compass Calibration to access the calibration screen.
Step 2: Start Compass Calibration
Tap Calibrate under the Compass section.
A pop-up dialog appears:
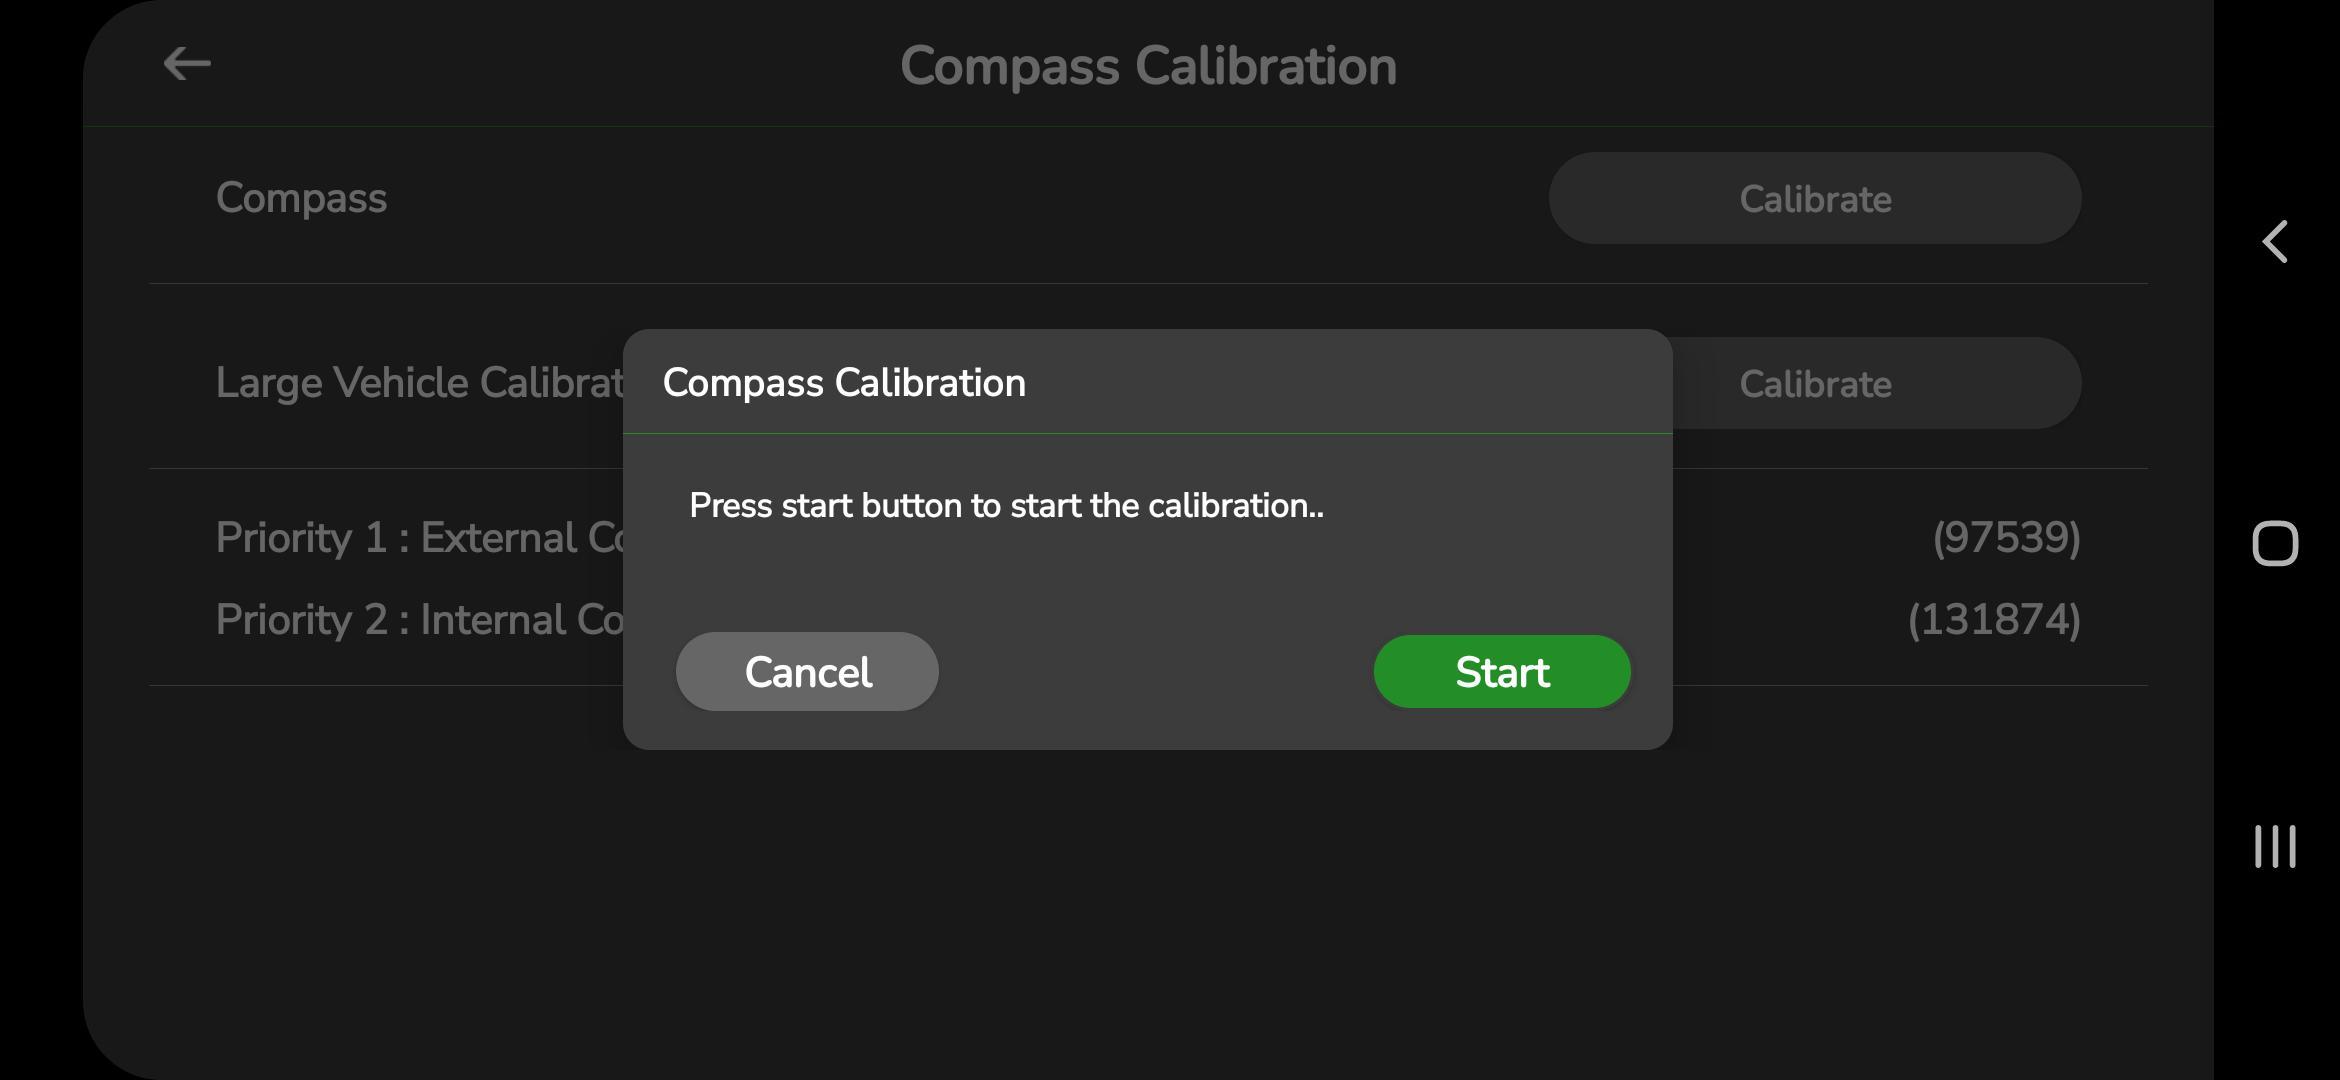
The message displayed:
“Press start button to start the calibration.”
Tap Start to continue, or Cancel to exit.
Step 3: Perform the Calibration
Once you tap Start, a new dialog appears showing instructions and the calibration progress:

The message displayed:
- Rotate the Aircraft randomly around all axes
- Compass calibration running
A percentage bar shows progress from 0% to 100%.
Rotate the drone slowly in all directions until the calibration completes.
Step 4: Completion
When the calibration reaches 100%, a completion message will appear.
After this, the drone will automatically reboot to apply the new compass values.
8.4.2 Large Vehicle Calibration:
Large platforms may require manual magnetic declination entry for accurate heading.
Step 1: Start Large Vehicle Calibration
Tap Calibrate under the Large Vehicle Calibration section.
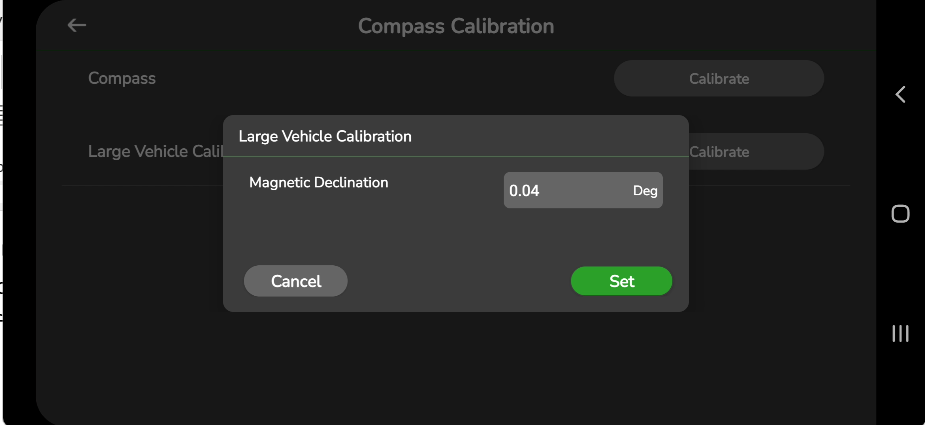
Step 2: Enter Magnetic Declination
Enter the appropriate magnetic declination value and tap Set.
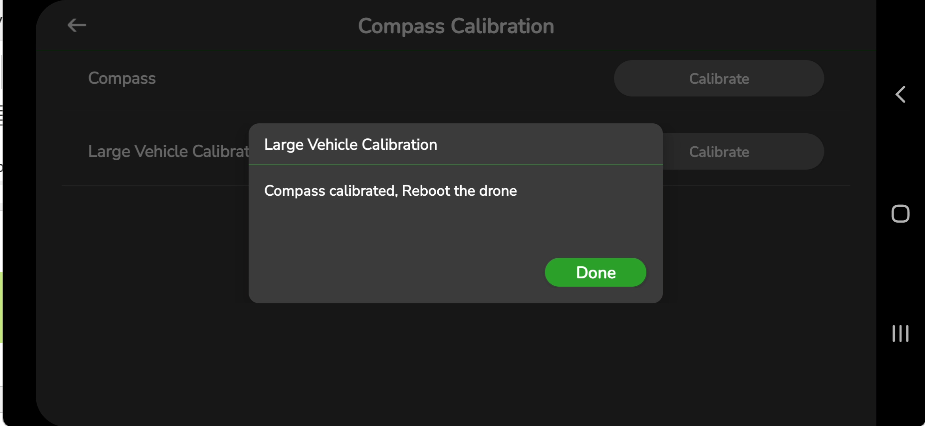
Step 3: Complete Calibration
A message appears indicating that calibration is complete and asking you to reboot the device.
8.5 IMU Calibration Settings
IMU (Inertial Measurement Unit) calibration includes the calibration of the Accelerometer, Barometer, and Level Horizon sensors.
These sensors help the drone maintain accurate attitude, orientation, and altitude during flight.
Before flying, it is recommended to calibrate the IMU to ensure correct sensor readings.
To open the IMU Calibration screen, go to Settings → IMU Calibration.
The following screen will appear:
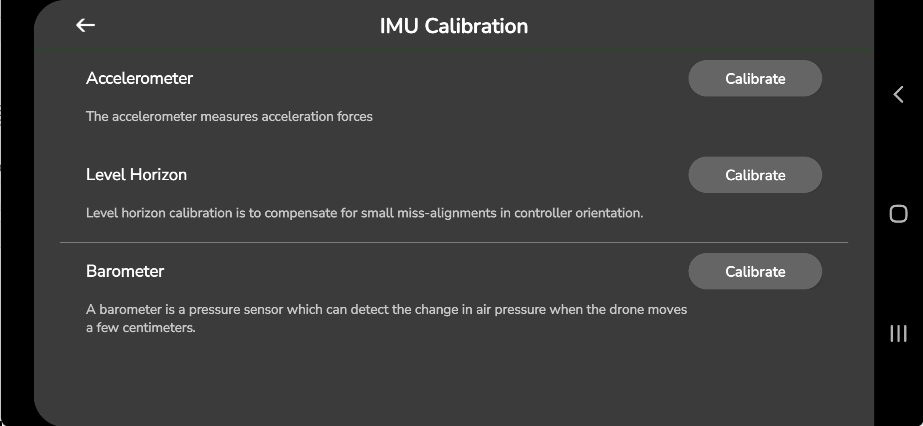
Below are the steps to calibrate each sensor.
8.5.1 Accelerometer Calibration
Accelerometer calibration removes errors due to scaling, bias, or orientation.
To calibrate the accelerometer:
- Tap Calibrate next to Accelerometer.
The following screen will appear:
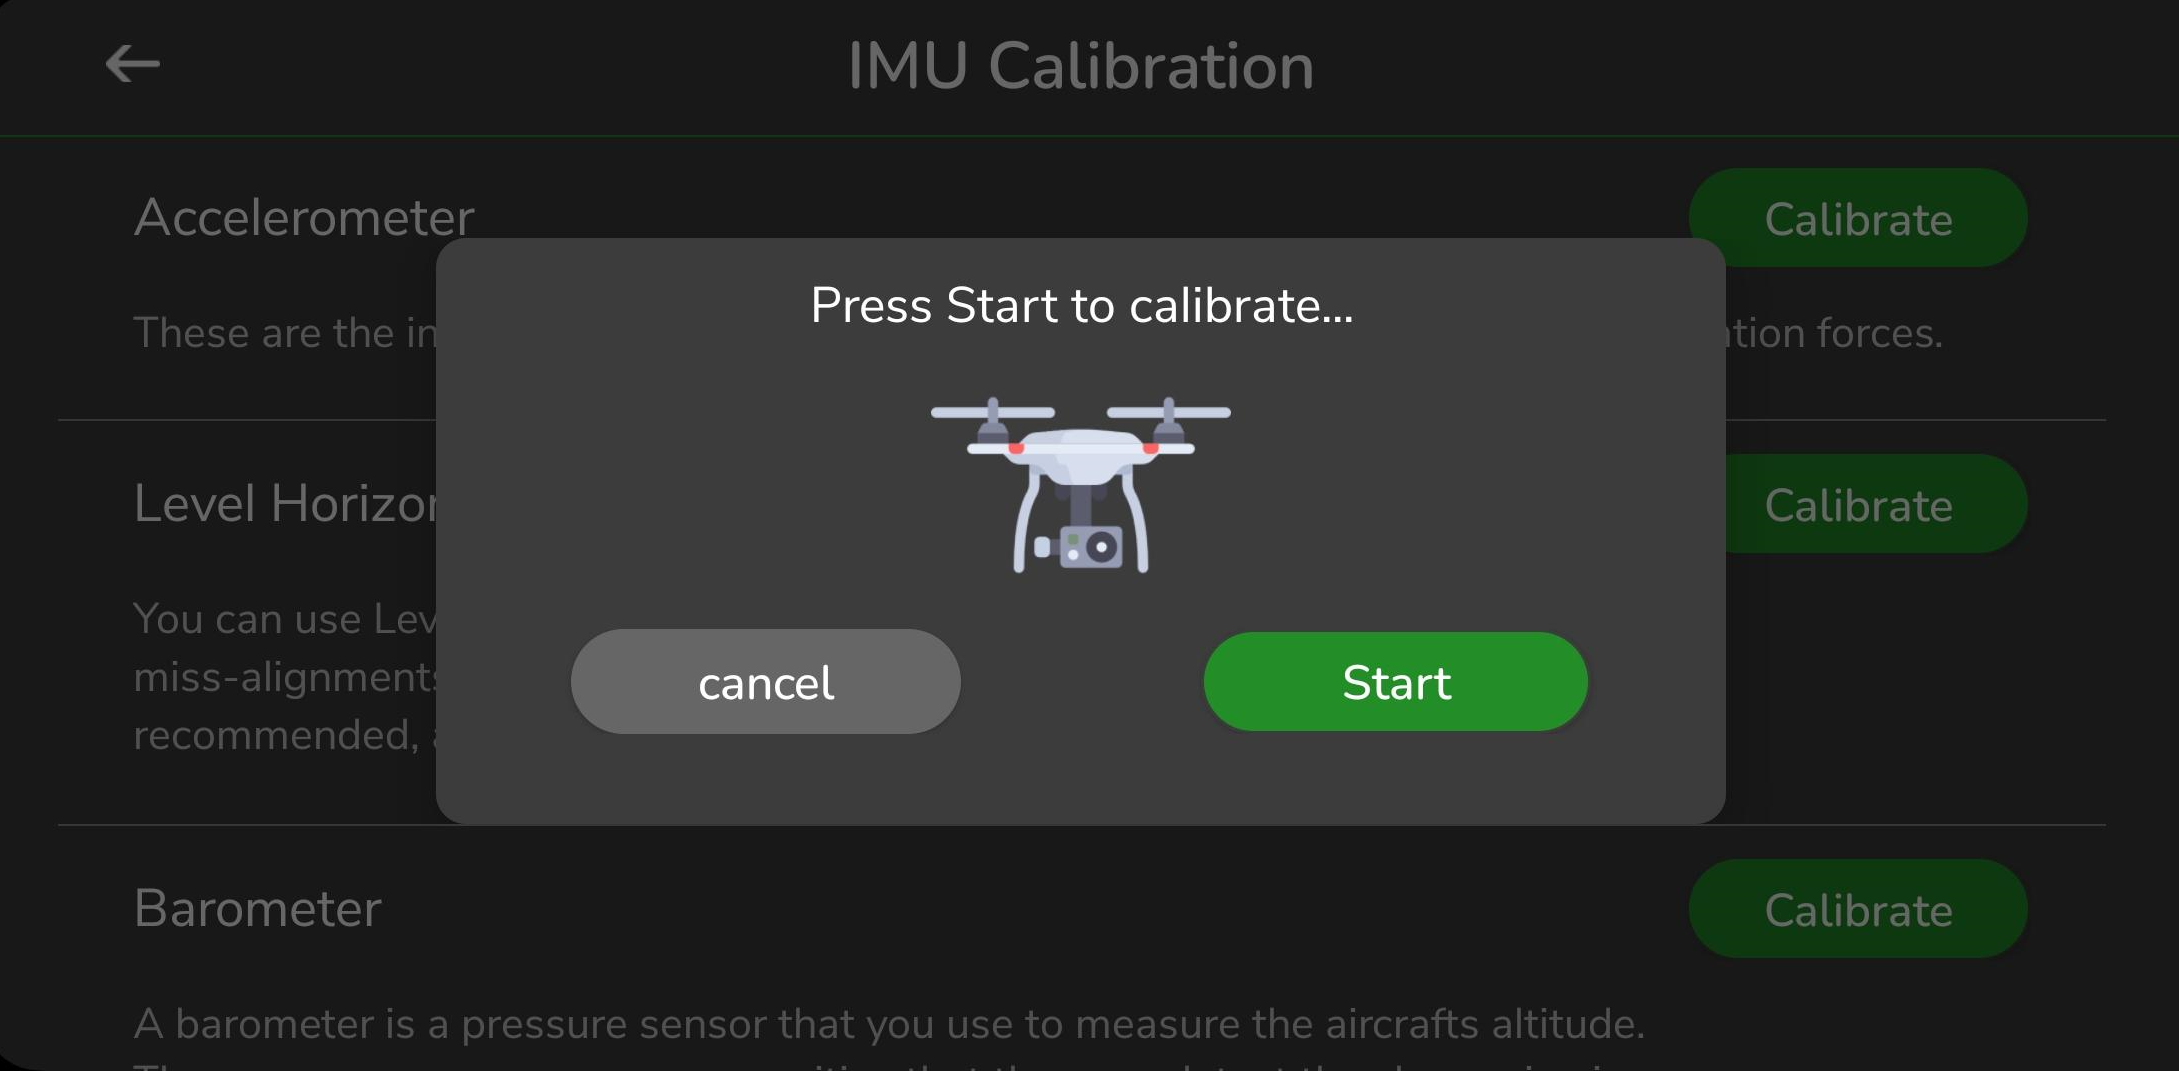
- Tap Start to begin calibration.
- Follow the on-screen instructions.
- A completion message will appear once calibration is finished.
This process ensures accurate acceleration measurements before flight.
8.5.2 Level Horizon Sensor Calibration:
The Level Horizon calibration aligns the flight controller to ensure the drone maintains a stable and level attitude.
To calibrate:
- Tap Calibrate next to Level Horizon.
The following screen will be displayed:

2. Follow the on-screen steps.
3. When calibration is complete, tap Done.
Regular Level Horizon calibration helps maintain smooth and stable flight performance.
8.5.3 Barometer Calibration:
The barometer measures atmospheric pressure to estimate altitude.
Calibrating the barometer before flight helps maintain accurate altitude readings.
To calibrate:
- Tap Calibrate next to Barometer.
The following screen will appear:
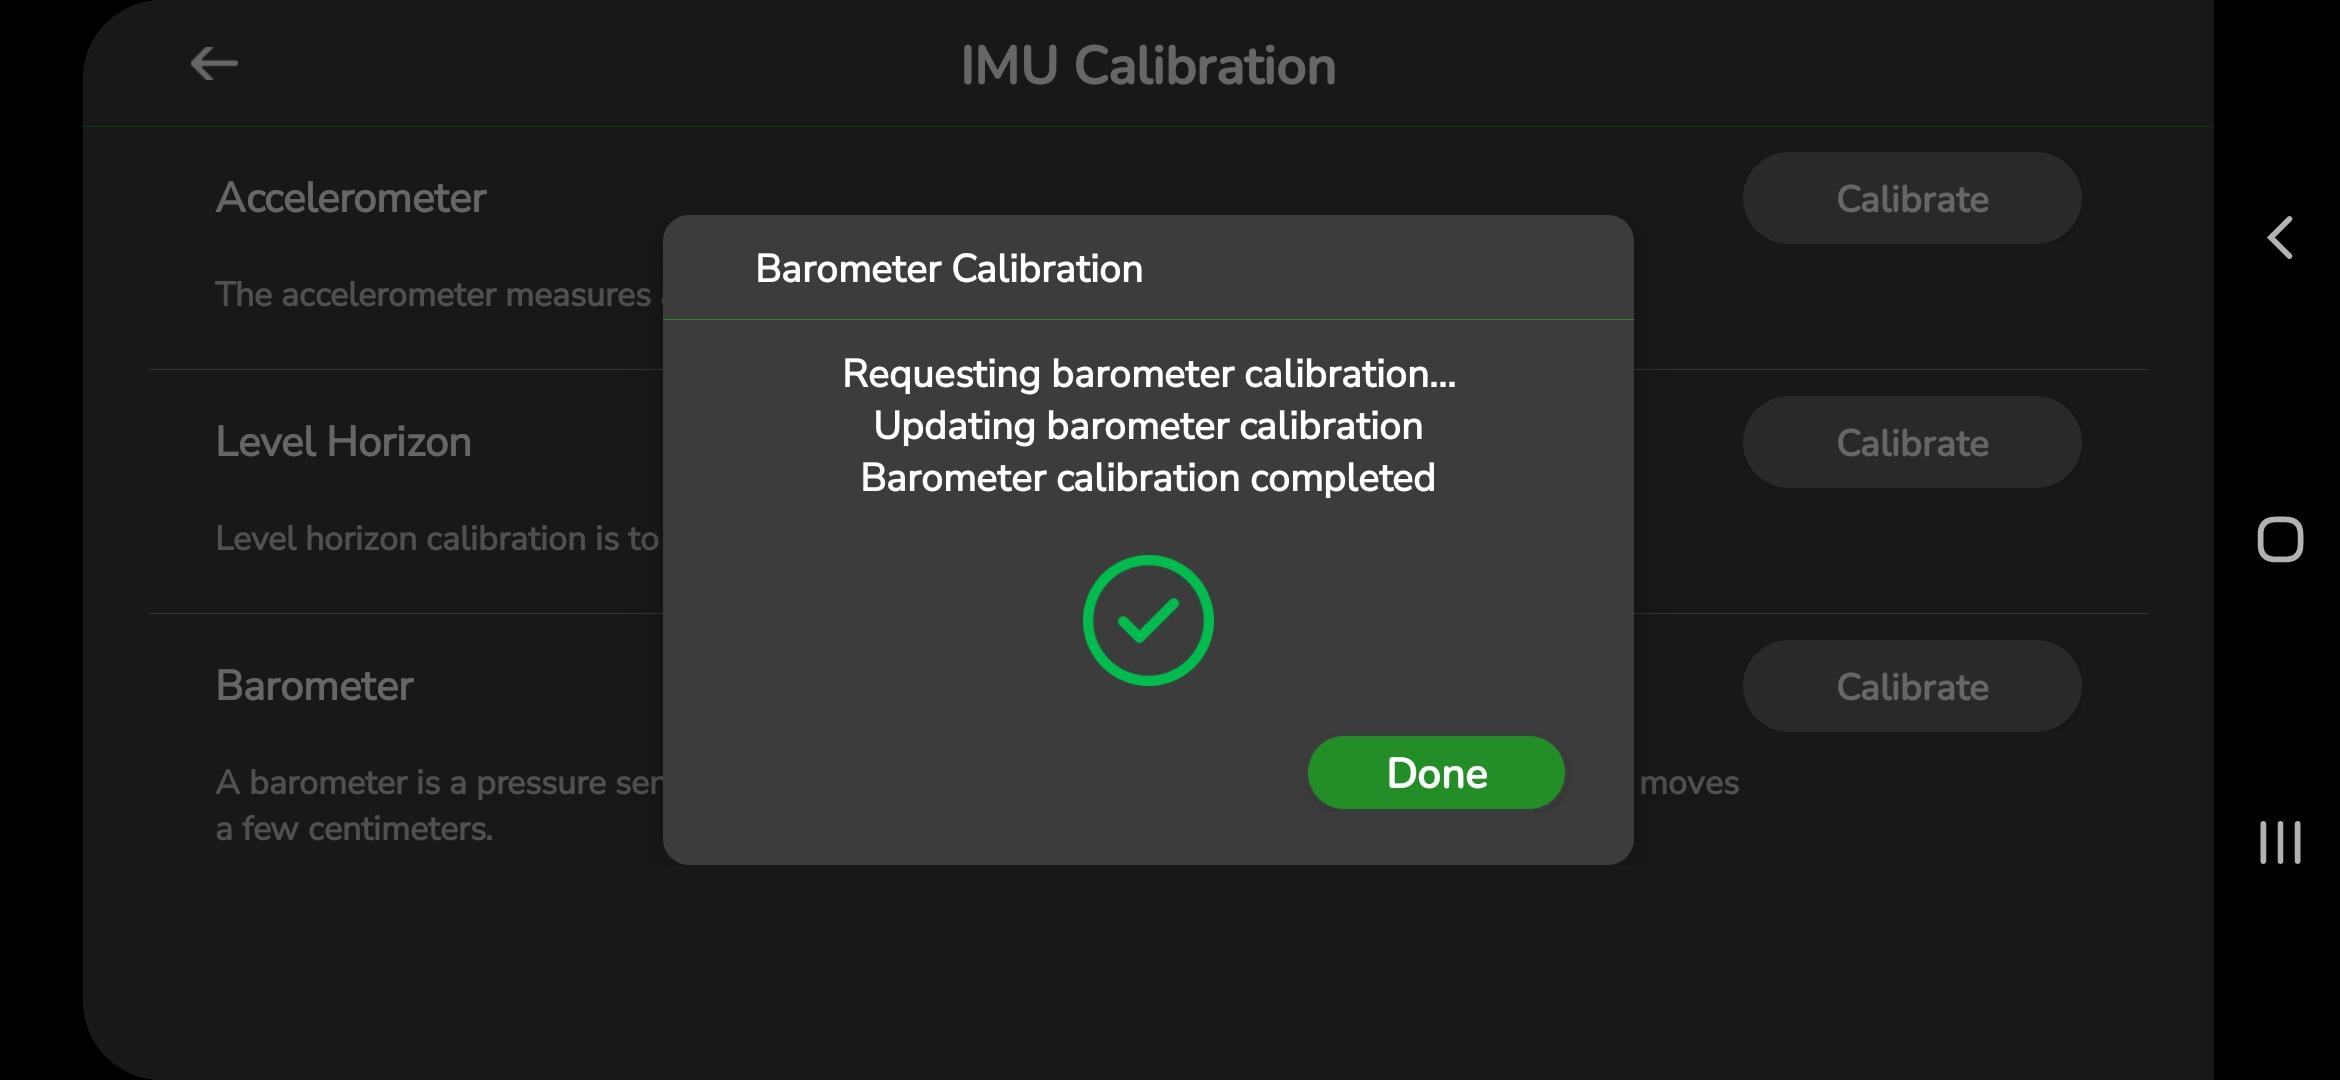
After completing the barometer calibration steps, tap Done.
This ensures correct altitude measurement during flight operations.
8.6 Camera Settings
The Camera Settings section allows you to configure video recording and real-time video parameters used by AeroGCS GREEN. These settings primarily cover RTSP configuration, video recording preferences, and supported streaming devices.
To access the Camera Settings:
- Open the Settings
- Tap Camera Settings.
The following screen will appear:

8.6.1. Video Recording
You can enable or disable video recording on your device using the toggle button on the Camera Settings screen.
- When enabled, the video is stored locally on your device.
- This option is helpful when internet connectivity is slow or unavailable.
- Recorded files can be transferred or synced later when a stable connection is available.
8.6.2. Video Streaming Device
Select the streaming device from the dropdown list shown on the Camera Settings screen.
If you select Mk15, the following screen appears:
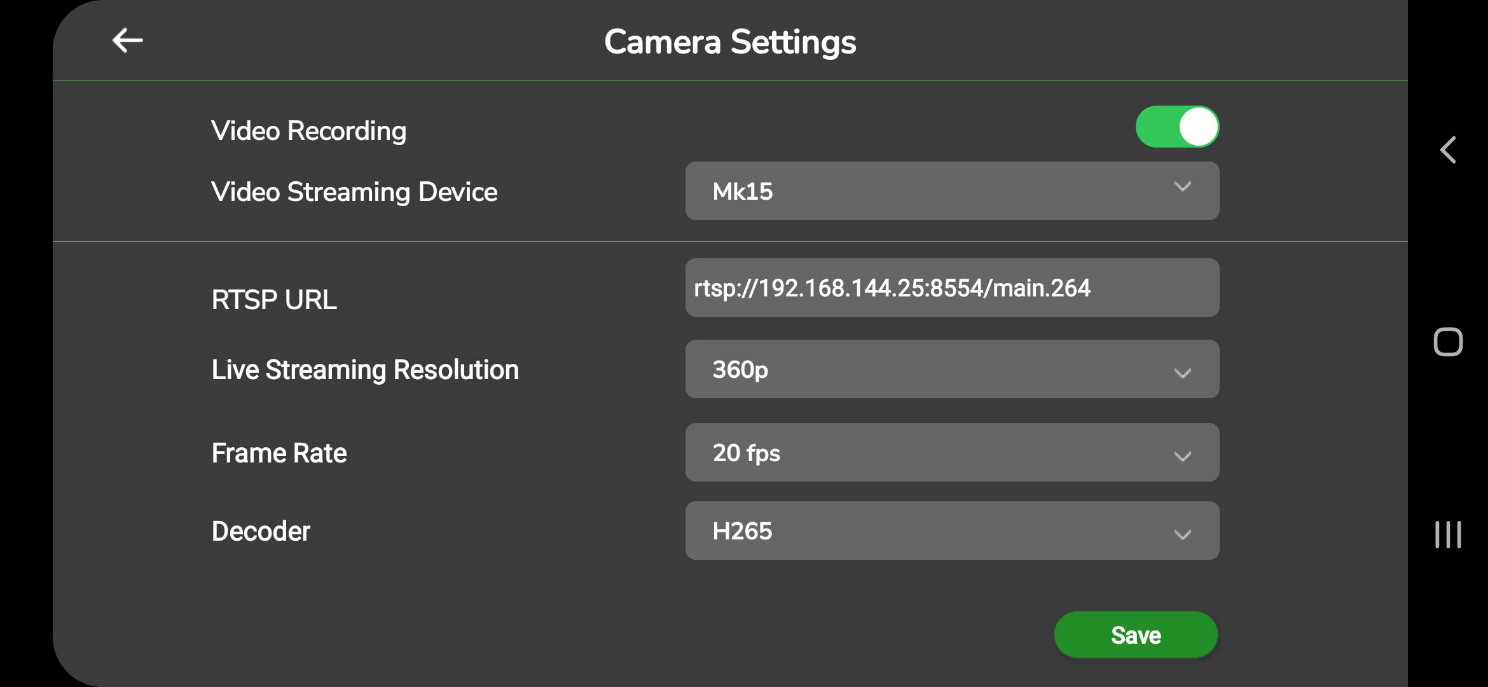
Configure the following parameters according to your requirements:
- RTSP URL
- Live Streaming Resolution
- Frame Rate
- Decoder
After entering the required details, tap Save to store your configuration.
8.7 General Settings
To access the General Settings, open the Settings menu and tap General Settings.
The following screen will appear:
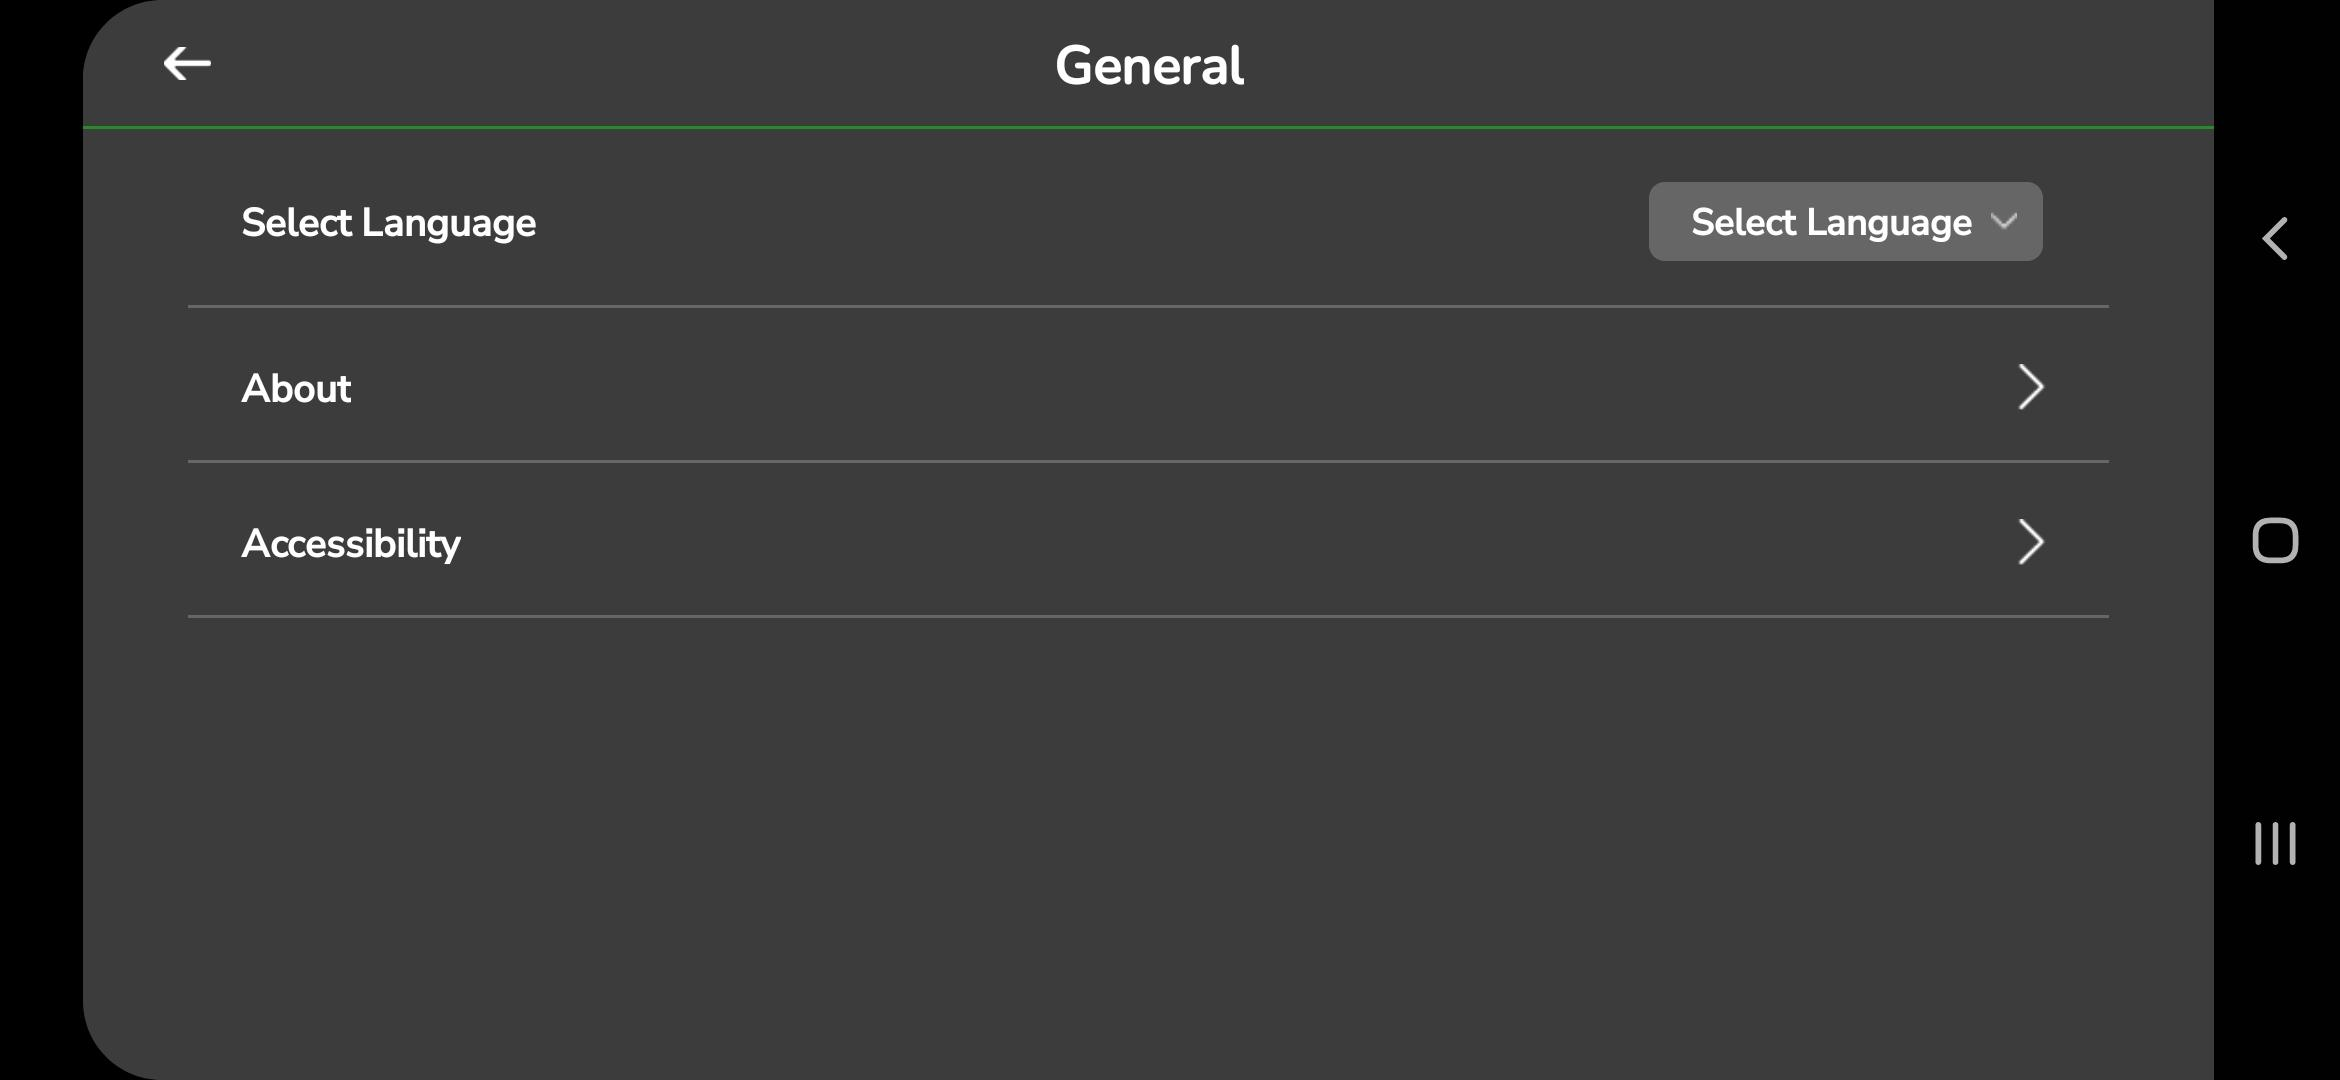
These settings allow you to select a language for the application and view system information through About and Accessibility options.
You can also enable or disable voice alerts for important notifications such as Tank Empty, Battery Failsafe, Obstacle Detected, and Maximum Speed Reached.
These voice alerts remain active during flight until the drone is disarmed.
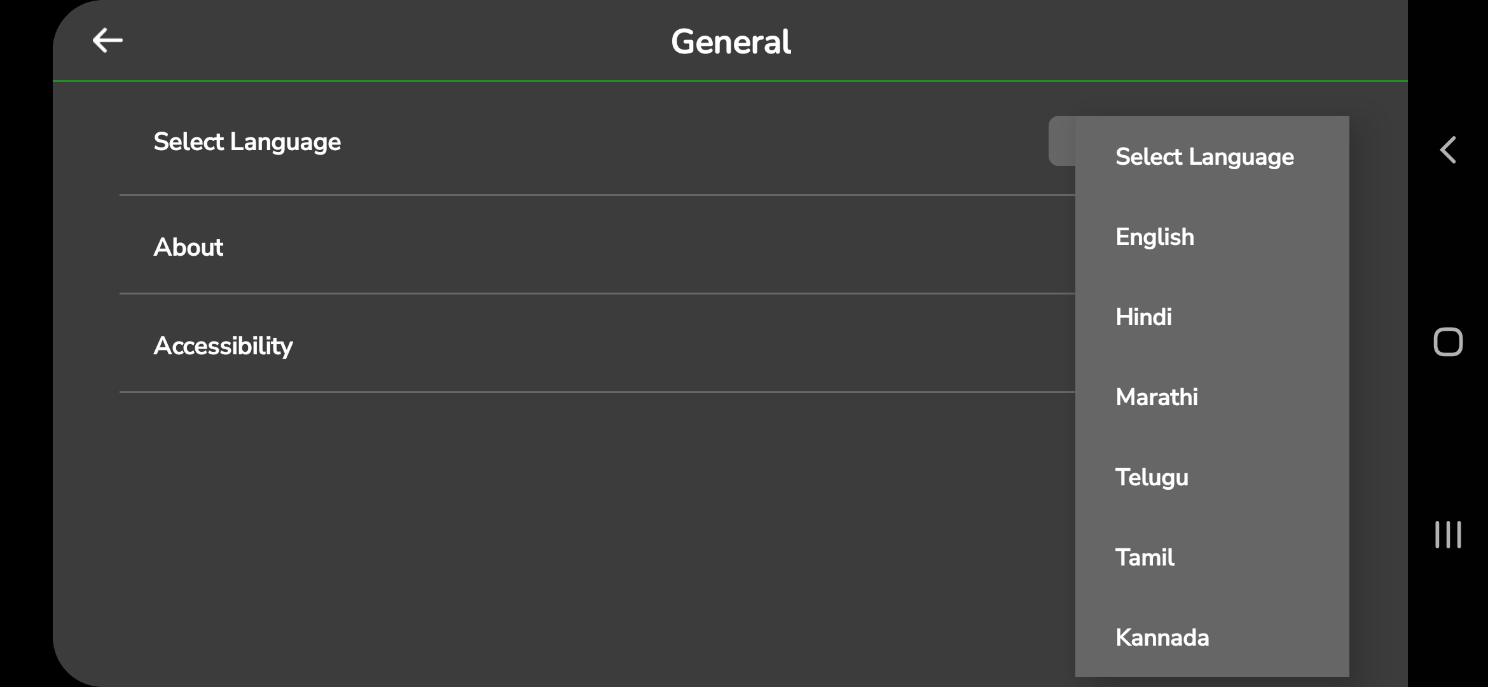
1. Select Language
2. About Application
The About section provides detailed system and identification information for AeroGCS GREEN.
You can use this screen to verify the app version, build number, firmware version, and key identifiers such as License Key, Drone ID, and UIN.
This information is required for:
- OEM registration
- Support requests
- Certification processes
Accessing the About Screen
- From the General Settings menu, tap About.
- The following screen will appear:
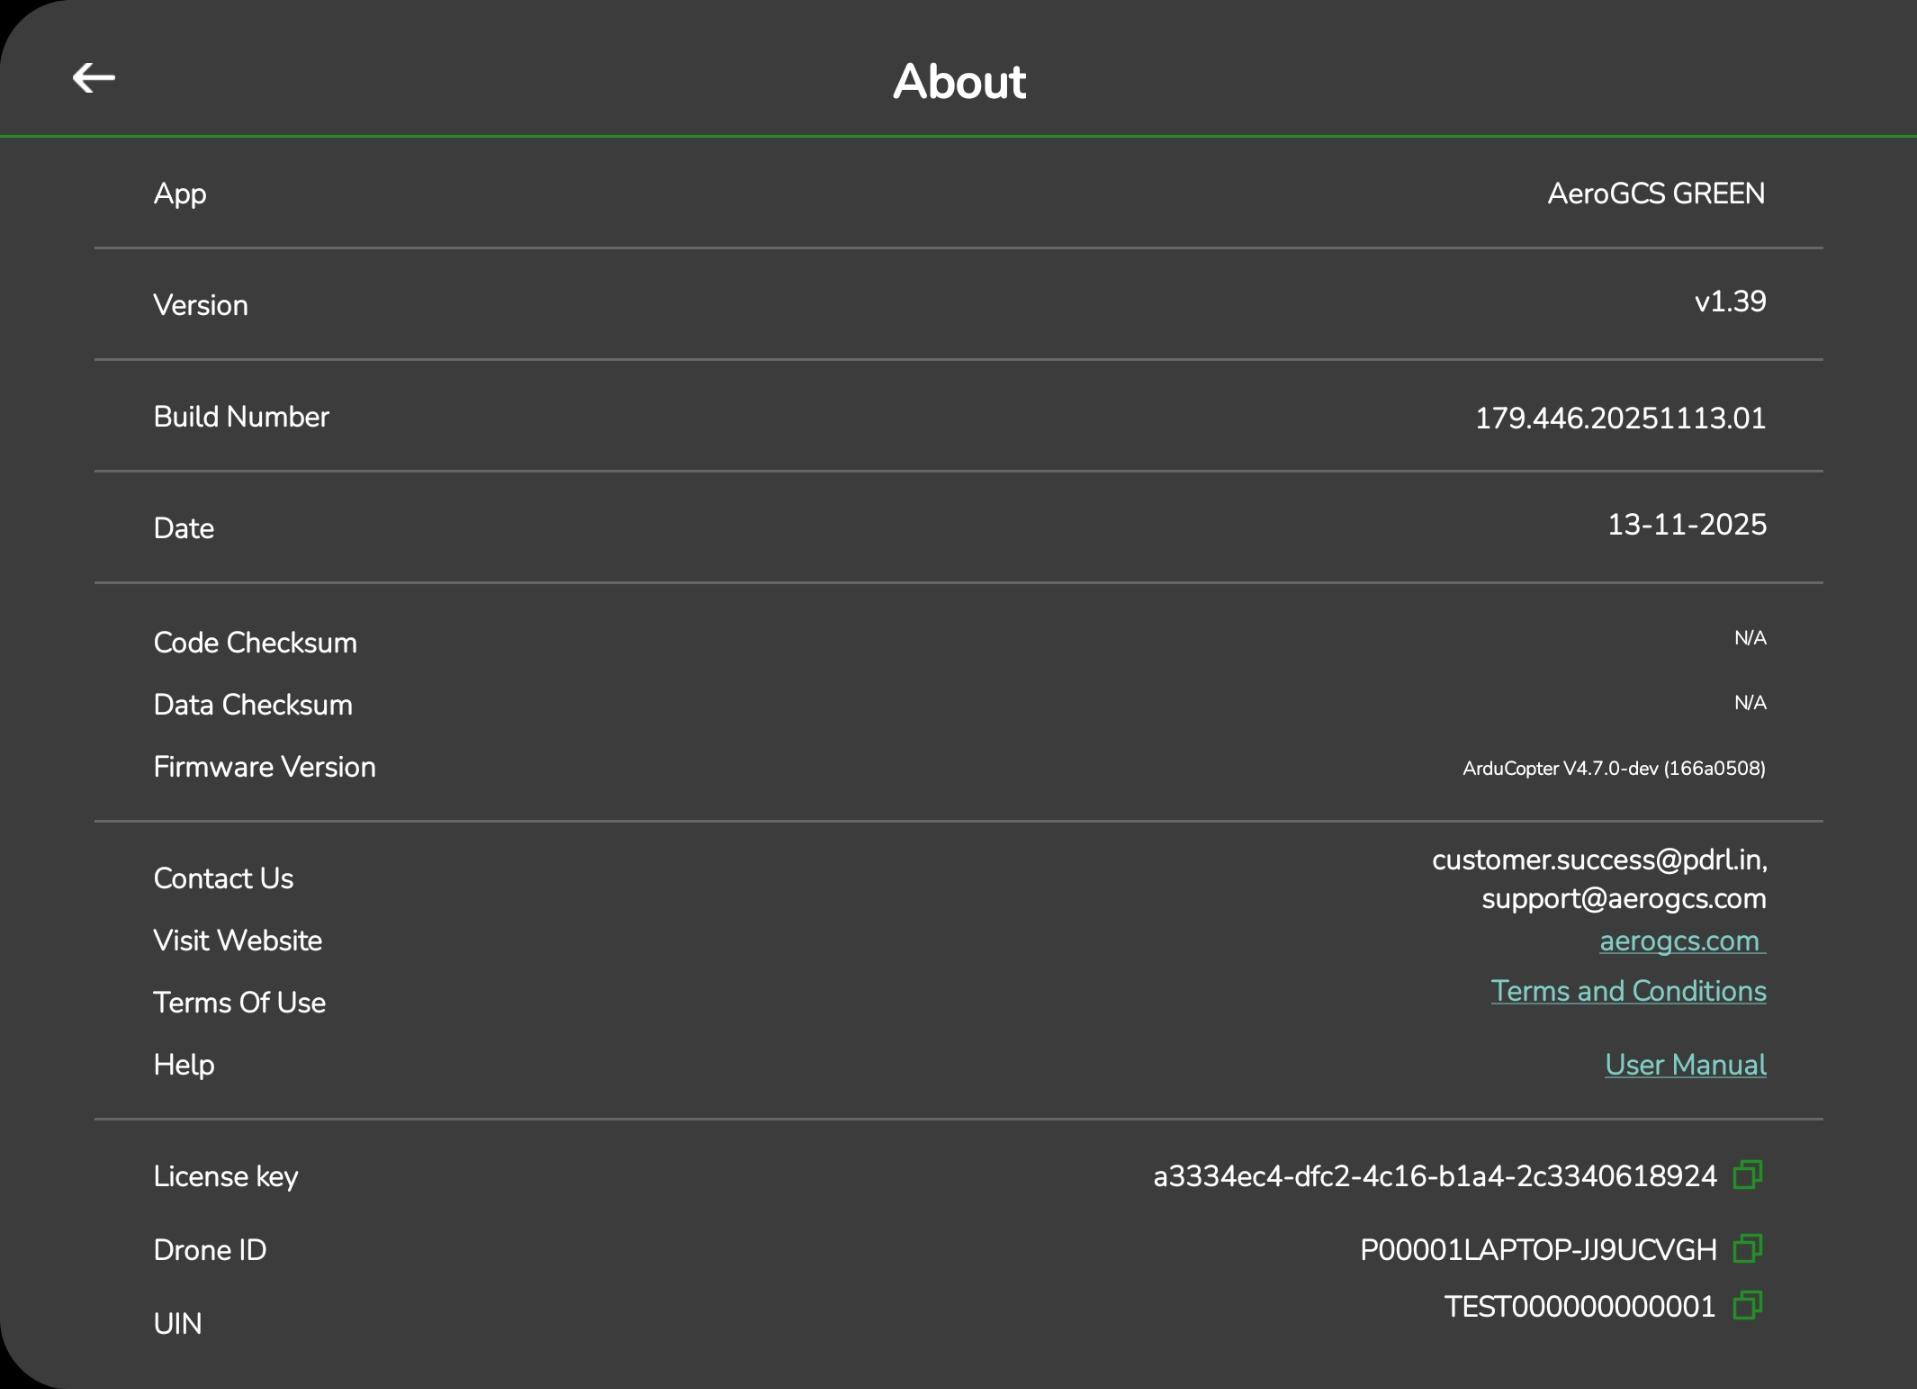
| Field | Description |
| App | Shows the application name (AeroGCS GREEN). |
| Version | Displays the current installed version. |
| Build Number | Identifies the specific build (e.g., 179.440.20251017.01). |
| Date | Release date of the build. |
| Code Checksum / Data Checksum | Internal verification values used for diagnostics. |
| Firmware Version | Displays the drone firmware version (e.g., ArduCopter V4.7.0-dev). |
| Contact Us | Opens an email link to support@aerogcs.com. |
| Visit Website | Redirects to aerogcs.com. |
| Terms of Use / Help / User Manual | Links to online resources. |
| License Key | Shows the active license key. Tap the copy icon to copy the key. |
| Drone ID | Displays the registered Drone ID. Tap the copy icon to copy the ID. |
| UIN | Shows the Unique Identification Number (if applicable). Copy icon available. |
Notes
- The copy icon next to License Key, Drone ID, and UIN makes it easy to copy these values when needed.
- The UIN field is not editable for compliance reasons.
- Always confirm that the displayed Firmware Version matches your drone’s firmware.
3. Accessibility
The Accessibility screen allows you to manage voice alerts for important flight notifications.
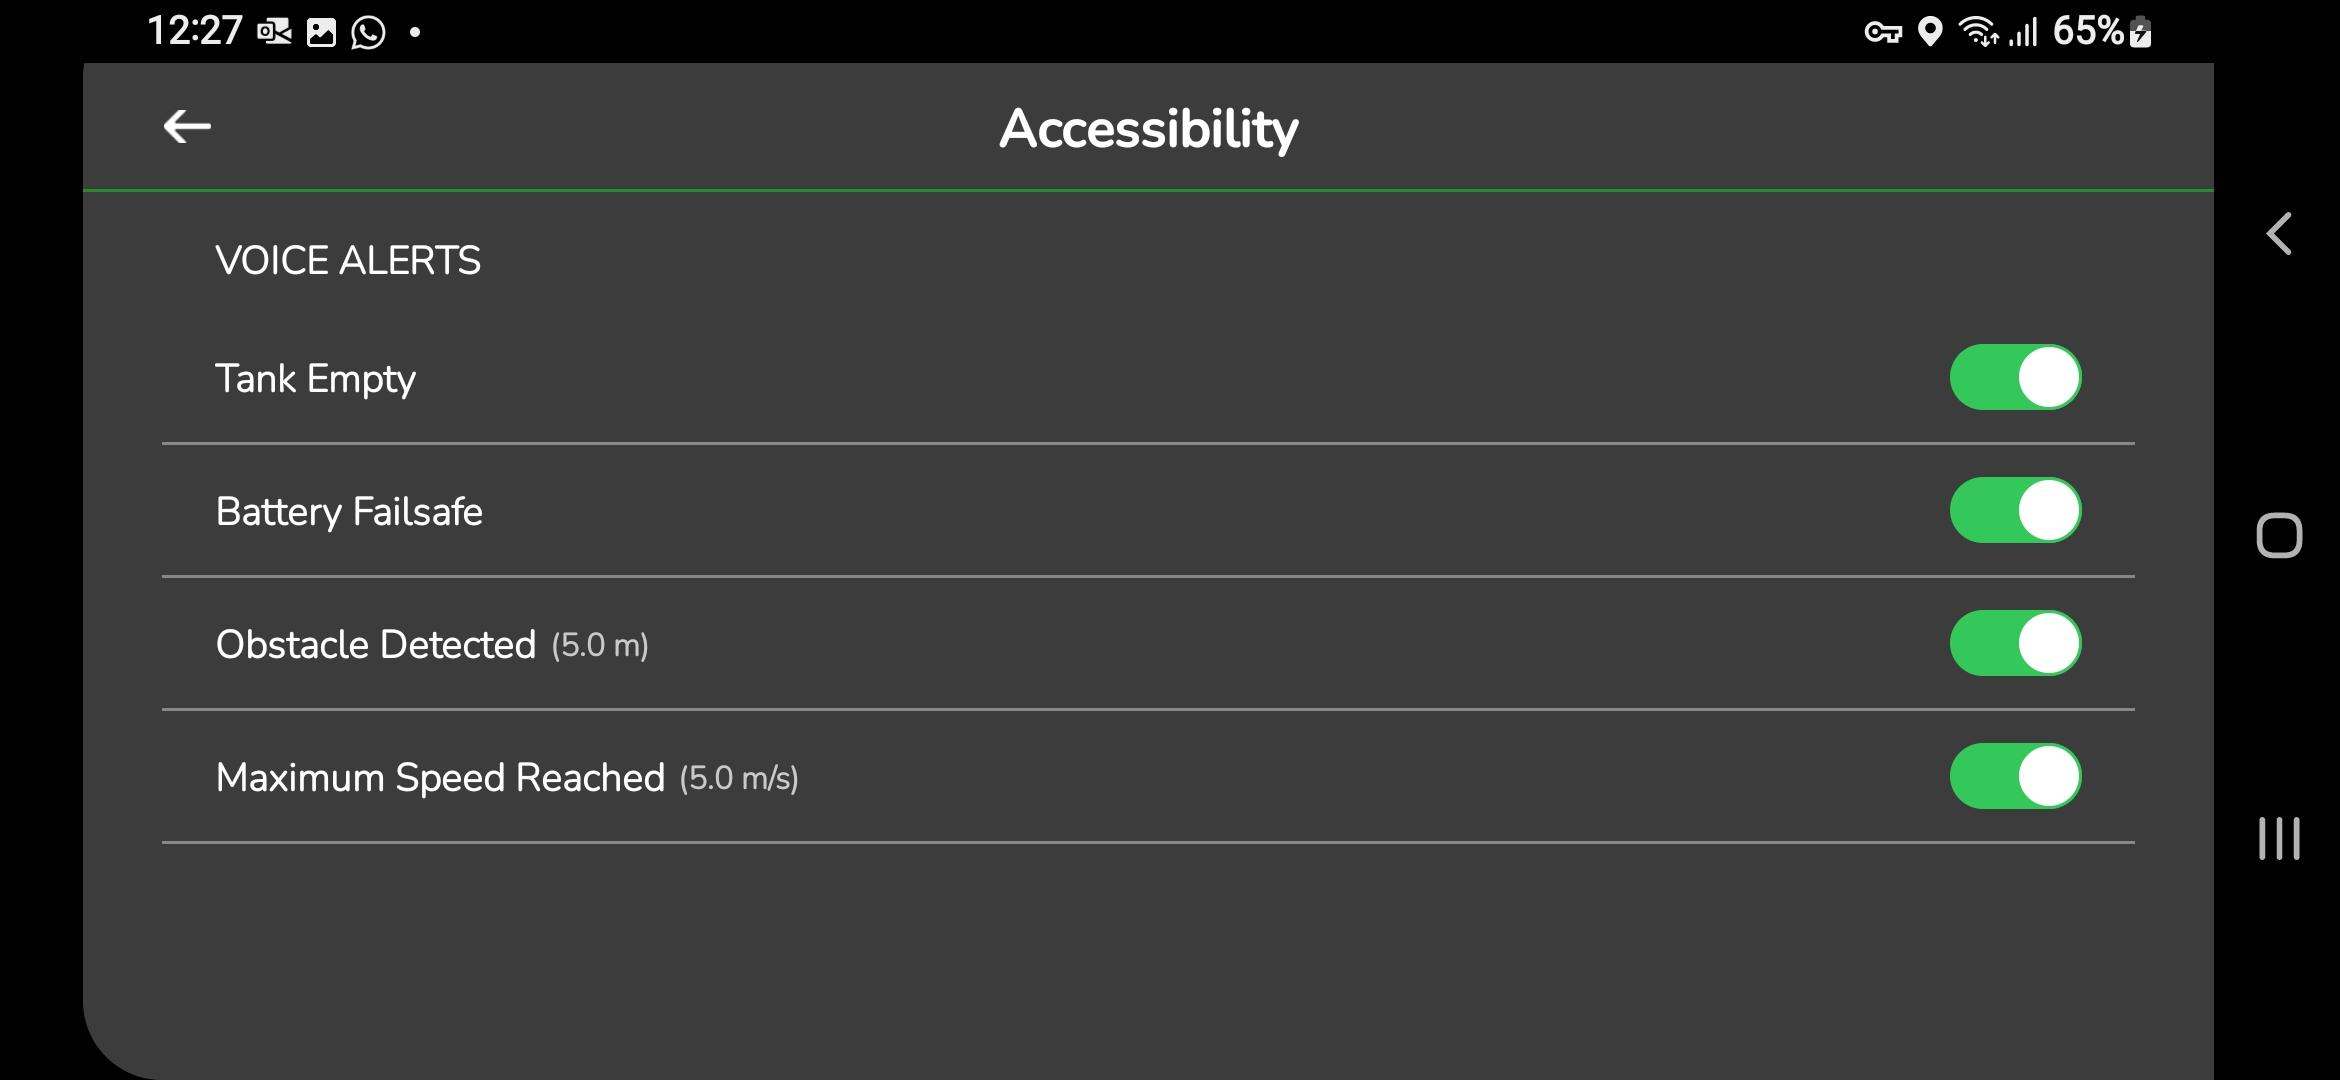
Voice alerts help you stay updated about the drone’s condition while flying, especially when your attention is on the field or the Fly View screen.
Default Behavior
- All voice alerts are enabled by default.
Enabling or Disabling Voice Alerts
- Open the Accessibility
- Each alert has a toggle switch.
- Tap the switch to enable or disable the alert.
Available Voice Alerts
- Tank Empty
- Alerts you when the liquid in the tank reaches a critical level.
- The drone will hover automatically when the tank becomes empty.
- Battery Failsafe
- Activates when the battery drops to a critical level.
- Helps you land the drone in time.
- Obstacle Detected
- Alerts you when an obstacle is detected in the drone’s flight path.
- Maximum Speed Reached
- Notifies you when the drone reaches the maximum configured speed.
Alert Activity During Flight
- All selected voice alerts remain active until the drone is disarmed.
- Disarming occurs after landing when the motors and propellers are turned off.
Benefits of Voice Alerts
- Provides timely warnings during flight.
- Helps maintain awareness without needing to constantly check the screen.
- Supports better decision-making by informing you about critical conditions.
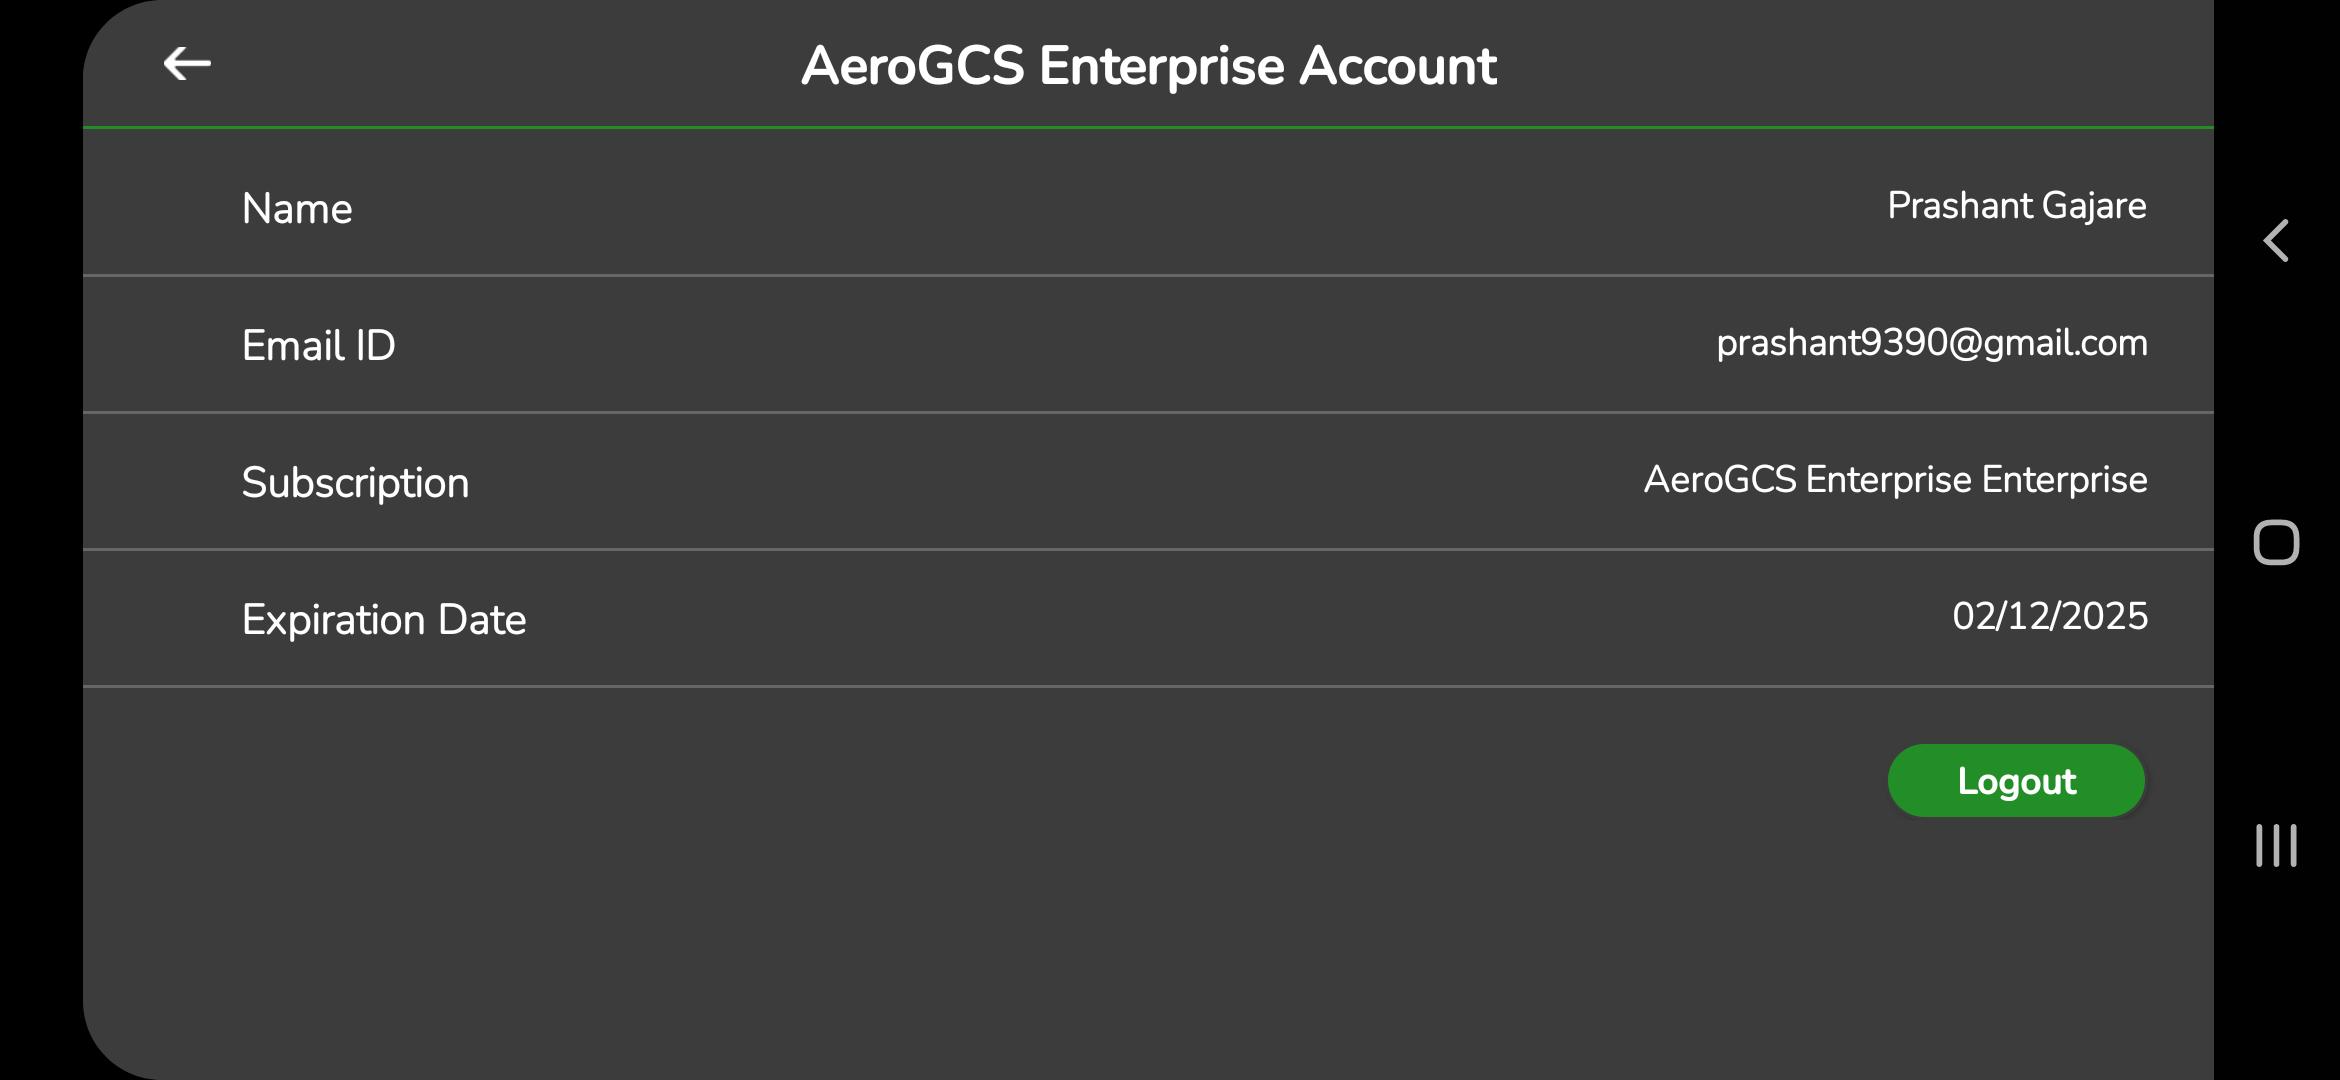
8.8 AeroGCS Enterprise Account
The AeroGCS Enterprise Account setting allows you to sign in to your AeroGCS Enterprise account so that your projects can be stored and synchronized with the AeroGCS Enterprise platform.
To open the Enterprise account settings:
- Go to the Settings
- Tap AeroGCS Enterprise Account.
The screen shown below will appear:
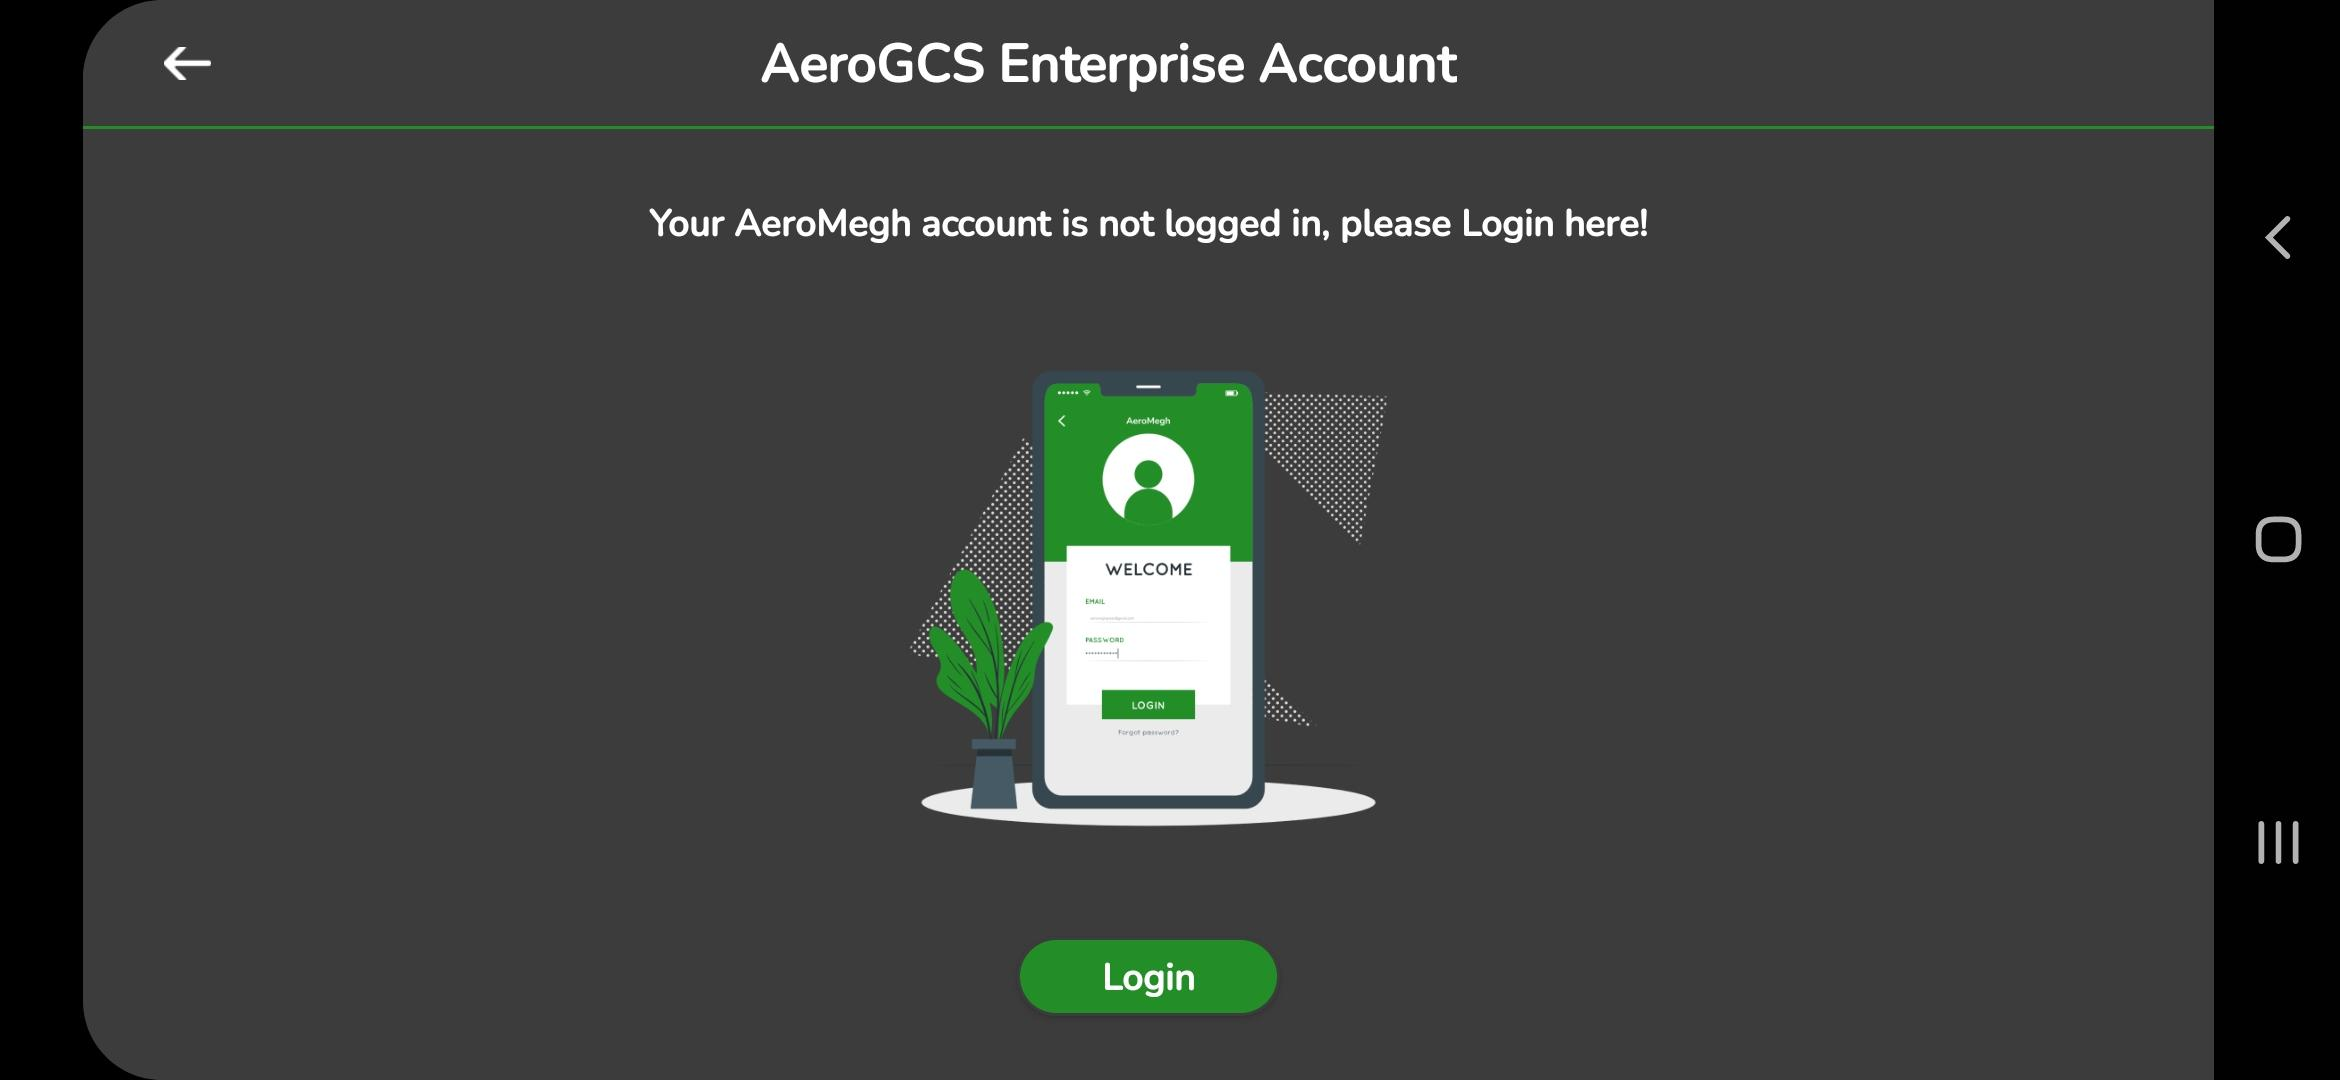
| Note If you do not have an AeroGCS Enterprise account, please create one before logging in. Refer to the “Creating AeroGCS Enterprise Account” section of this manual for step-by-step instructions. An active account is required to use Enterprise-linked project syncing and storage features. |
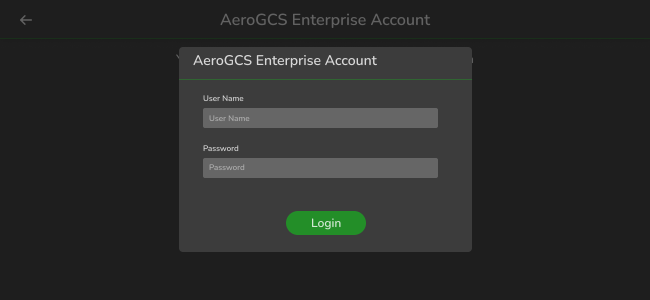
8.8.1. Login:
8.8.2. Account Details
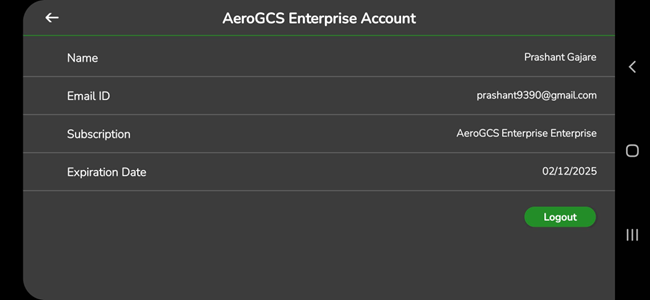
The Account Details screen shows:
- User Name
- Email Address
- Subscription Status
- Plan Expiration Date
This information verifies your active Enterprise account and subscription validity.