-
AeroGCS DEFENCE
4. Mission Planning and Execution
Unlike conventional systems that require saving and managing projects before execution, AeroGCS DEFENCE allows you to plan and fly instantly after establishing a connection with the drone. The intuitive map-based interface, flexible waypoint controls, and support for advanced overlays such as terrain and vector maps make it a powerful tool for diverse mission scenarios—from real-time surveillance to strategic aerial reconnaissance.
| Note: AeroGCS DEFENCE is a fully offline application. All mission data, logs, and configuration files are stored locally on the user’s system in encrypted form for added security. Internet connectivity is not required for any planning or execution step. |
After logging in, you are taken directly to the Flight View (Map Screen). To begin mission planning:
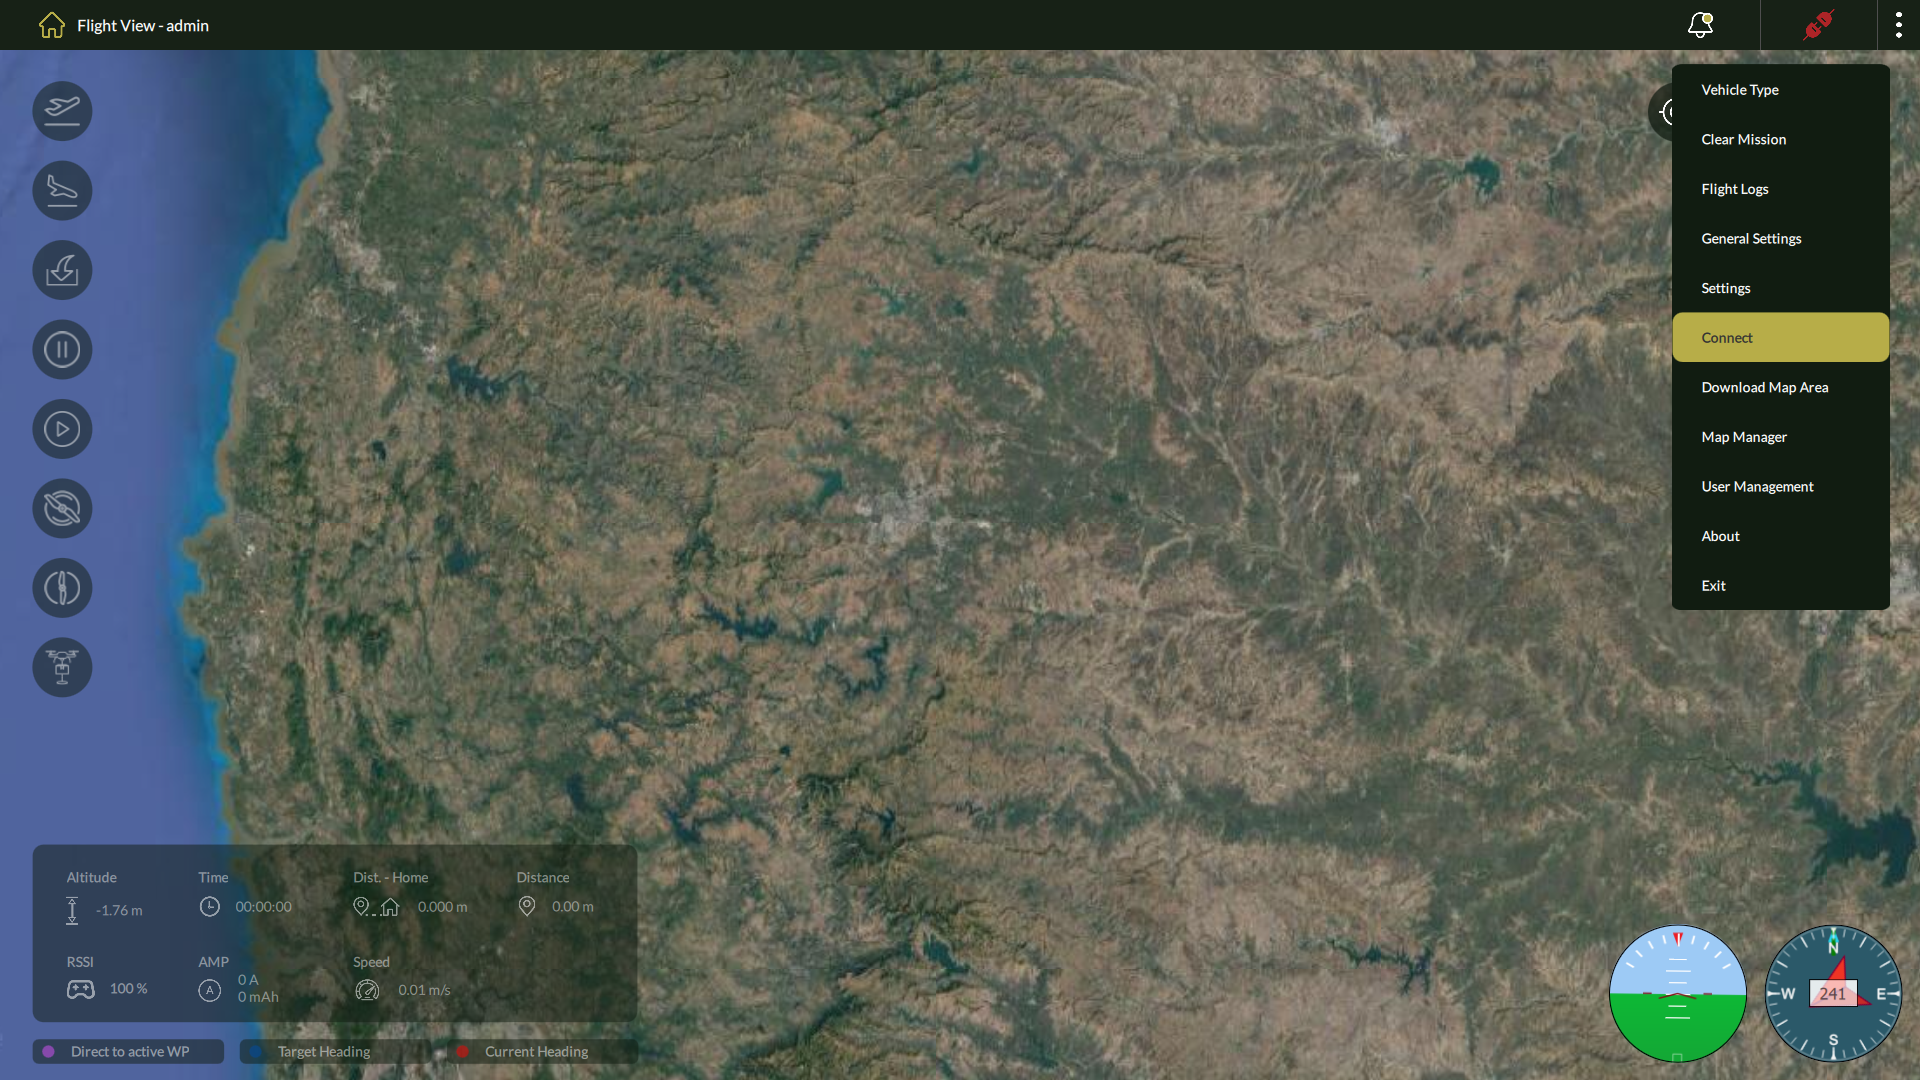
- Use the Connect option from the menu to establish communication with the drone.
- Once connected, the map interface becomes fully interactive, allowing you to place waypoints and initiate flight operations immediately.
The sections ahead guide you through each aspect of mission planning—from placing waypoints and configuring parameters to uploading the mission and launching the flight—ensuring you make the most of AeroGCS DEFENCE’s robust capabilities.
4.1 Overview of Planning Workflow
4.1.1 Mission Planning Workflow – Step-by-Step
| Step | Action |
| 1 | Login to AeroGCS DEFENCE using your valid user credentials. |
| 2 | Connect the application to your drone via the Connect option in the top-right menu. |
| 3 | Upon successful connection, the system opens the Flight View with live map and drone data. |
| 4 | Begin planning by clicking on the map to add Waypoints. |
| 5 | Configure each waypoint using the Waypoint Properties panel. |
| 6 | Optionally set a Mission Fence for safe operation boundaries. |
| 7 | Save the plan (optional), or directly proceed to fly the mission. |
| Note: AeroGCS DEFENCE allows direct mission execution without saving. You may save the plan for reuse if needed. |
4.1.2 Key Features Supporting the Workflow
| Feature | Purpose |
| Central Map View | Drag-and-drop waypoint placement and real-time visual feedback. |
| Waypoint Panel | Configure detailed flight parameters per waypoint. |
| Fence Settings | Define safety boundaries around the mission area. |
| Mission Statistics | View cumulative distance and time estimates for planned routes. |
| Three-Dot Menu | Access options like Clear Mission, Download Map, User Management, and more. |
4.2 Accessing the Planning Interface
4.2.1 Launching the Planning Interface – Step-by-Step
| Step | Action |
| 1 | Launch AeroGCS DEFENCE and log in using your assigned username and password. |
| 2 | From the top-right menu, click the three-dot icon and select Connect. |
| 3 | Choose the available drone connection method (e.g., Serial Port, UDP, etc.). |
| 4 | Once connected, the Flight View screen is displayed with live map and drone information. |
| 5 | You are now ready to begin adding waypoints and planning your mission. |
4.2.2 Default State After Connection
| UI State | Description |
| First Waypoint | The first waypoint (1) is automatically placed at the drone’s current location. |
| Planning Tools | Tools like waypoint addition, mission fence, and gimbal settings are now available. |
| Drone Status | Drone icon appears on the map with current telemetry and connection status. |
| Note: All mission planning occurs on the Flight View, which also serves as the control interface during mission execution. |
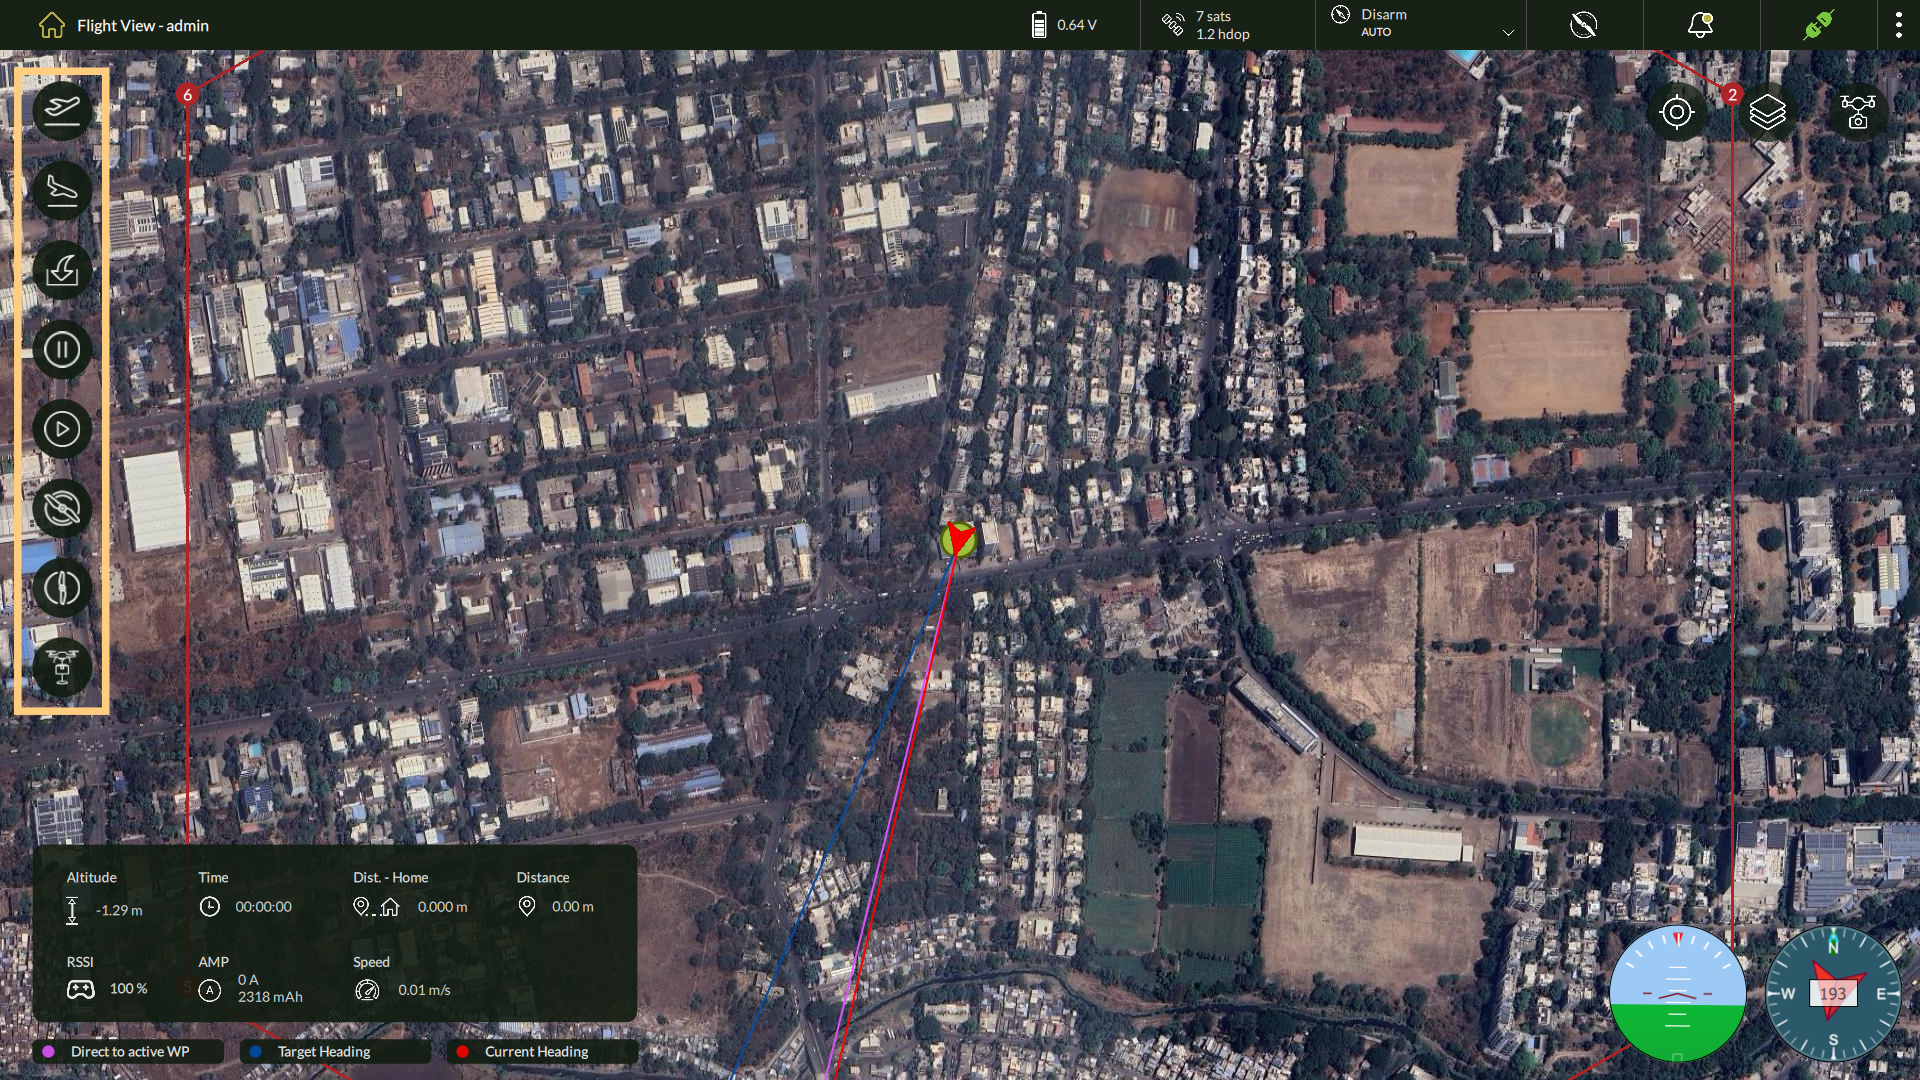
4.3 Adding Waypoints
In AeroGCS DEFENCE, mission planning begins with adding waypoints to the map. Each waypoint represents a coordinate the drone must navigate to, allowing users to define the flight path visually and interactively.
The interface supports intuitive point-and-click placement, automatic waypoint indexing, and tools for managing single or multiple waypoints.
4.3.1 Adding Waypoints
| Step | Action |
| 1 | Ensure the drone is connected via the Connect option in the top-right menu. |
| 2 | On the Flight View, click on the map to place the second waypoint. |
| 3 | The first waypoint is automatically added at the drone’s current location. |
| 4 | Continue clicking on the map to add subsequent waypoints in the desired sequence. |
| 5 | Each waypoint is numbered automatically (e.g., 1, 2, 3…). |
| 6 | To reposition a waypoint, click and drag it to a new location. |
4.3.2 Deleting Waypoints
You can delete waypoints individually or clear the entire mission plan.
To delete a specific waypoint:
- Click on the waypoint on the map.
- In the Waypoint Details panel (right side), click the Clear
To delete all waypoints (clear mission):
- Click the three-dot menu at the top-right.
- Select Clear Mission from the dropdown.
4.3.3 Rally Point
A Rally Point is a predefined alternative landing or return location used by the UAV in emergency or failsafe scenarios. Rally points improve mission resilience by providing backup navigation destinations when the drone cannot return to the home location.
Adding Rally Point
To add a rally point:
- Toggle Add Rally to ON in the Waypoint Configuration Panel.
- Click on the desired location on the map to place the rally point marker.
- A rally point will appear and be added to the mission plan.
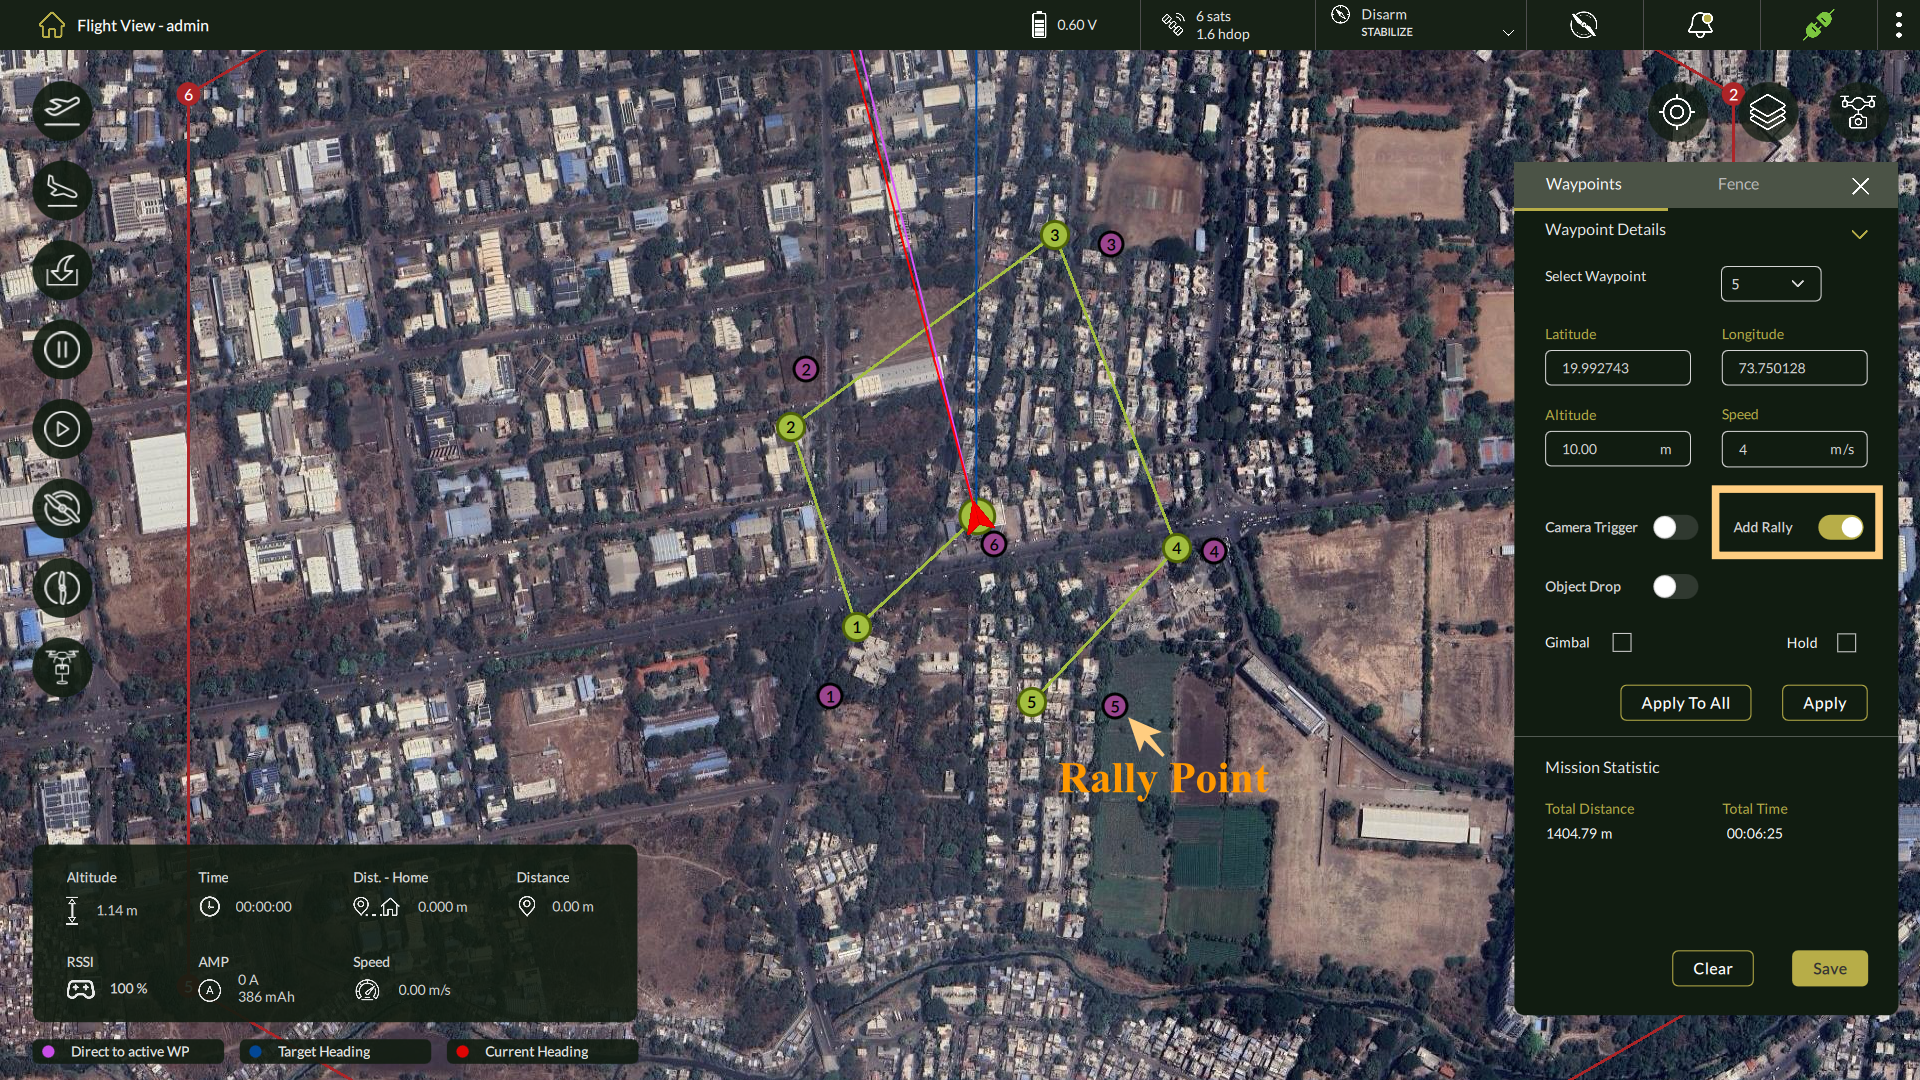
| 🛈 Important: When Add Rally is enabled, adding standard waypoints is temporarily disabled. To continue adding waypoints, turn Add Rally OFF. |
Workflow Recommendation:
- Add all required waypoints first.
- Then enable Add Rally to place up to six rally points.
- After adding rally points, you may disable the toggle to re-enable waypoint editing.
Removing Rally Points:
- To remove a rally point:
- Click on the rally point marker on the map.
- Press the Clear button in the configuration panel.
- The selected rally point will be removed from the mission plan.
| Note: Even after disabling Add Rally, previously added rally points remain visible and active on the mission map until manually cleared. |
4.3.4 ROI (Region of Interest)
Adding and Removing ROI (Region of Interest) Points
Region of Interest (ROI) points are used to define specific targets or zones that the UAV camera or gimbal should focus on during the mission. These points are helpful for applications such as inspection, surveillance, or photography.
Adding an ROI Point:
To add an ROI point to your mission plan:
- Right-click on the map at the desired location.
- Select Add ROI context menu appeared on the screen.
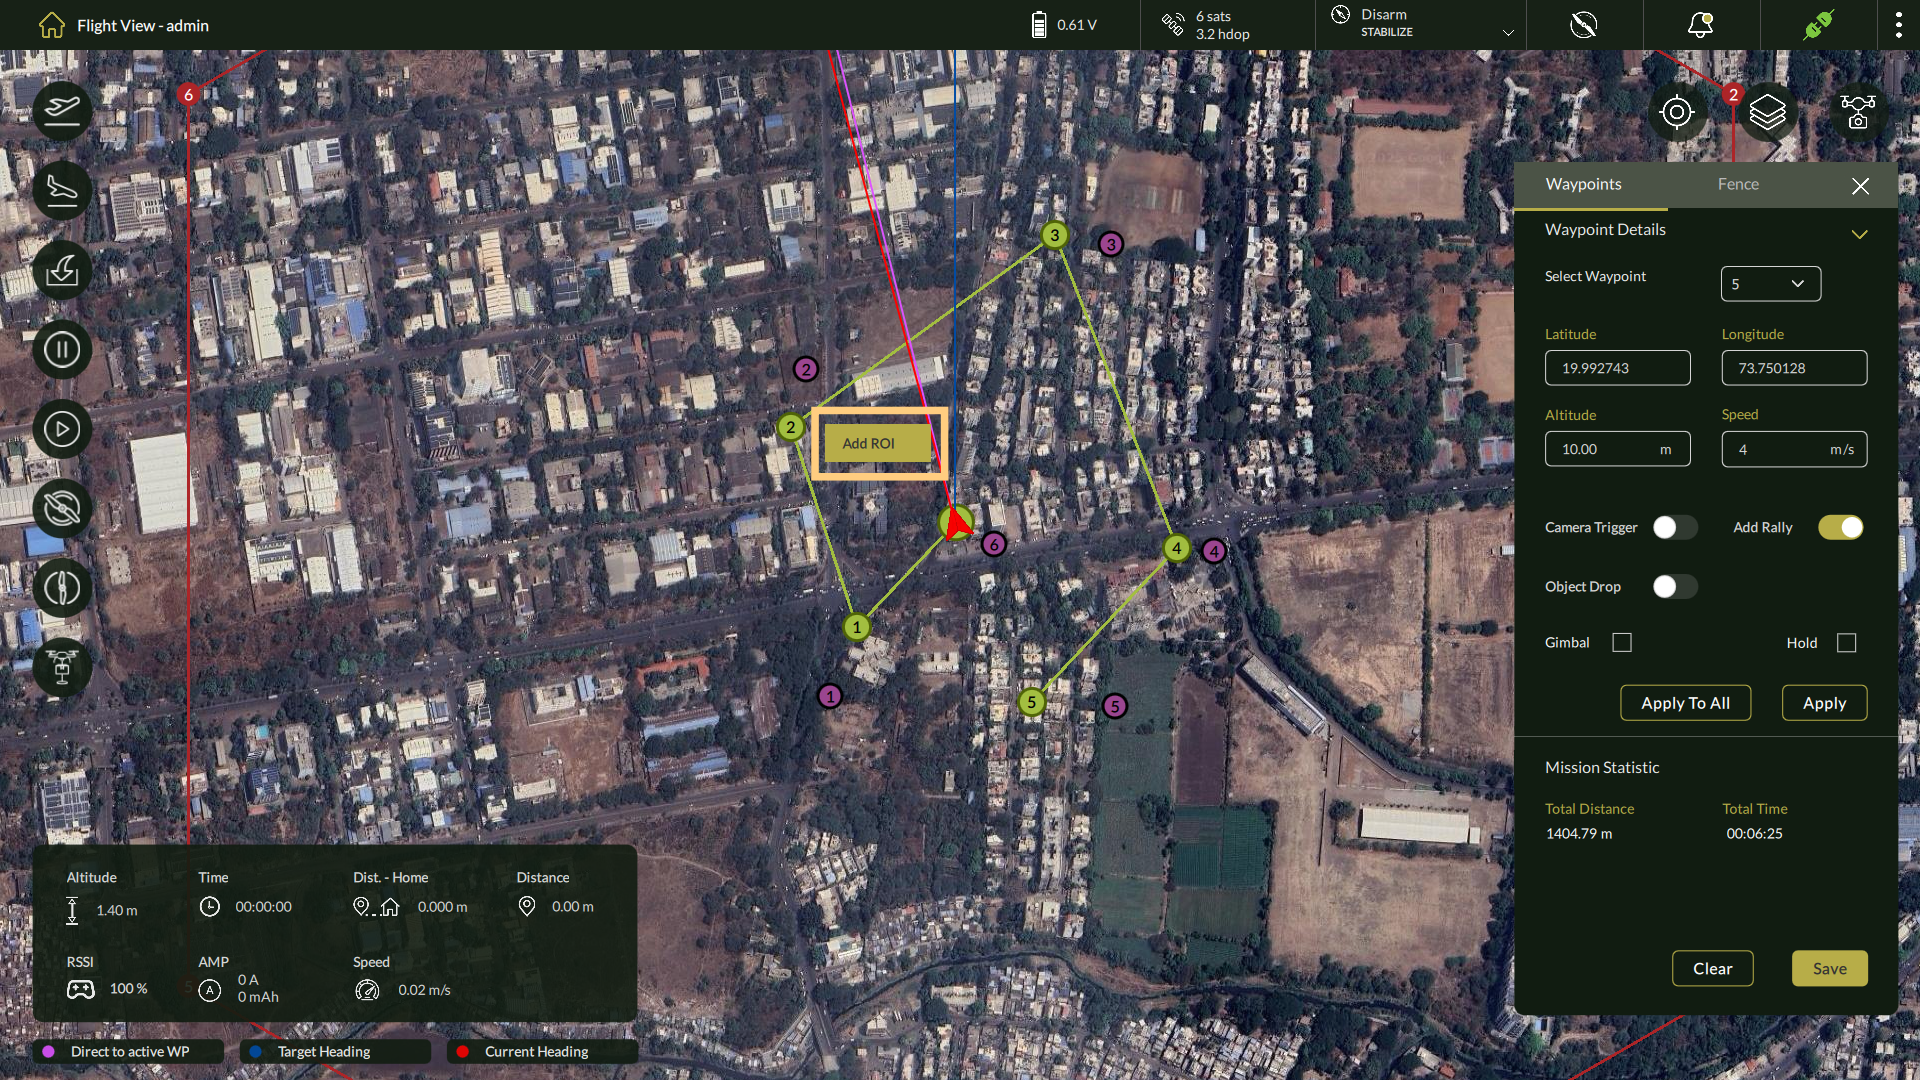
3. An “R” marker will appear on the map, representing the newly added ROI point.
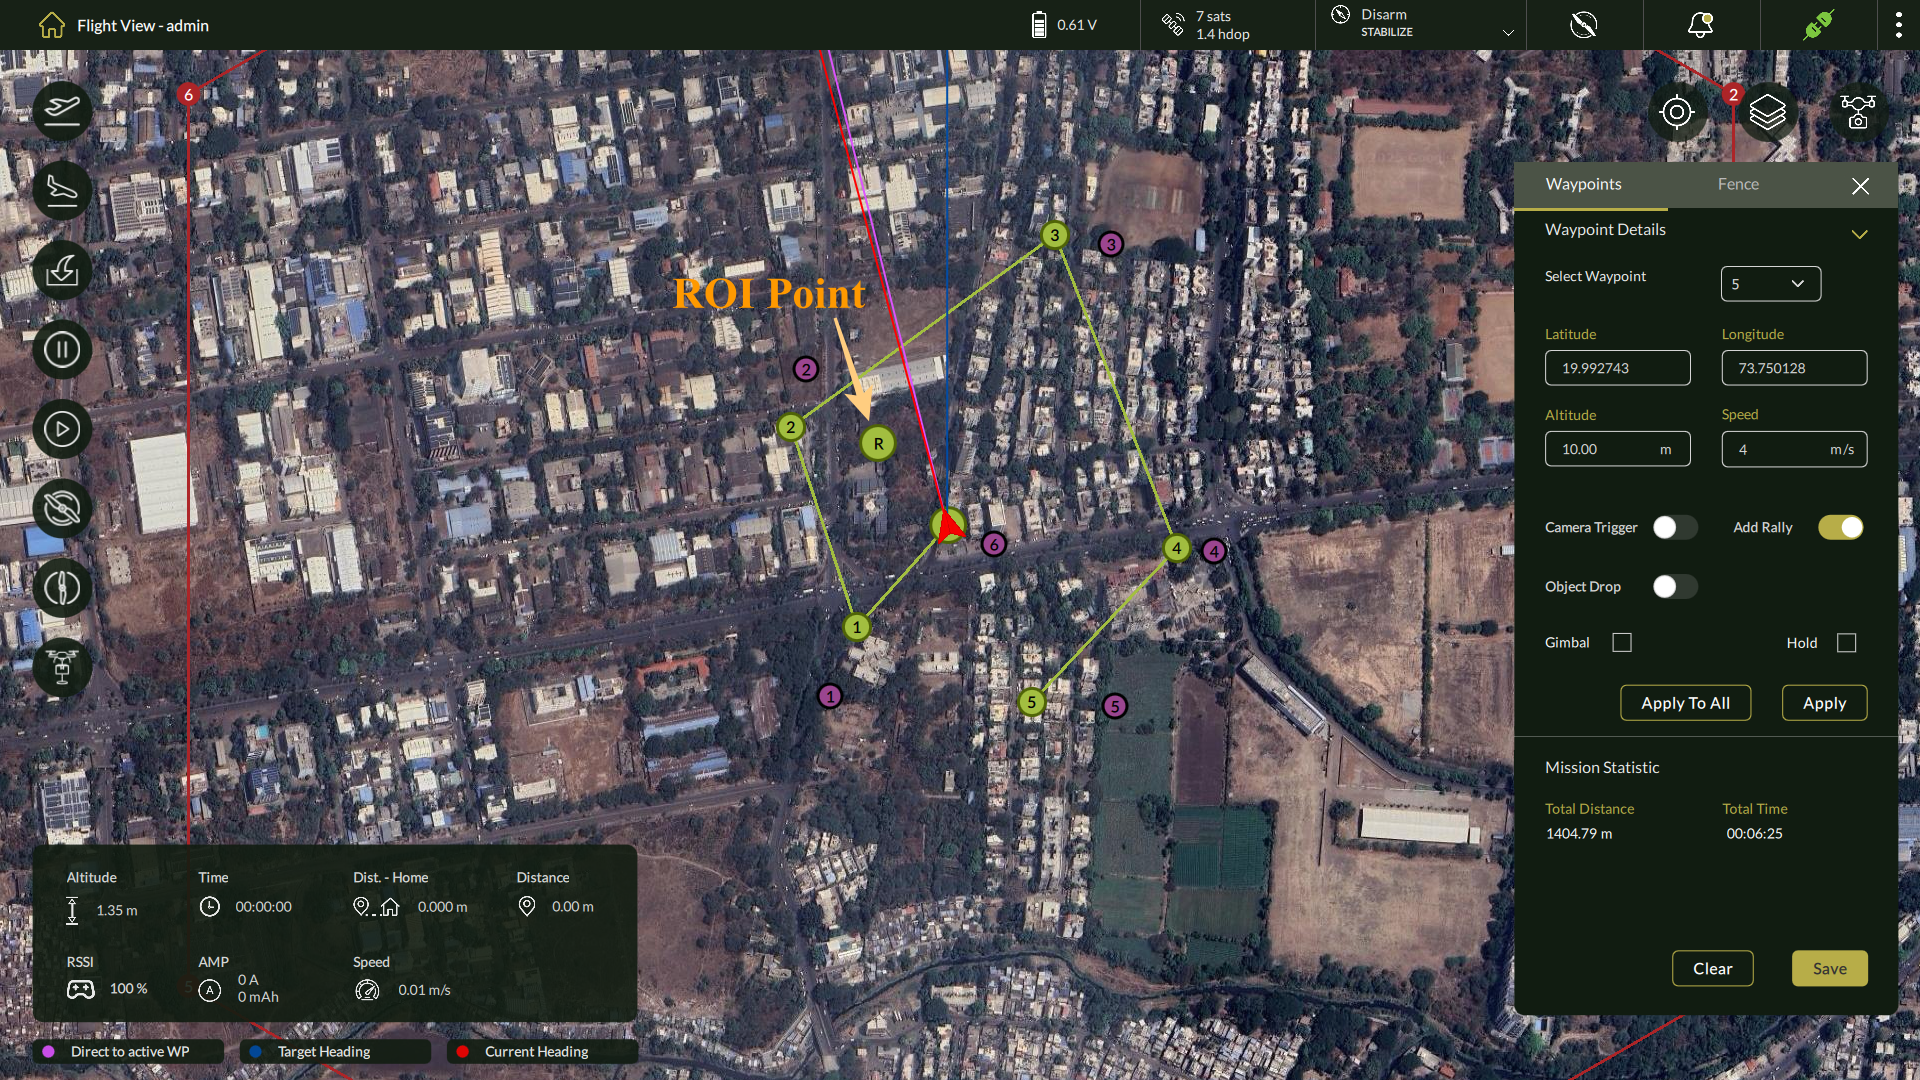
| 🛈 ROI markers guide camera or gimbal orientation and may be used in advanced payload operations or custom mission logic. |
Removing an ROI Point:
To remove an existing ROI point:
- Left-click on the “R” marker on the map.
- A Remove ROI option will appear.
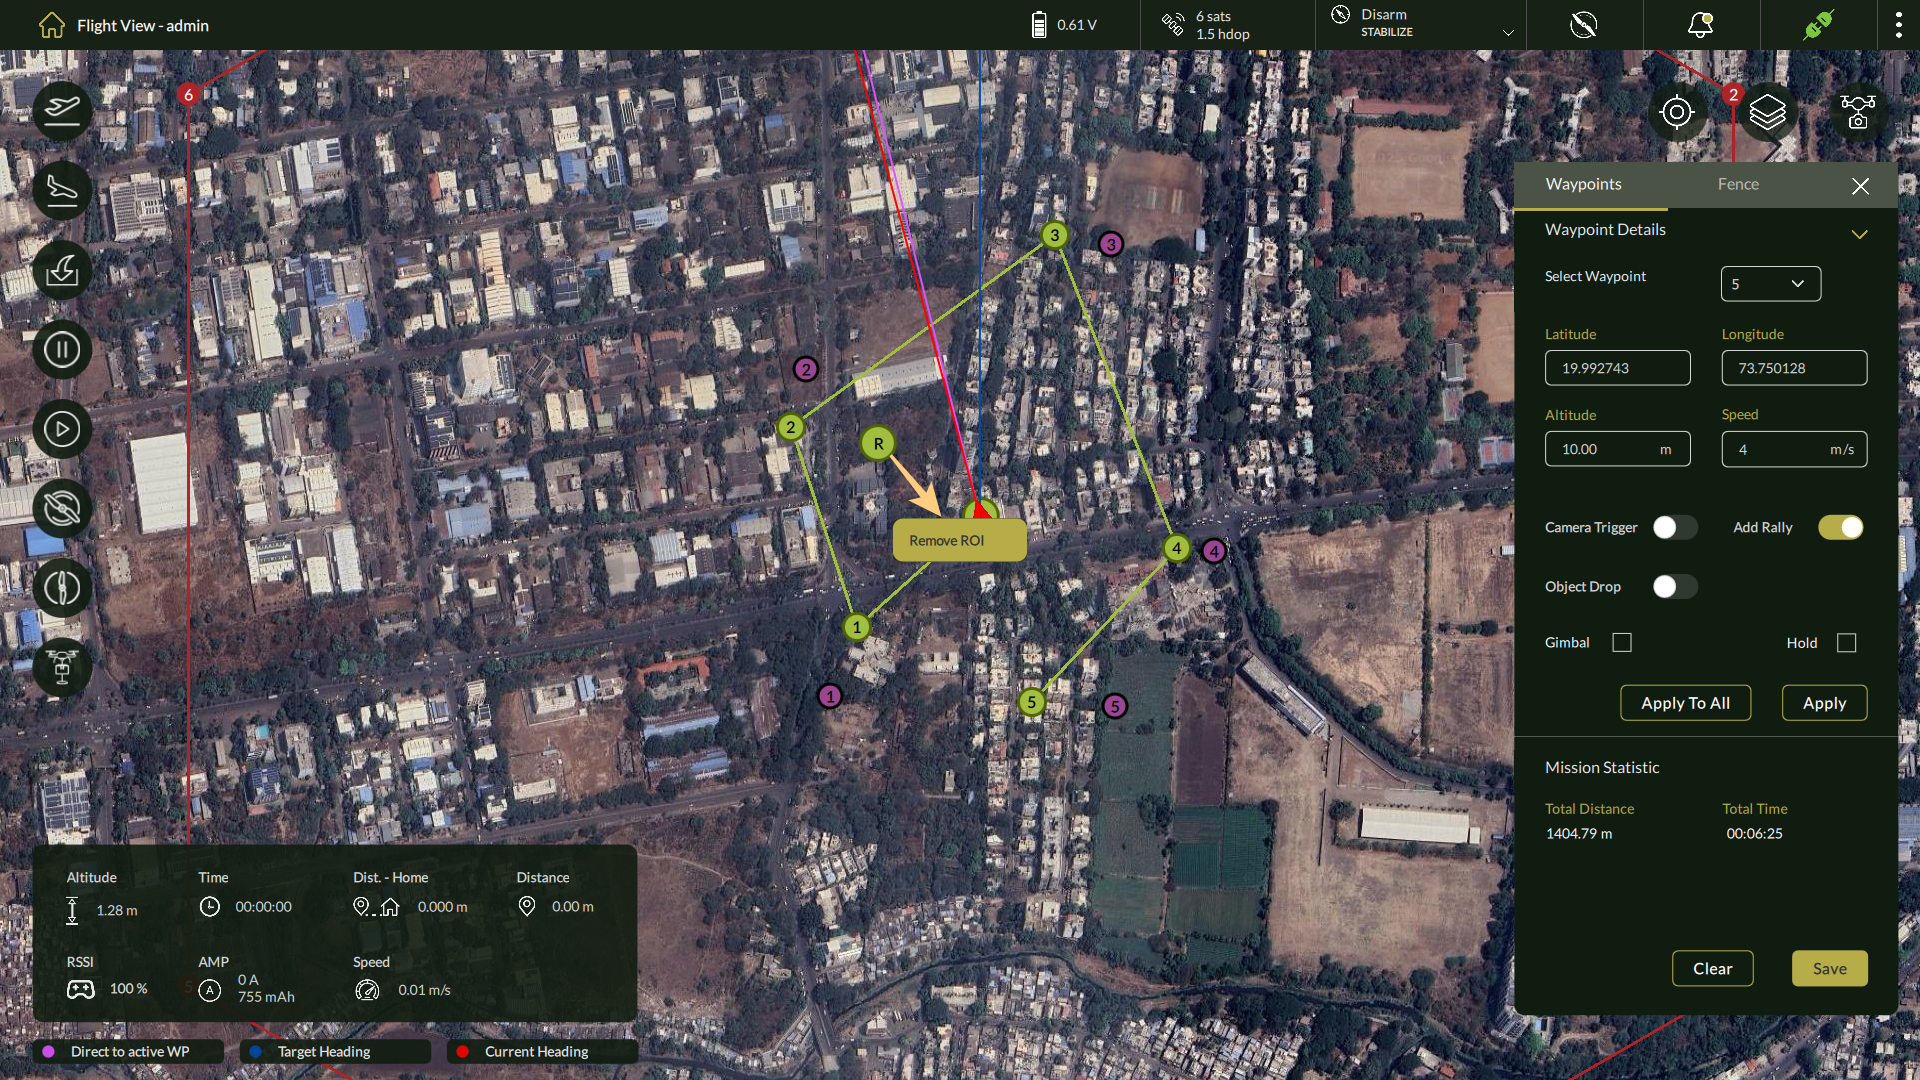
| Note: Multiple ROI points can be added. ROI markers are visually distinct from waypoints and rally points for clarity. |
4.3.5 Waypoint Placement Tips
| Tip | Details |
| Automatic First waypoint Location | First Waypoint is auto-assigned to the drone’s current location when mission starts. |
| Map Zoom | Use scroll or zoom tools for precision waypoint placement. |
| Live Feedback | Distance, heading, and estimated time update in real-time as WPs are added. |
| Note: Waypoints must be placed within the operational boundary defined by local regulations and mission constraints. |
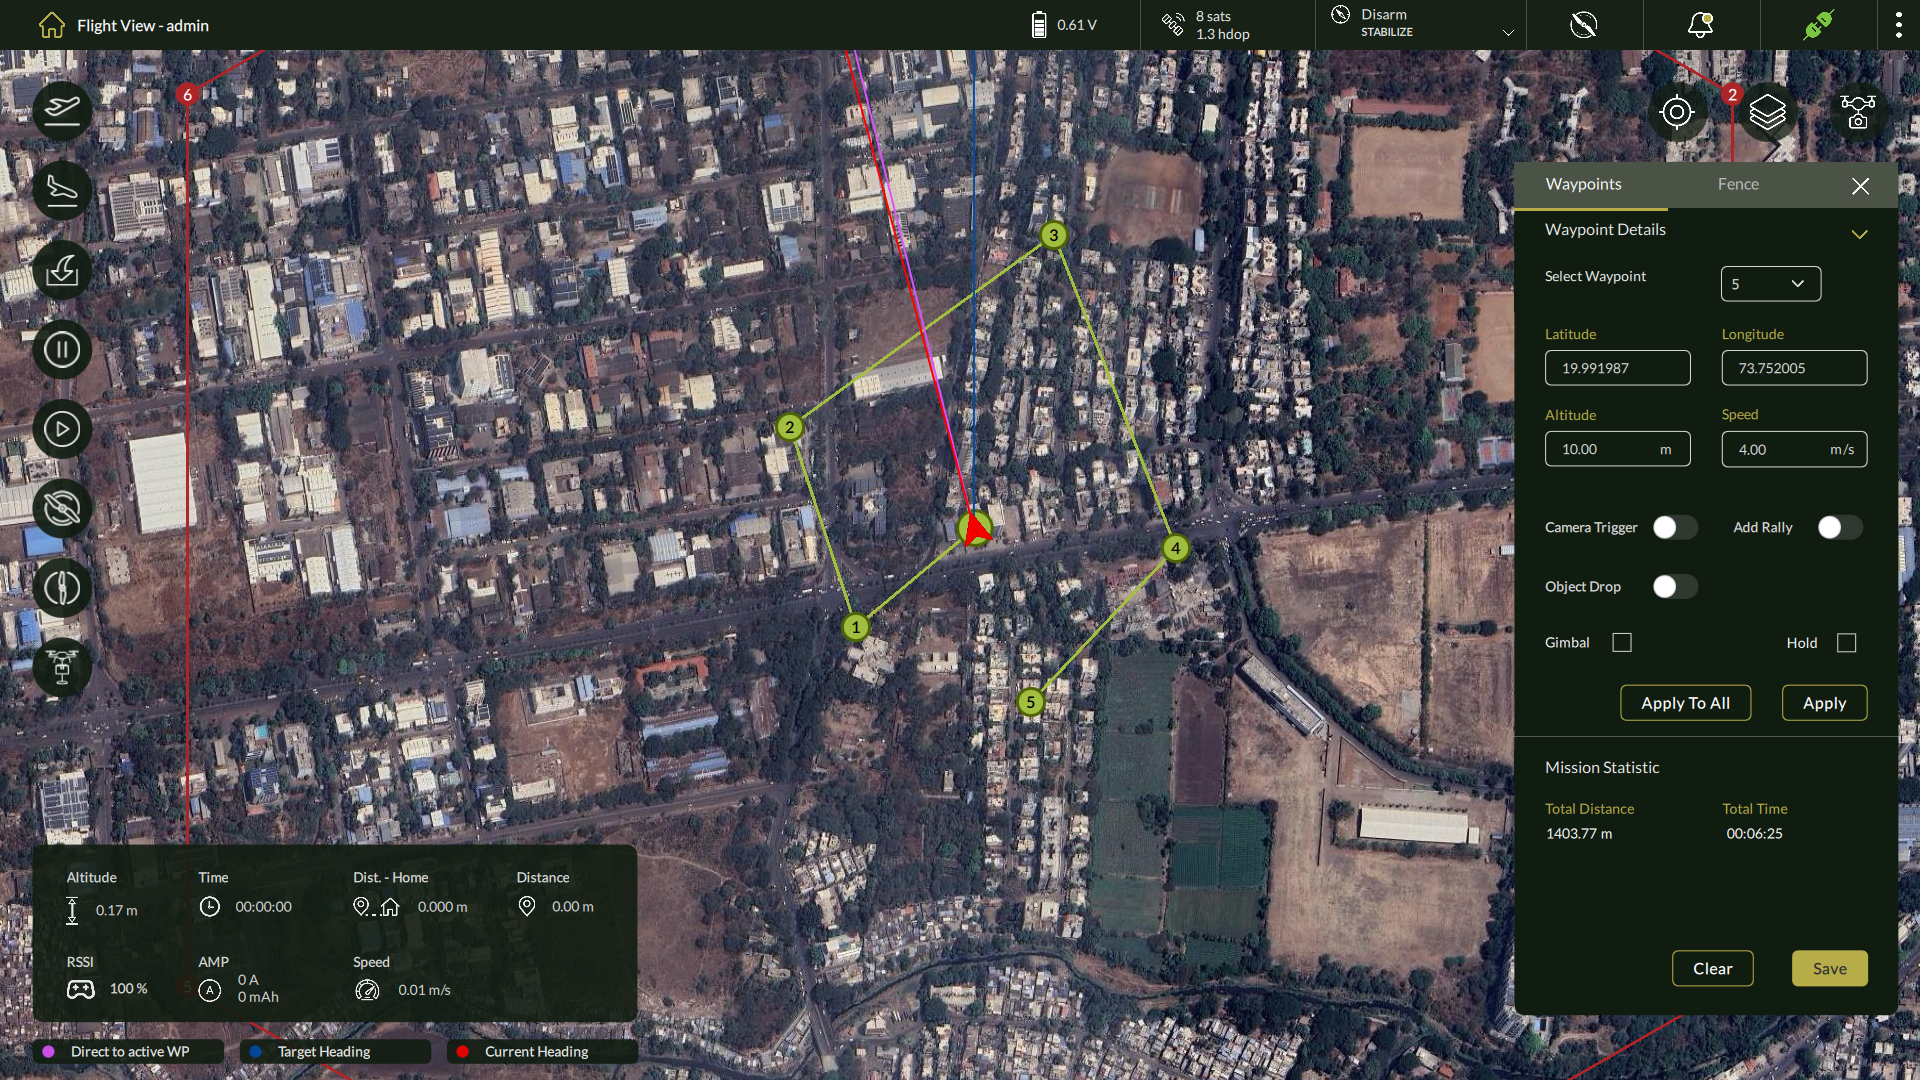
4.4 Configuring Waypoint Properties
These settings help tailor the flight path for operational accuracy and safety.
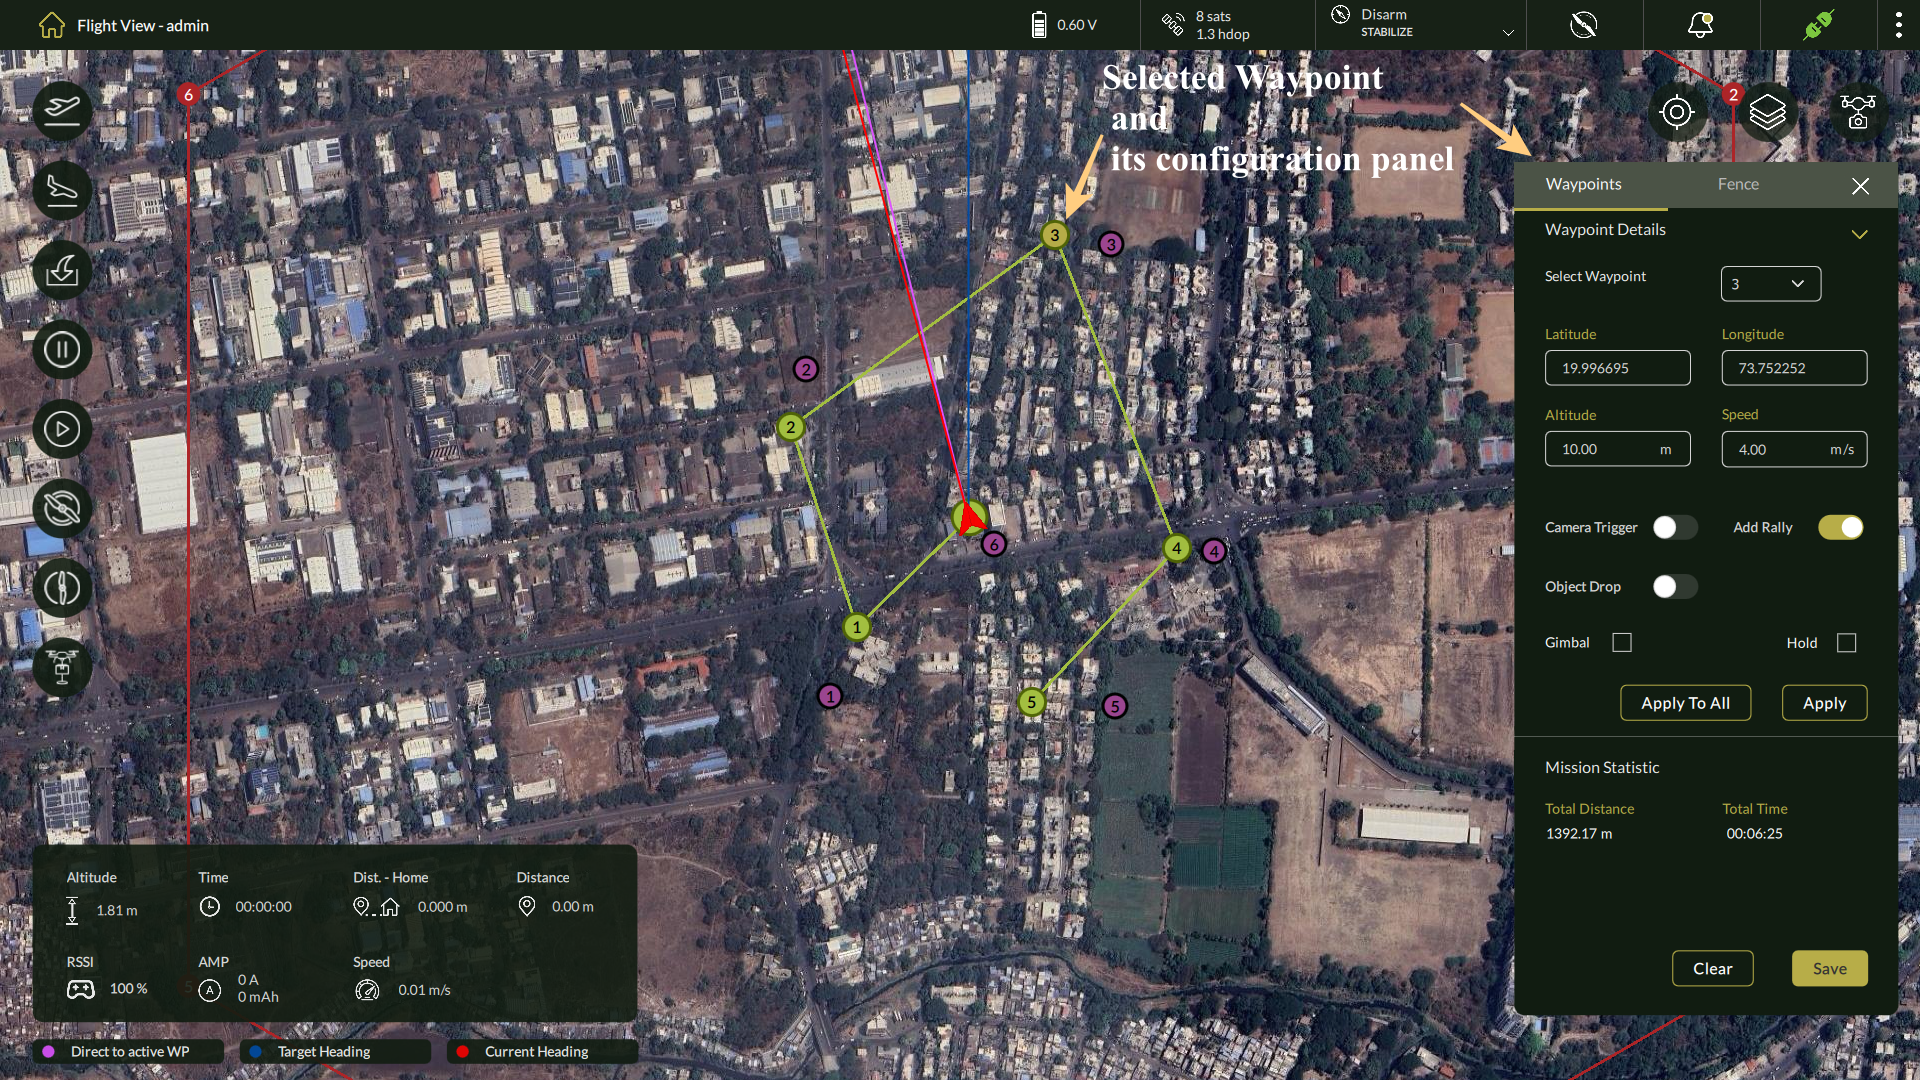
4.4.1 Accessing the Waypoint Properties Panel
| Step | Action |
| 1 | Click on a Waypoint (e.g., 1, 2) on the mission map. |
| 2 | The Waypoint Details panel opens on the right side of the screen. |
| 3 | Use the Select Waypoint dropdown to switch between waypoints if multiple are present. |
4.4.2 Configuring Per-Waypoint Parameters
Each waypoint supports individual settings that control flight characteristics and onboard equipment.
Steps to configure waypoint parameters:
- In the Waypoint Details panel:
- Review or manually update the Latitude and Longitude
- Set the Altitude (in meters) the drone should reach at this point.
- Set the Speed (in m/s) for the drone to approach or exit this waypoint.
- Optional configurations:
- Camera Trigger: Enable to capture aerial imagery at this point.
- Add Rally: Enable to mark this waypoint as a return/rally point.
- Object Drop Toggle : The Object Drop switch allows operators to configure the UAV to release a payload at the selected waypoint. When enabled, this triggers a precise payload drop at that location based on mission-specific requirements such as medical kit delivery, sensor deployment, or tactical drops.
| Note: Ensure that the UAV is equipped with a compatible object drop mechanism before activating this feature. |
- Gimbal Control:
- Check the Gimbal
- Set values for Pitch, Roll, and Yaw (in degrees).
- Define the Duration (in seconds) to hold the gimbal orientation.
- Hold: Enable to make the drone hover at the waypoint and execute defined actions.
3. Click Apply to save your settings.
The Apply To All button allows operators to propagate the currently selected Altitude and Speed values to all defined waypoints in a single action. This ensures consistency in flight parameters and saves time during complex mission planning.
| Use this option when uniform flight height or speed is required across the route. |
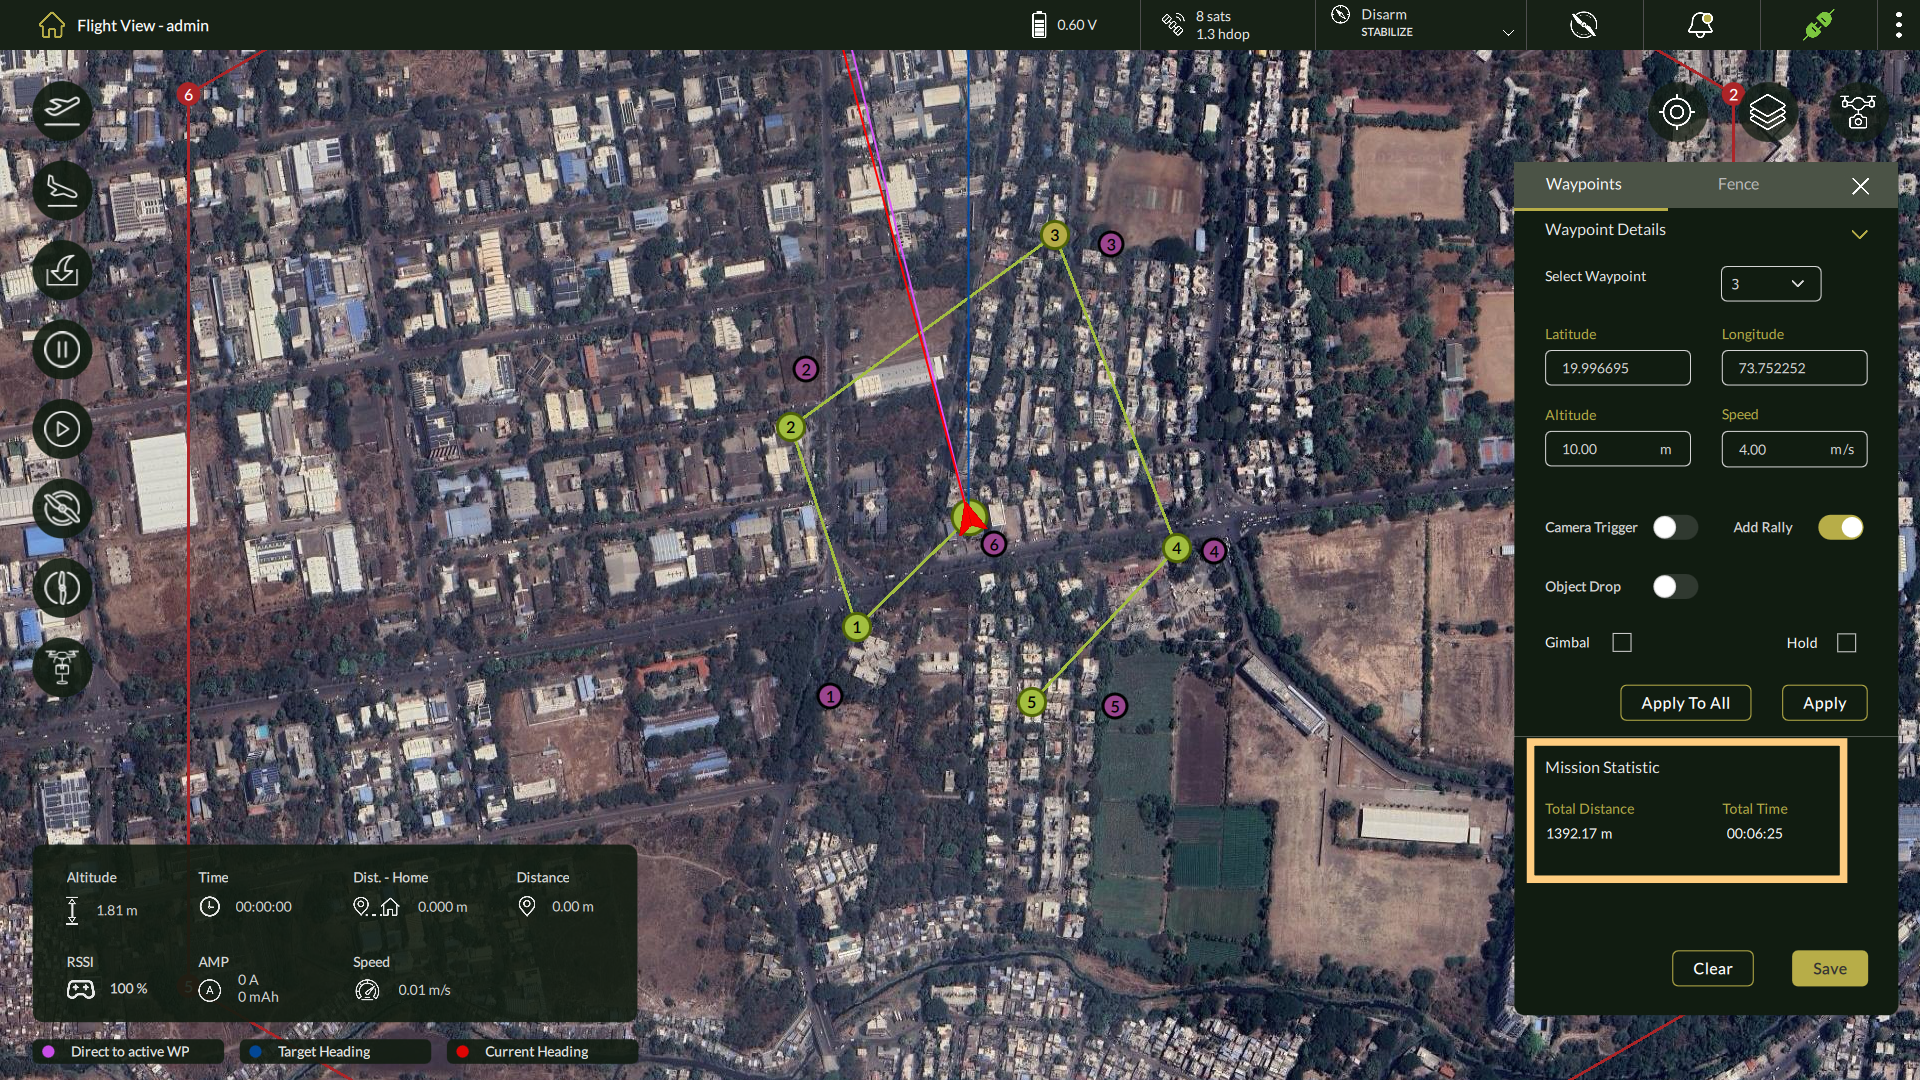
4.4.3 Mission Statistics Summary
| Metric | Description |
| Total Distance | Total flight distance across all waypoints (in meters). |
| Total Time | Estimated mission duration, based on configured speeds and distances. |
4.4.4 Configuring the Mission Fence
The Fence feature allows you to set a circular boundary that restricts drone movement beyond a defined perimeter. This ensures safe containment of the flight area.
Steps to configure a mission fence:
- Click the Fence tab next to the Waypoints tab in the right configuration panel.
- From the Select Waypoint dropdown, choose a reference waypoint for the fence.
- Adjust the Fence Area using:
- The slider, or
- Manually entering a value (Minimum: 1000 m, Maximum: 5000 m).
- Click Save to apply the fence boundary.
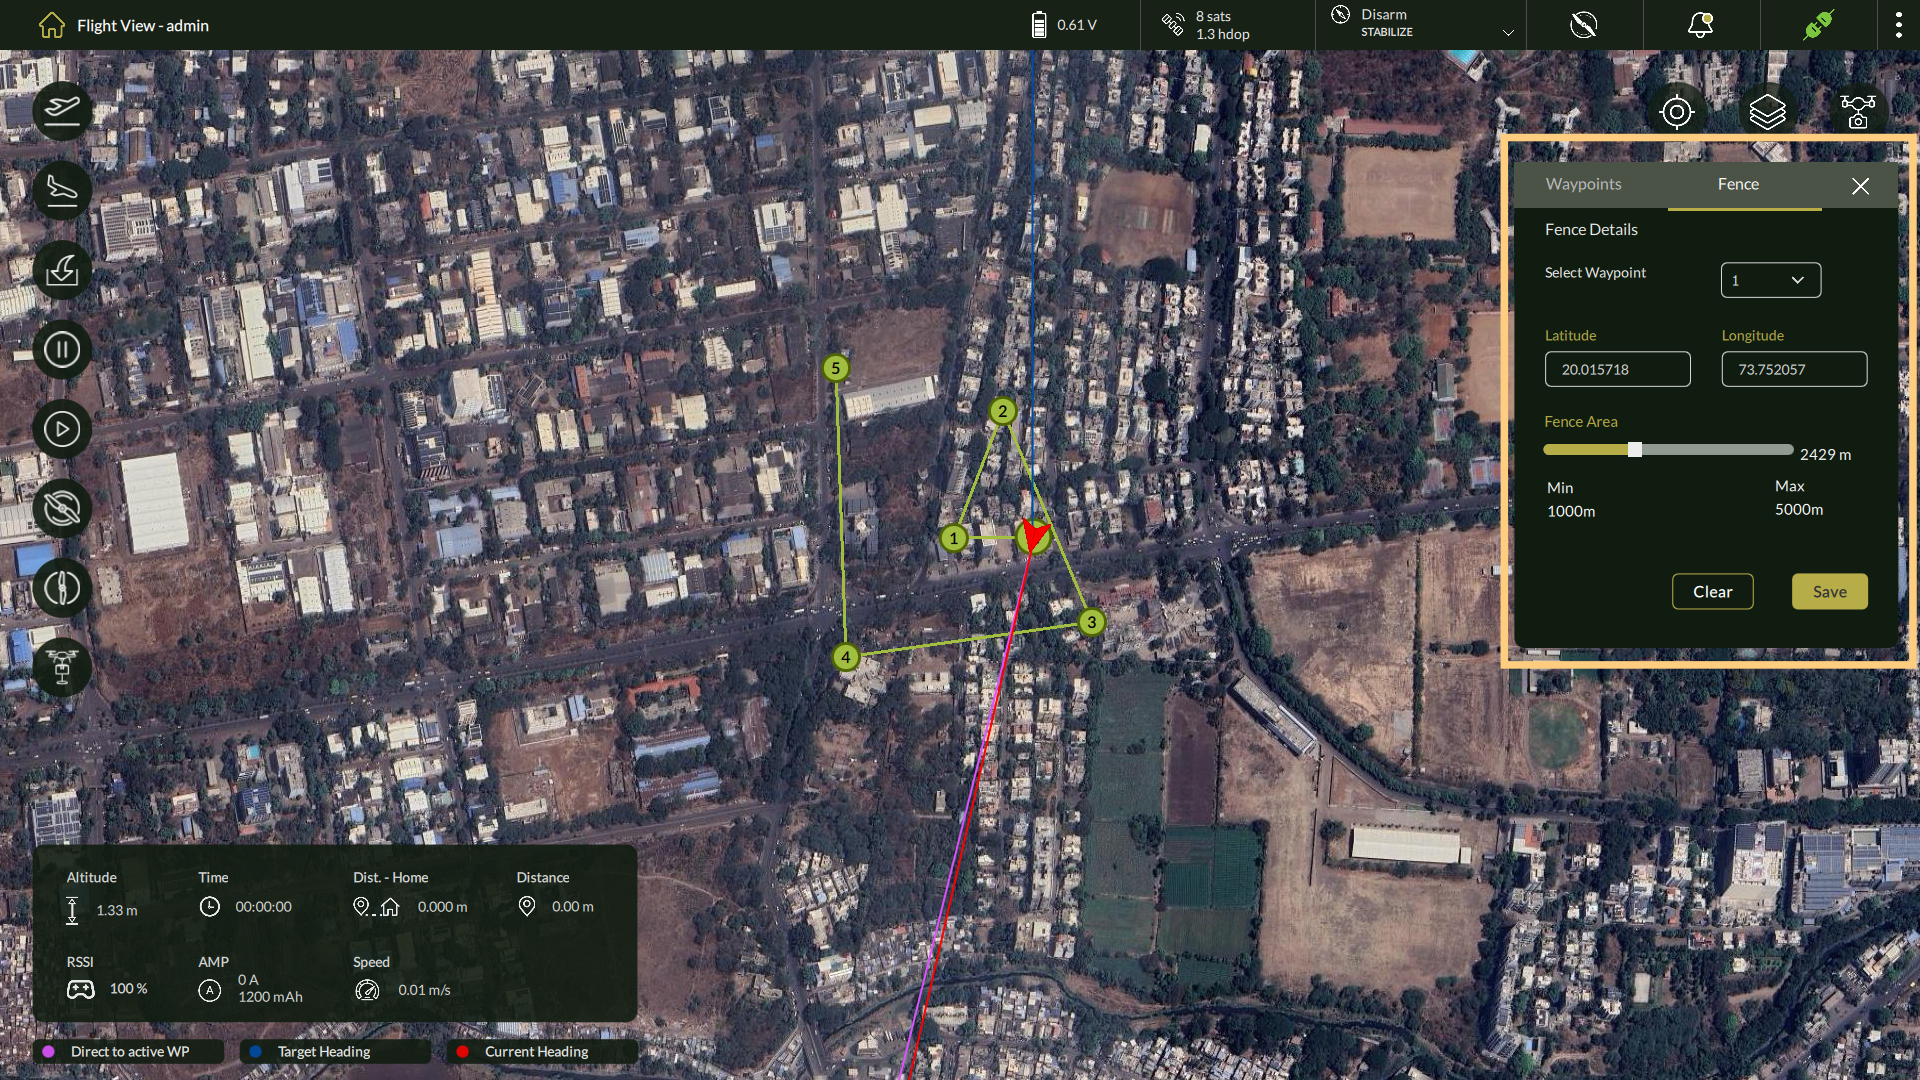
| Note: The fence applies globally to the entire mission, not individual waypoints. Ensure the radius falls within safe and legal flight zones. |
4.5 Saving and Managing Missions
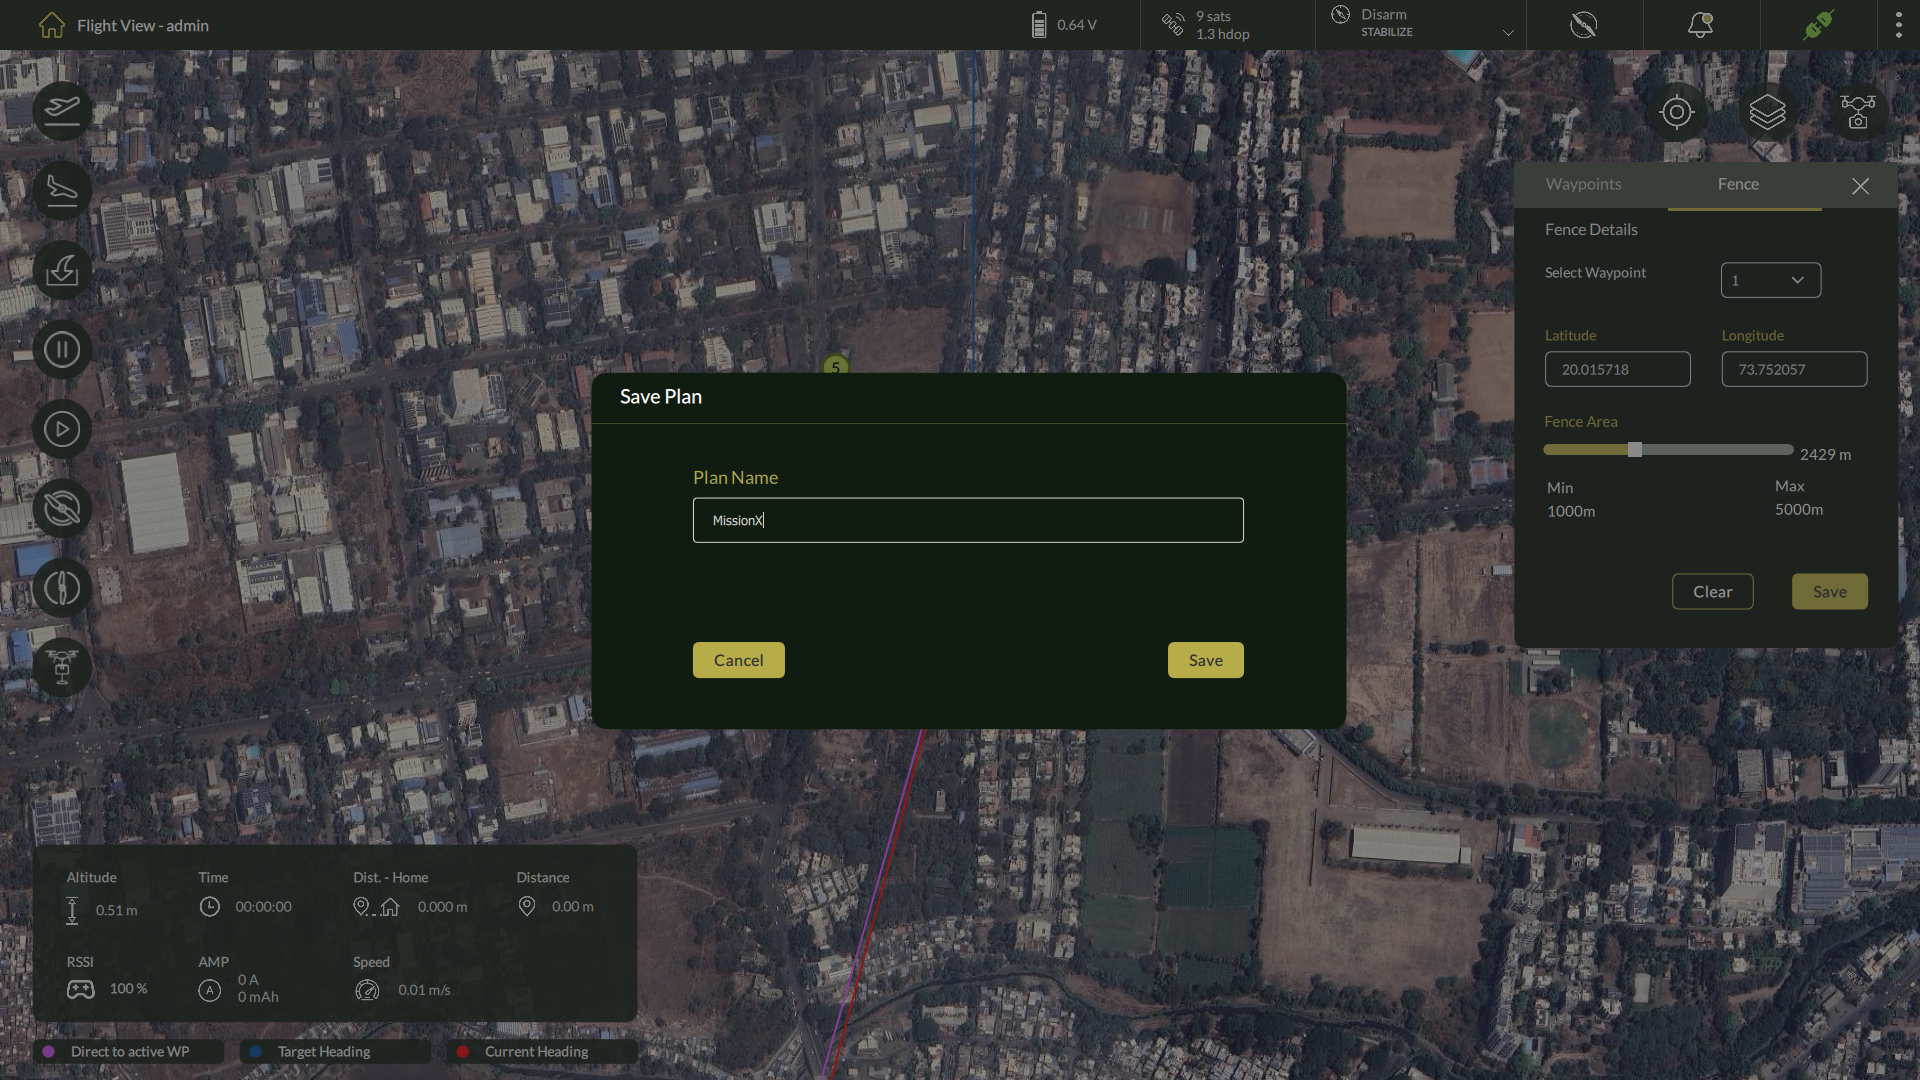
4.5.1 Saving a Mission Plan
Once your mission is ready, follow these steps to save it:
Steps to Save the Plan
- In the Waypoint Panel, click the Save button at the bottom-right corner.
- A Save Plan dialog box will appear.
- Enter a suitable Plan Name in the input field.
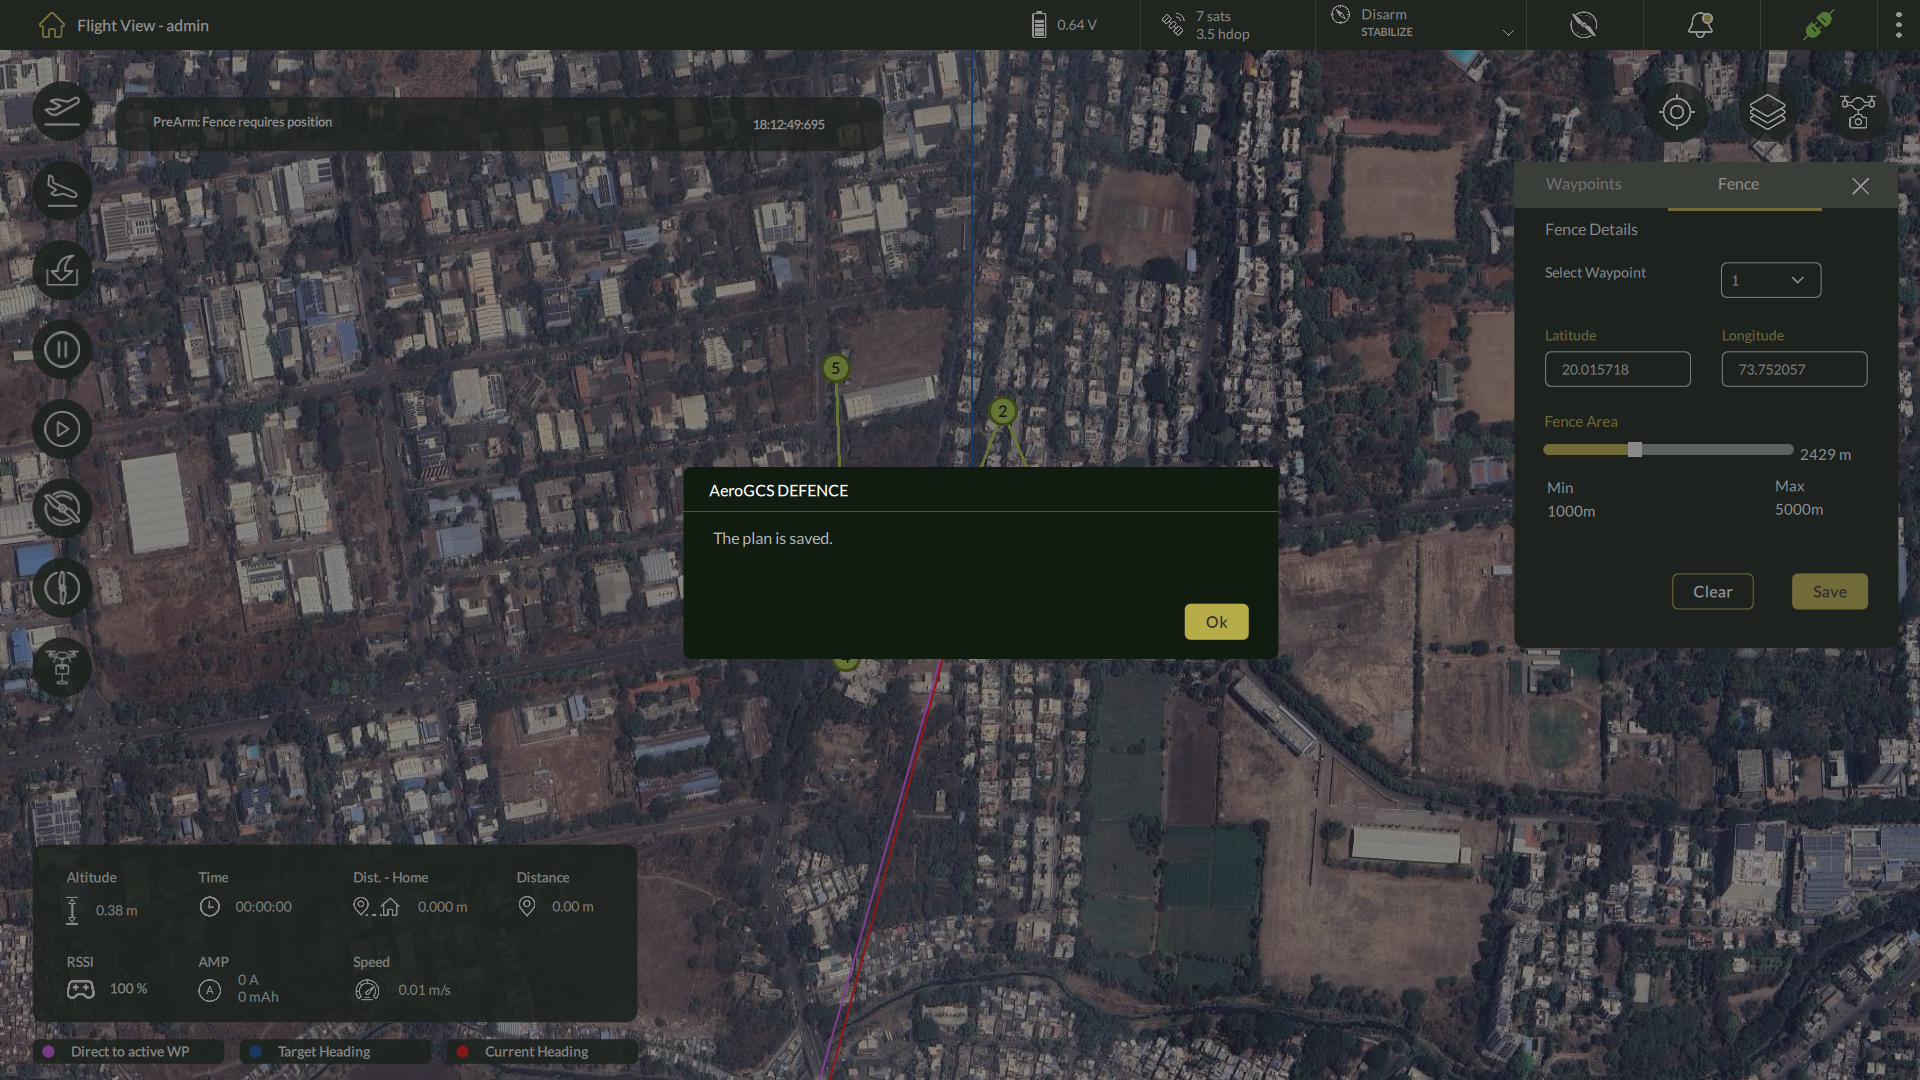
- Click Save to confirm.
4.5.2 Accessing Saved Plans
You can access and manage previously saved missions using the Plans module on the Home screen.
Steps to View Saved Plans
- Click the Home icon in the top-left navigation bar to return to the Home screen.
- Select the Plans
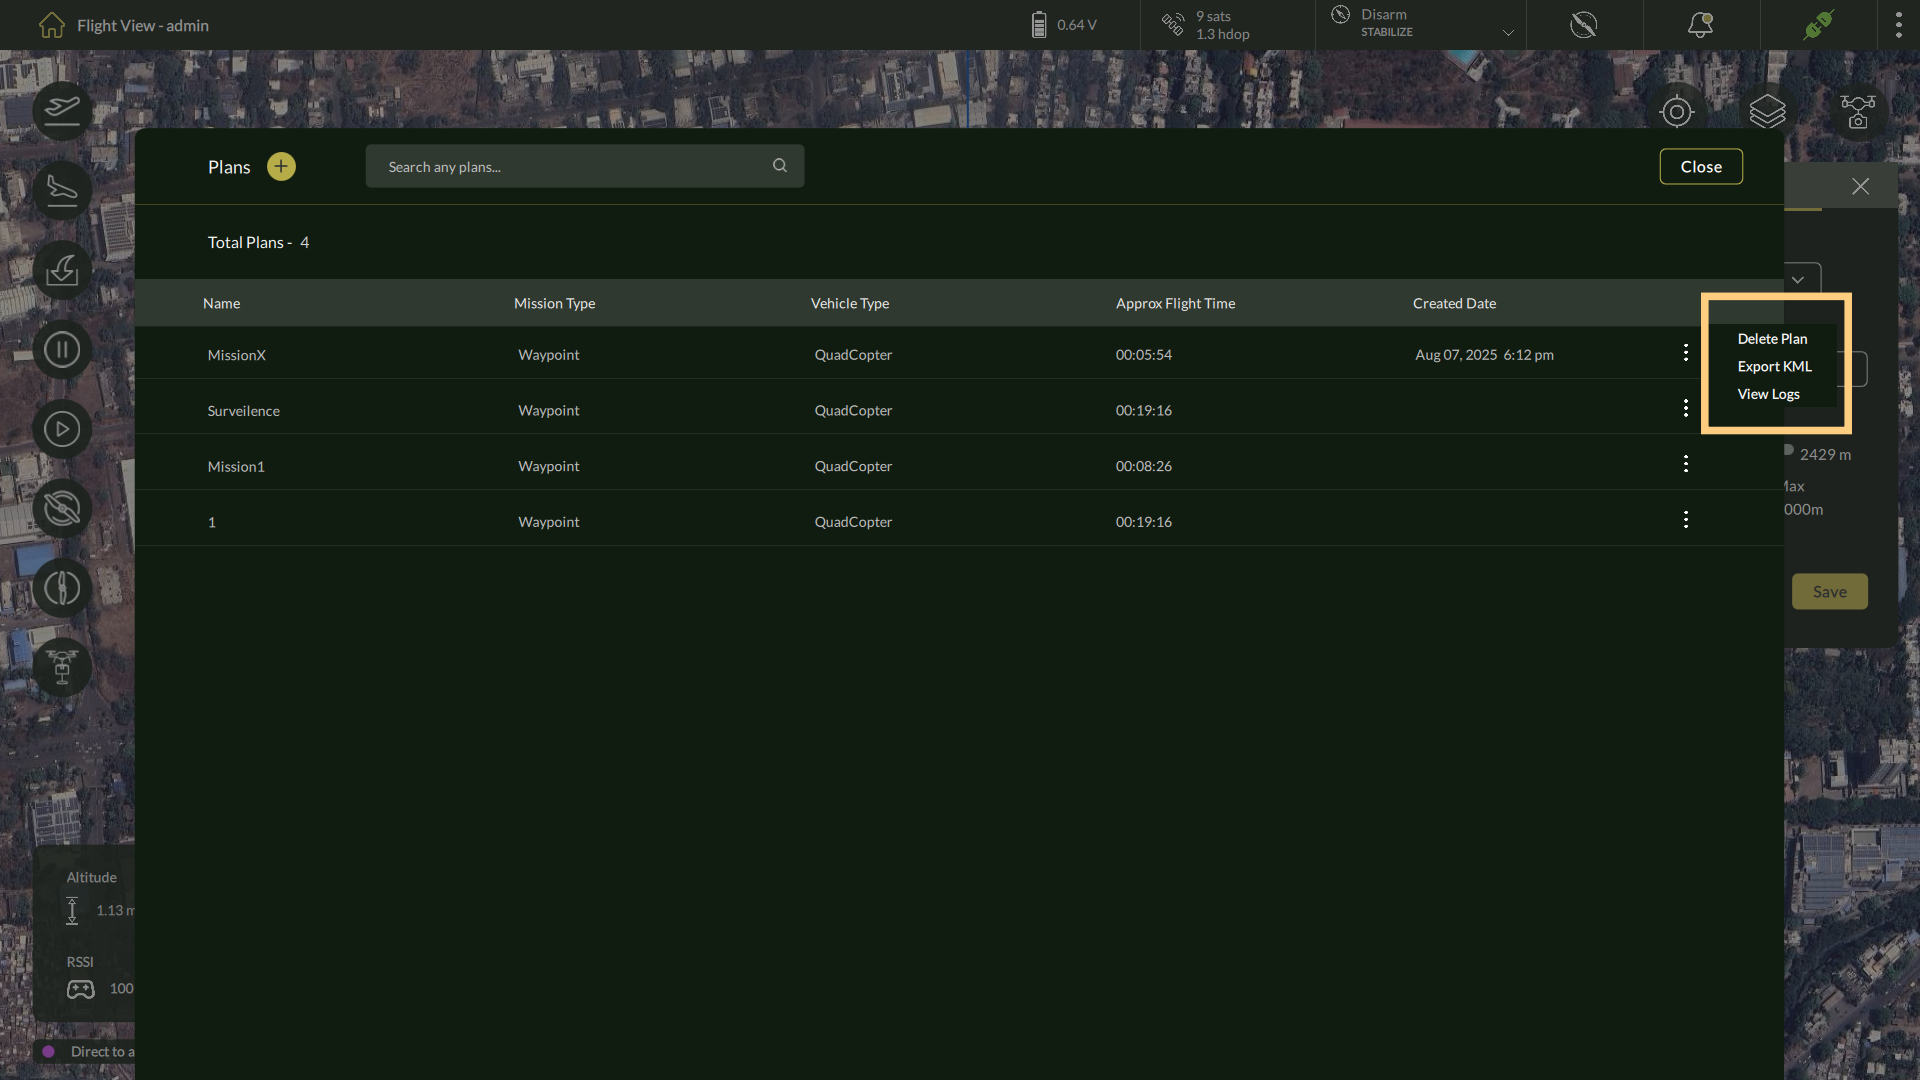
- The Plans List view will open, showing all saved missions in a tabular format.
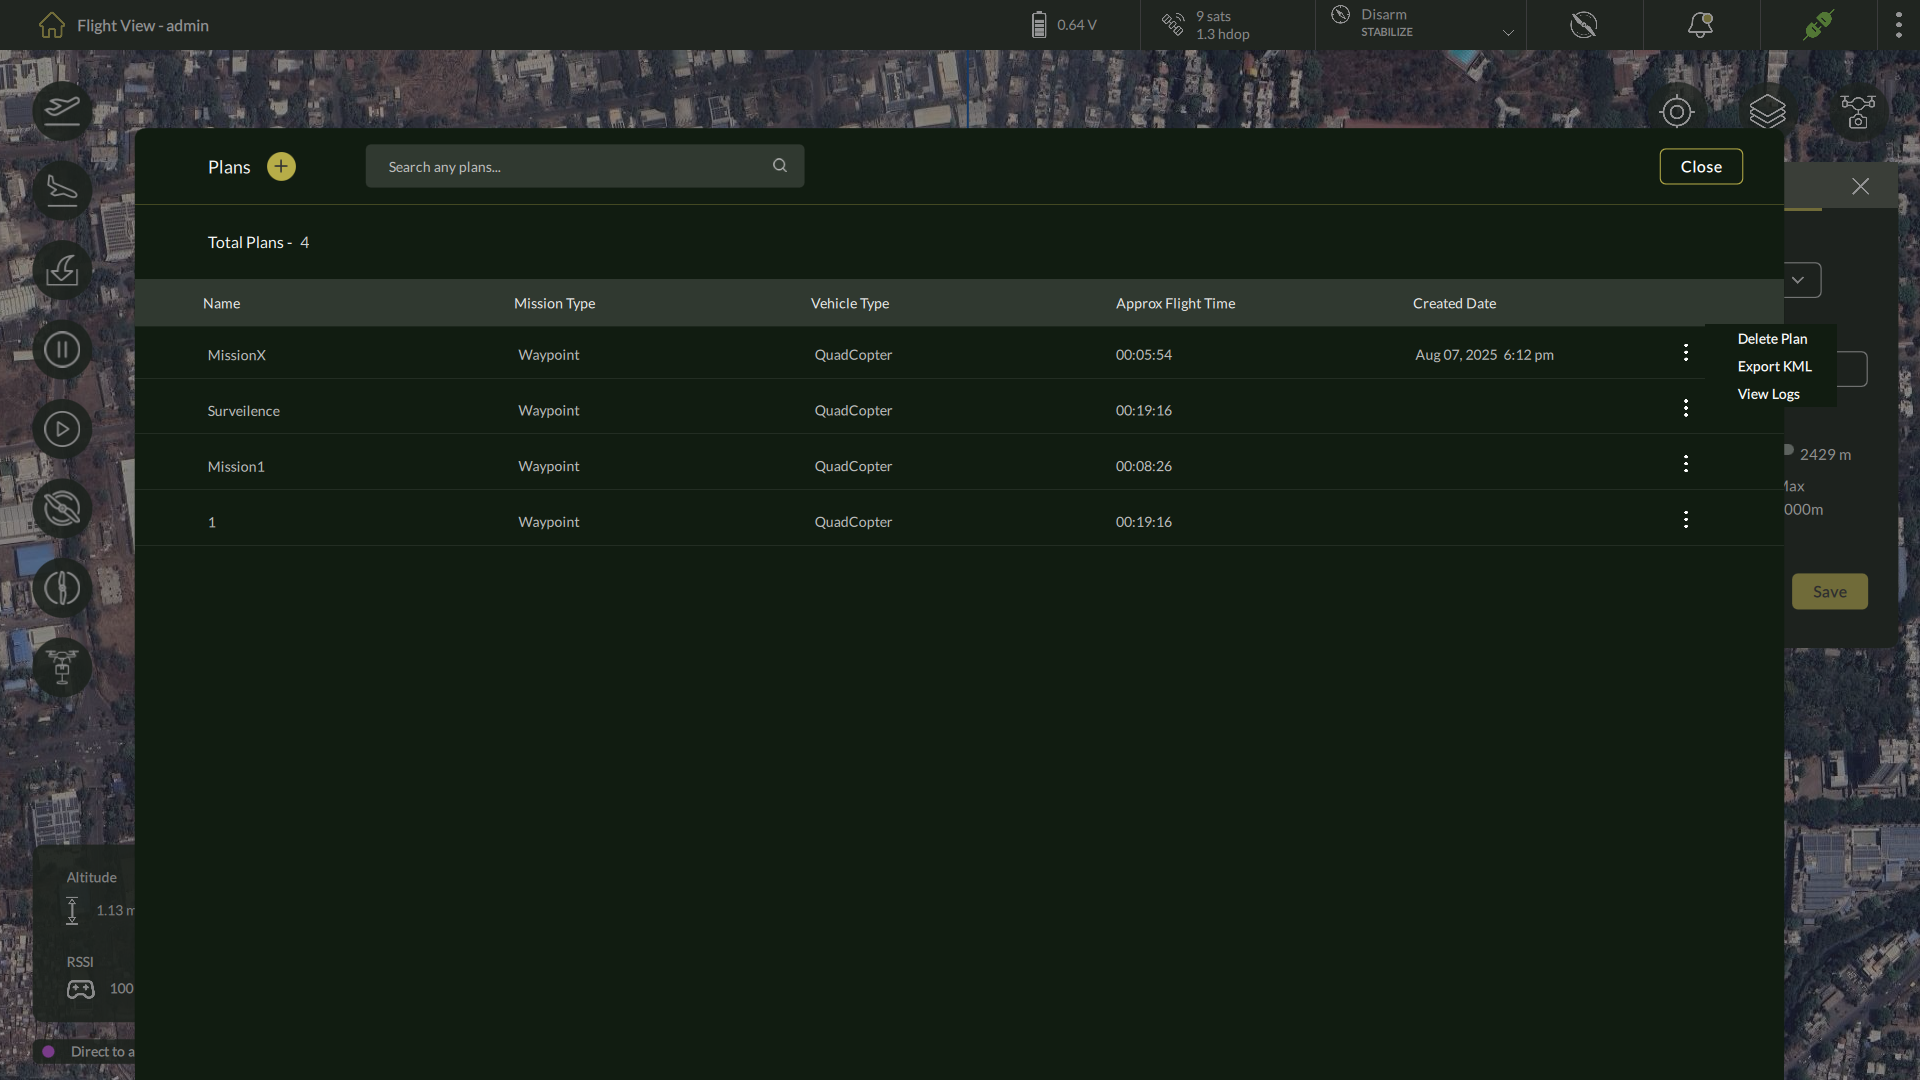
4.5.3 Plan List – Overview of Columns
| Column | Description |
| Name | Name of the saved mission plan. |
| Mission Type | Type of mission (e.g., Surveillance, Mapping). |
| Vehicle Type | Assigned drone or platform type. |
| Approx Flight Time | Estimated time for completing the mission. |
| Created Date | Date and time the plan was saved. |
| Options Menu | Three-dot menu for managing individual plans. |
4.5.4 Managing Saved Plans
Available Options
| Option | Description |
| Delete Plan | Permanently removes the selected plan from the system. |
| Export KML | Exports the selected plan as a KML file for use in GIS tools. |
| View Logs | Displays logs associated with this plan including flight history. |
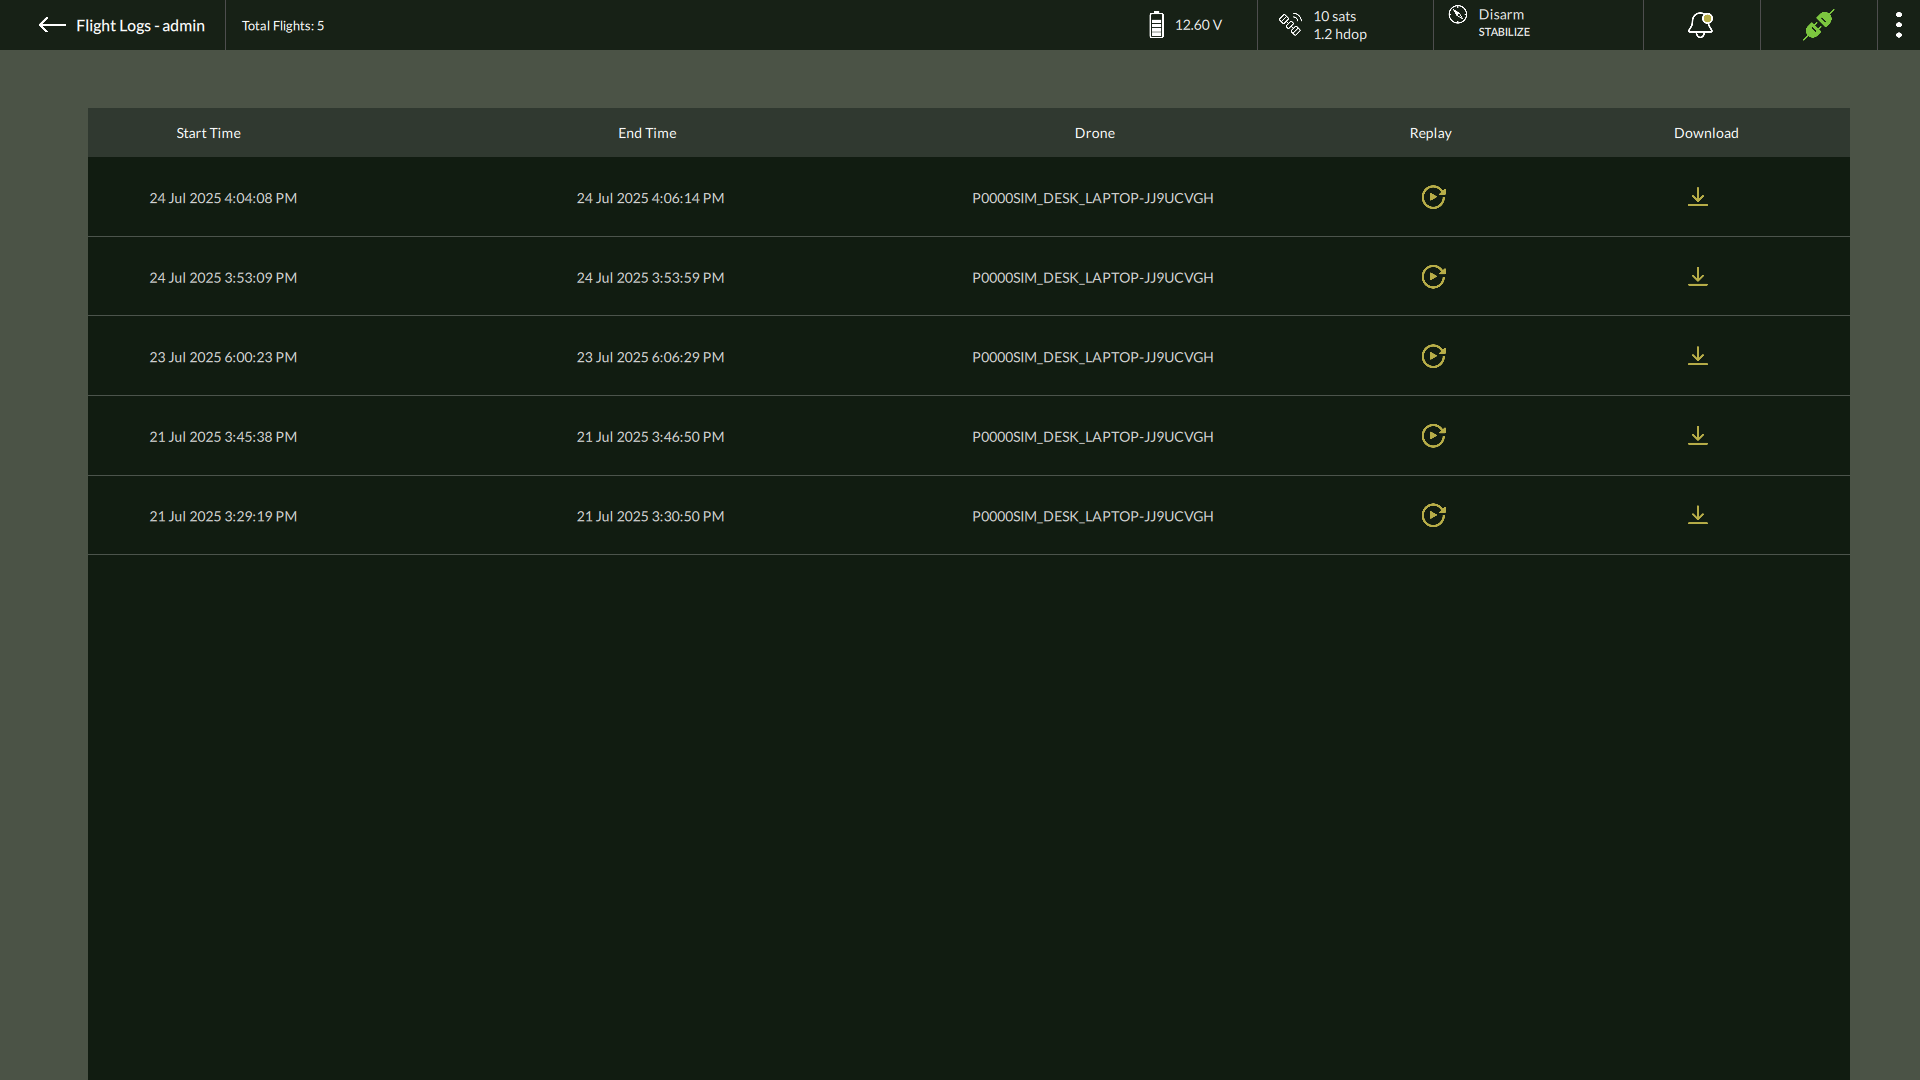
4.5.5 Viewing Flight Logs
| Log Field | Description |
| Start Time | When the mission started. |
| End Time | When the mission ended. |
| Drone | The drone used in this mission. |
| Replay | Option to replay the mission (if available). |
| Download | Download the mission log file. |

| Tip: Use the Search Field at the top of the Plans screen to quickly locate a mission by name. |
4.6 Loading and Editing Existing Missions
4.6.1 Loading a Saved Mission
To continue working on an existing mission, follow the steps below to load a saved plan from the Plans List screen.
Steps:
- Click the Home icon from the top-left navigation bar to access the Plans screen.
- Locate the required mission in the Plans List
- Use the Search bar at the top to filter by plan name, if needed.
- Click on the desired plan row to open it.
- The selected mission will be loaded into the planning interface, displaying all previously defined waypoints and configurations.
Note: Make sure the drone is connected before executing or editing the loaded mission. |
4.6.2 Editing a Loaded Mission
Editable Components:
| Component | Description |
| Waypoints | Add, delete, or reposition waypoints. |
| Waypoint Properties | Modify altitude, speed, gimbal settings, and camera triggers. |
| Fence Settings | Adjust or redefine the mission geofence. |
Steps:
- Load the mission as described in Section 4.6.1.
- Make required modifications directly on the map or in the right-hand configuration panel:
- Move or add waypoints.
- Adjust waypoint altitude, speed, camera trigger, or gimbal settings.
- Edit the Fence Area by switching to the Fence
- Click the Save button in the lower-right corner of the panel to update the mission.

| Note: When saving an edited mission, the existing plan will be overwritten. Renaming the plan is not supported. If you need to preserve the original, create a new mission manually. |
4.7 Deleting and Exporting Missions
4.7.1 Deleting a Mission
If a mission is no longer needed, you can remove it permanently from the system.
Steps:
- Click the Home icon in the top-left to open the saved plans list.
- Locate the mission you want to delete.
- Click the three-dot menu (⋮) at the end of the corresponding row.
- Select Delete Plan from the dropdown options.
- Confirm the deletion when prompted.
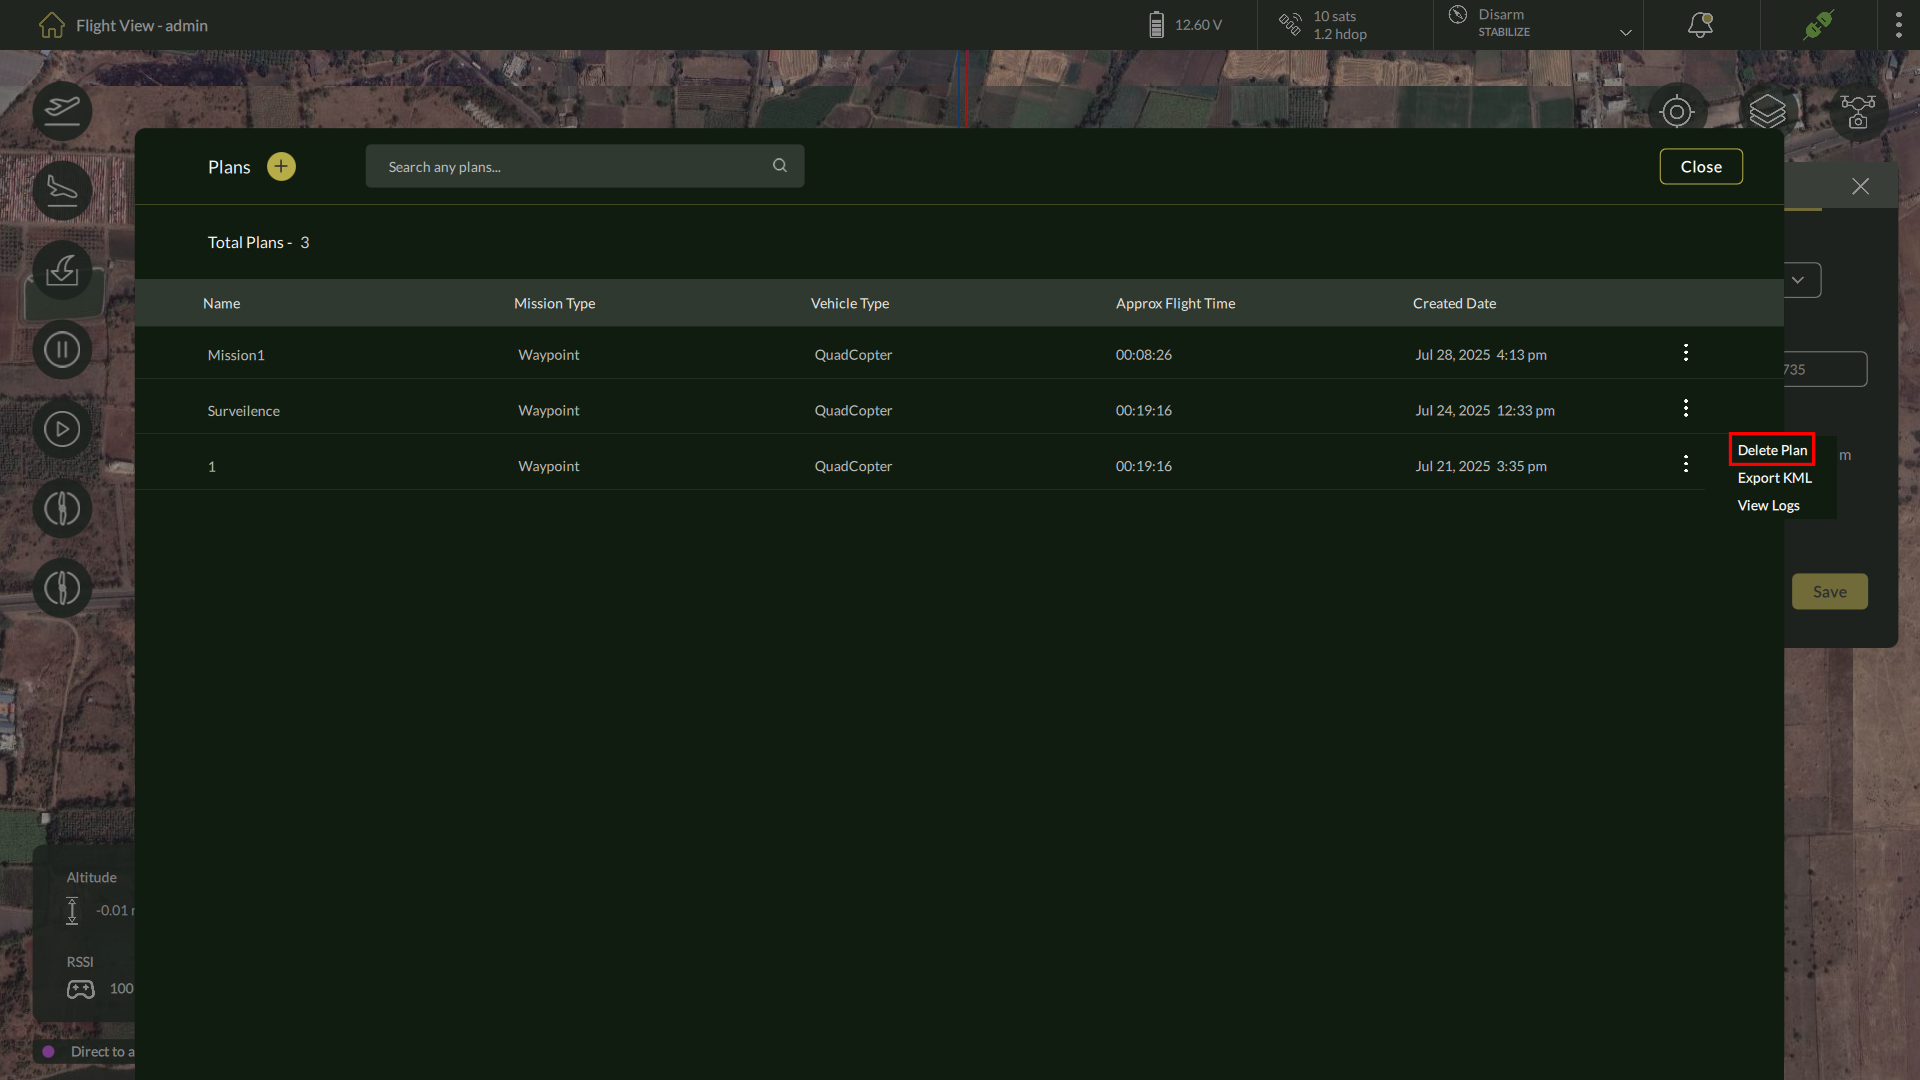
| Caution: Deleting a mission is irreversible. Ensure you no longer need the mission or have exported it before deletion. |
4.7.2 Exporting a Mission as KML
AeroGCS DEFENCE allows exporting mission plans in KML (Keyhole Markup Language) format, which is compatible with GIS and 3D visualization tools like Google Earth.
Steps:
- Click the Home icon in the top-left to open the saved plans list.
- Locate the mission you want to delete.
- Click the three-dot menu (⋮) in the row corresponding to the mission.
- Select Export KML.
- The system will generate and download the .kml file for the selected mission.
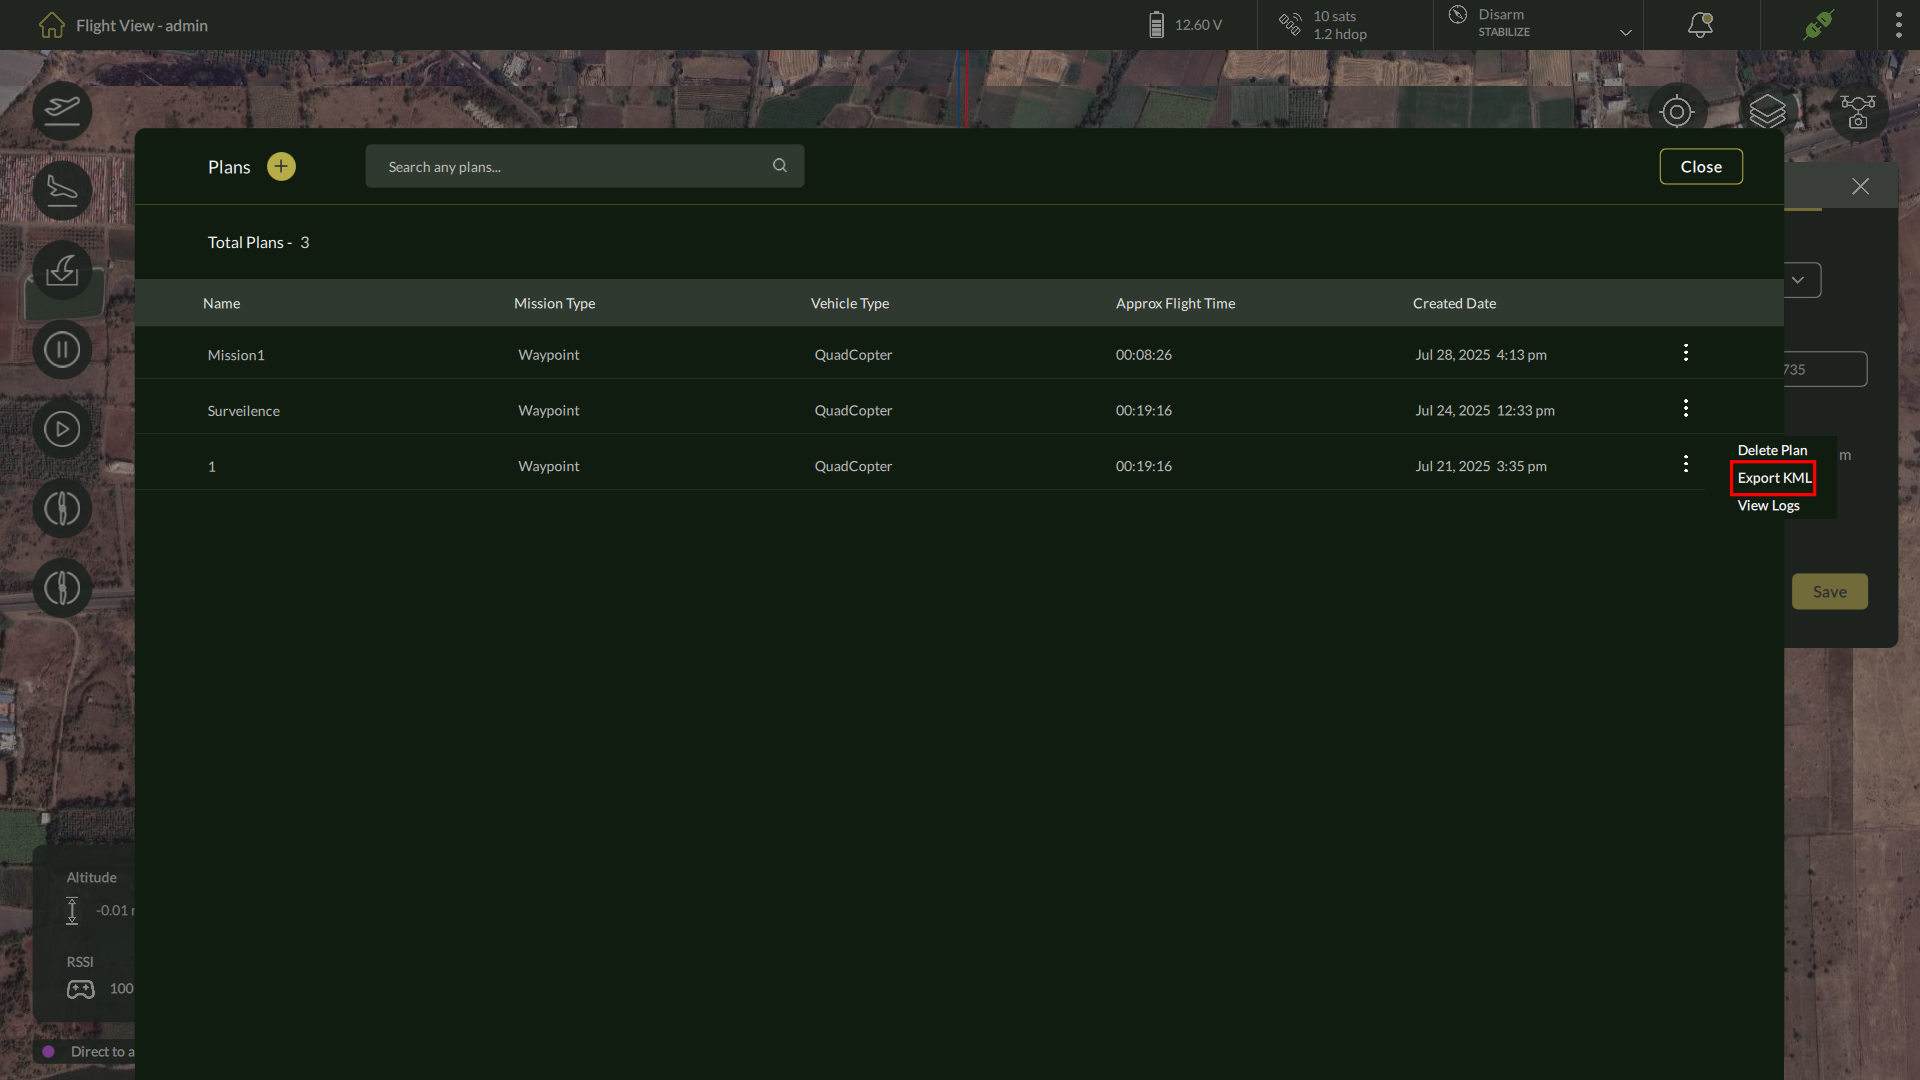
| Tip: Exporting a mission is helpful for archiving, sharing with collaborators, or visualizing mission geometry in third-party tools. |
4.8 Viewing Mission Logs
4.8.1 Accessing Mission Logs
You can view logs for any saved or executed mission using the Plans screen.
Steps:
- Click the Home icon in the top-left navigation bar to open the list of saved plans/missions.
- Locate the desired mission from the list.
- Click the three-dot menu (⋮) at the end of the mission row.
- Select View Logs from the dropdown menu.
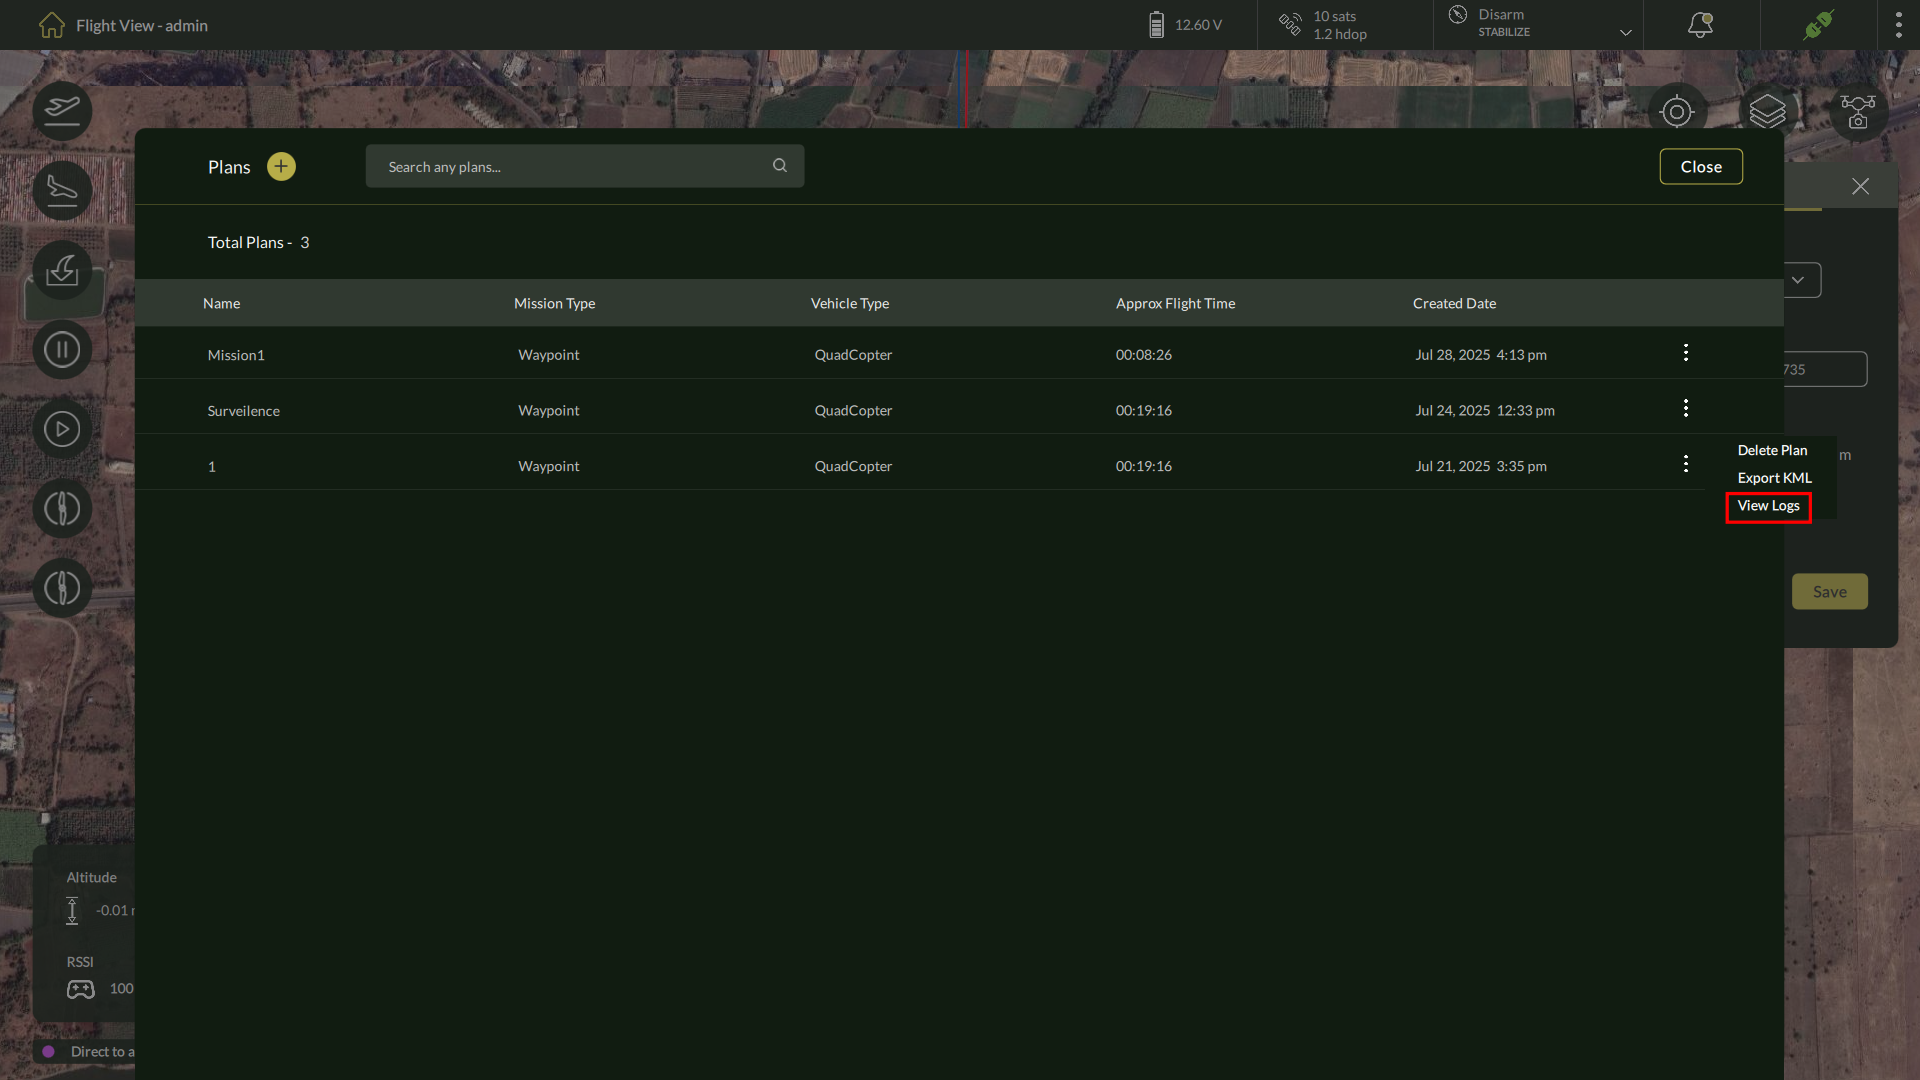
4.8.2 Log Details and Playback
| Field | Description |
| Start Time | Timestamp when the mission execution began. |
| End Time | Timestamp when the mission execution concluded. |
| Drone | Name or identifier of the drone used for the mission. |
| Replay | Launches the mission playback for review and analysis. |
| Download | Exports the log file for local storage, diagnostics, or reporting purposes. |
| Tip: Use Replay for post-mission analysis or pilot training. Export logs regularly for compliance and audit records. |
4.9 Mission Execution
4.9.1 Executing the Planned Mission
To begin flight execution:
- Ensure the drone is connected and the mission is visible on the flight map.
- Confirm that the drone is properly armed using the Arm button on the left-side flight controls.
- Click the Take-Off button to initiate pre-flight checks and start the mission.
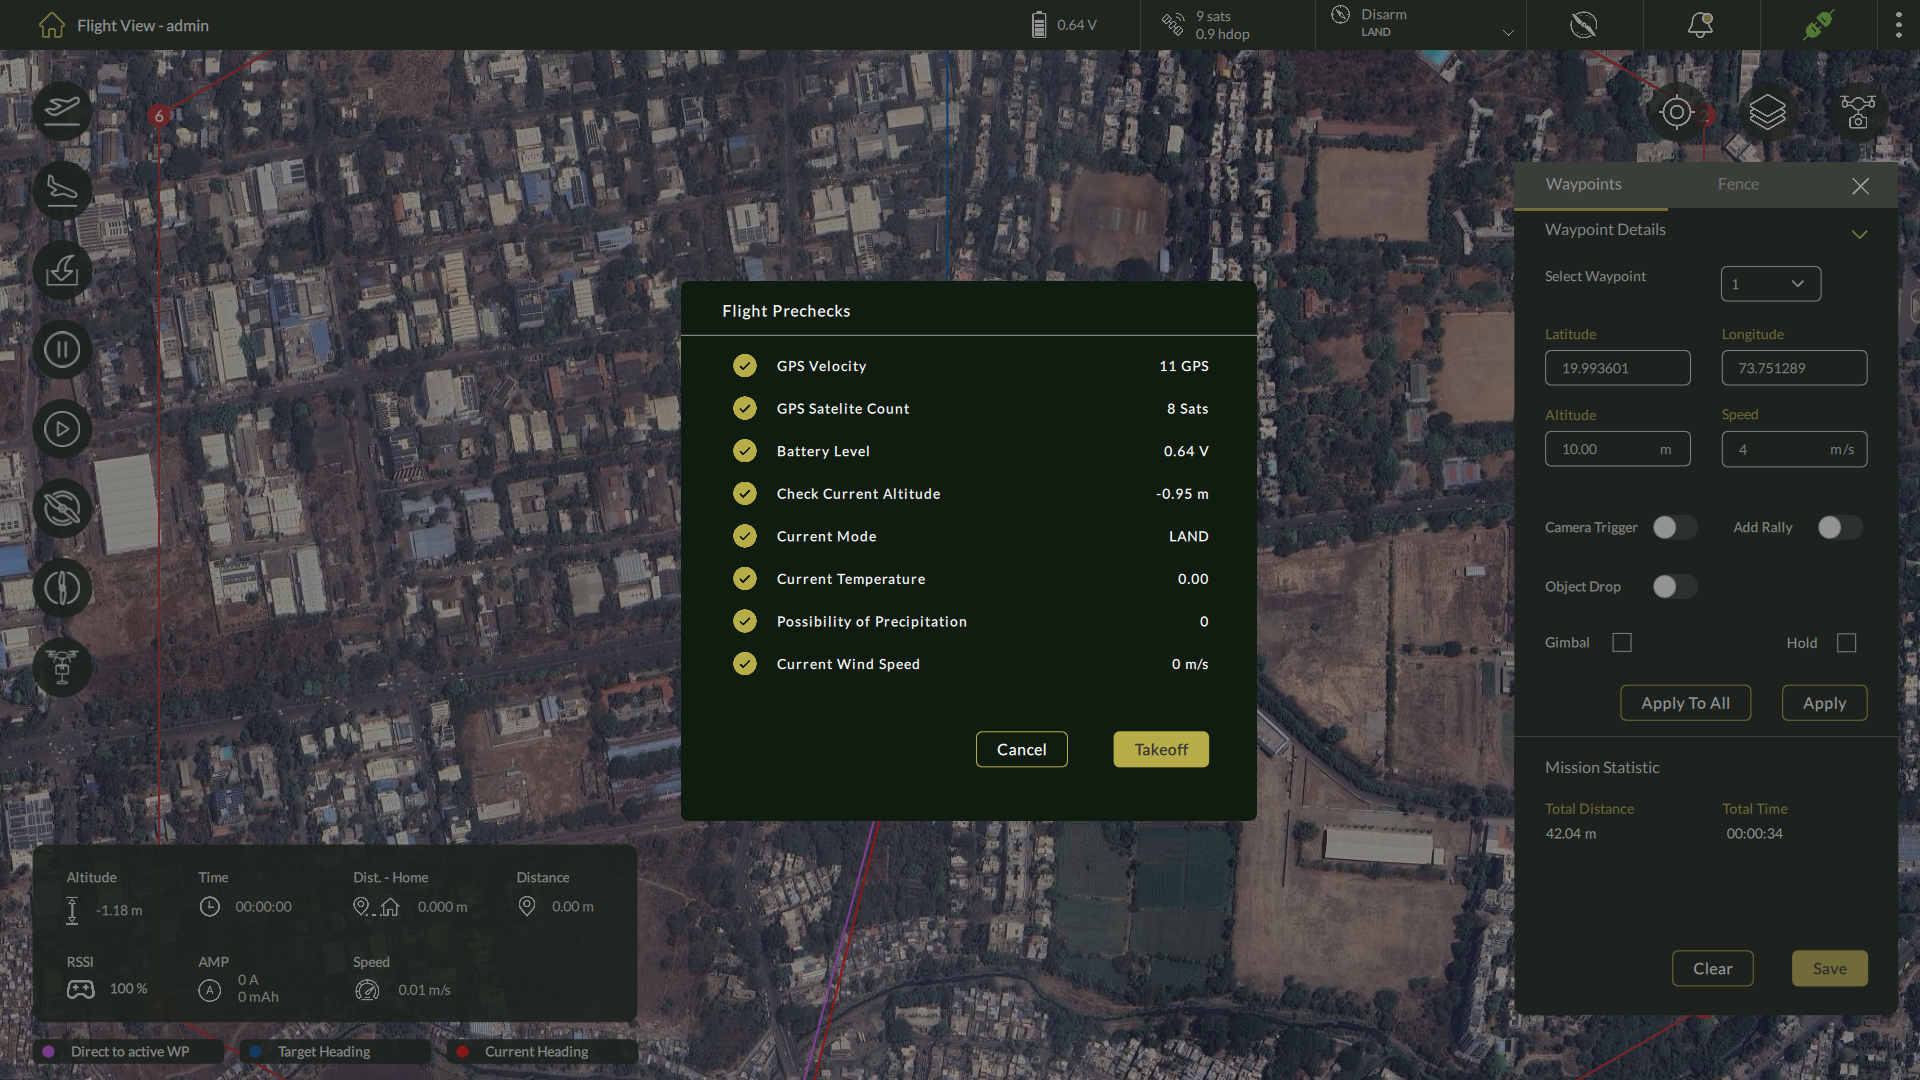
Click on “Takeoff” to start flight.
Once airborne, the drone will automatically begin navigating through the configured waypoints in sequence.
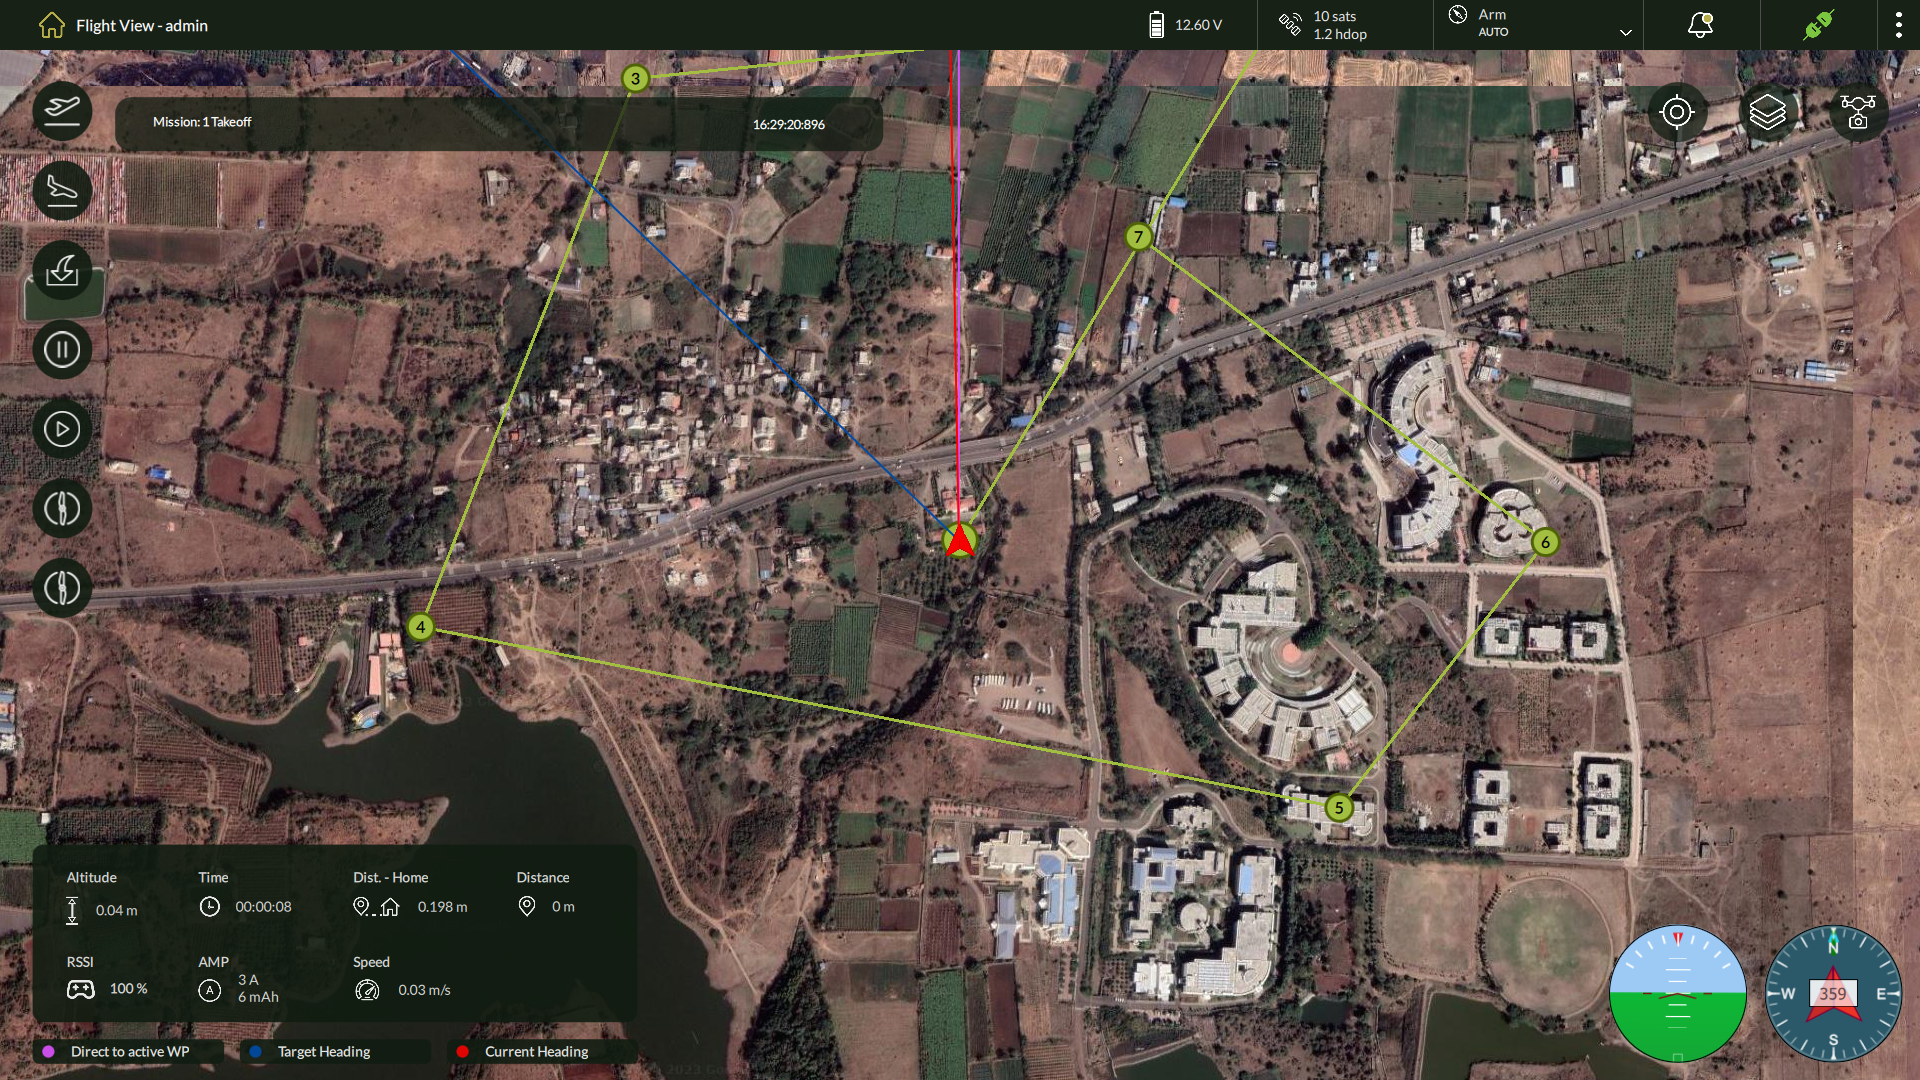
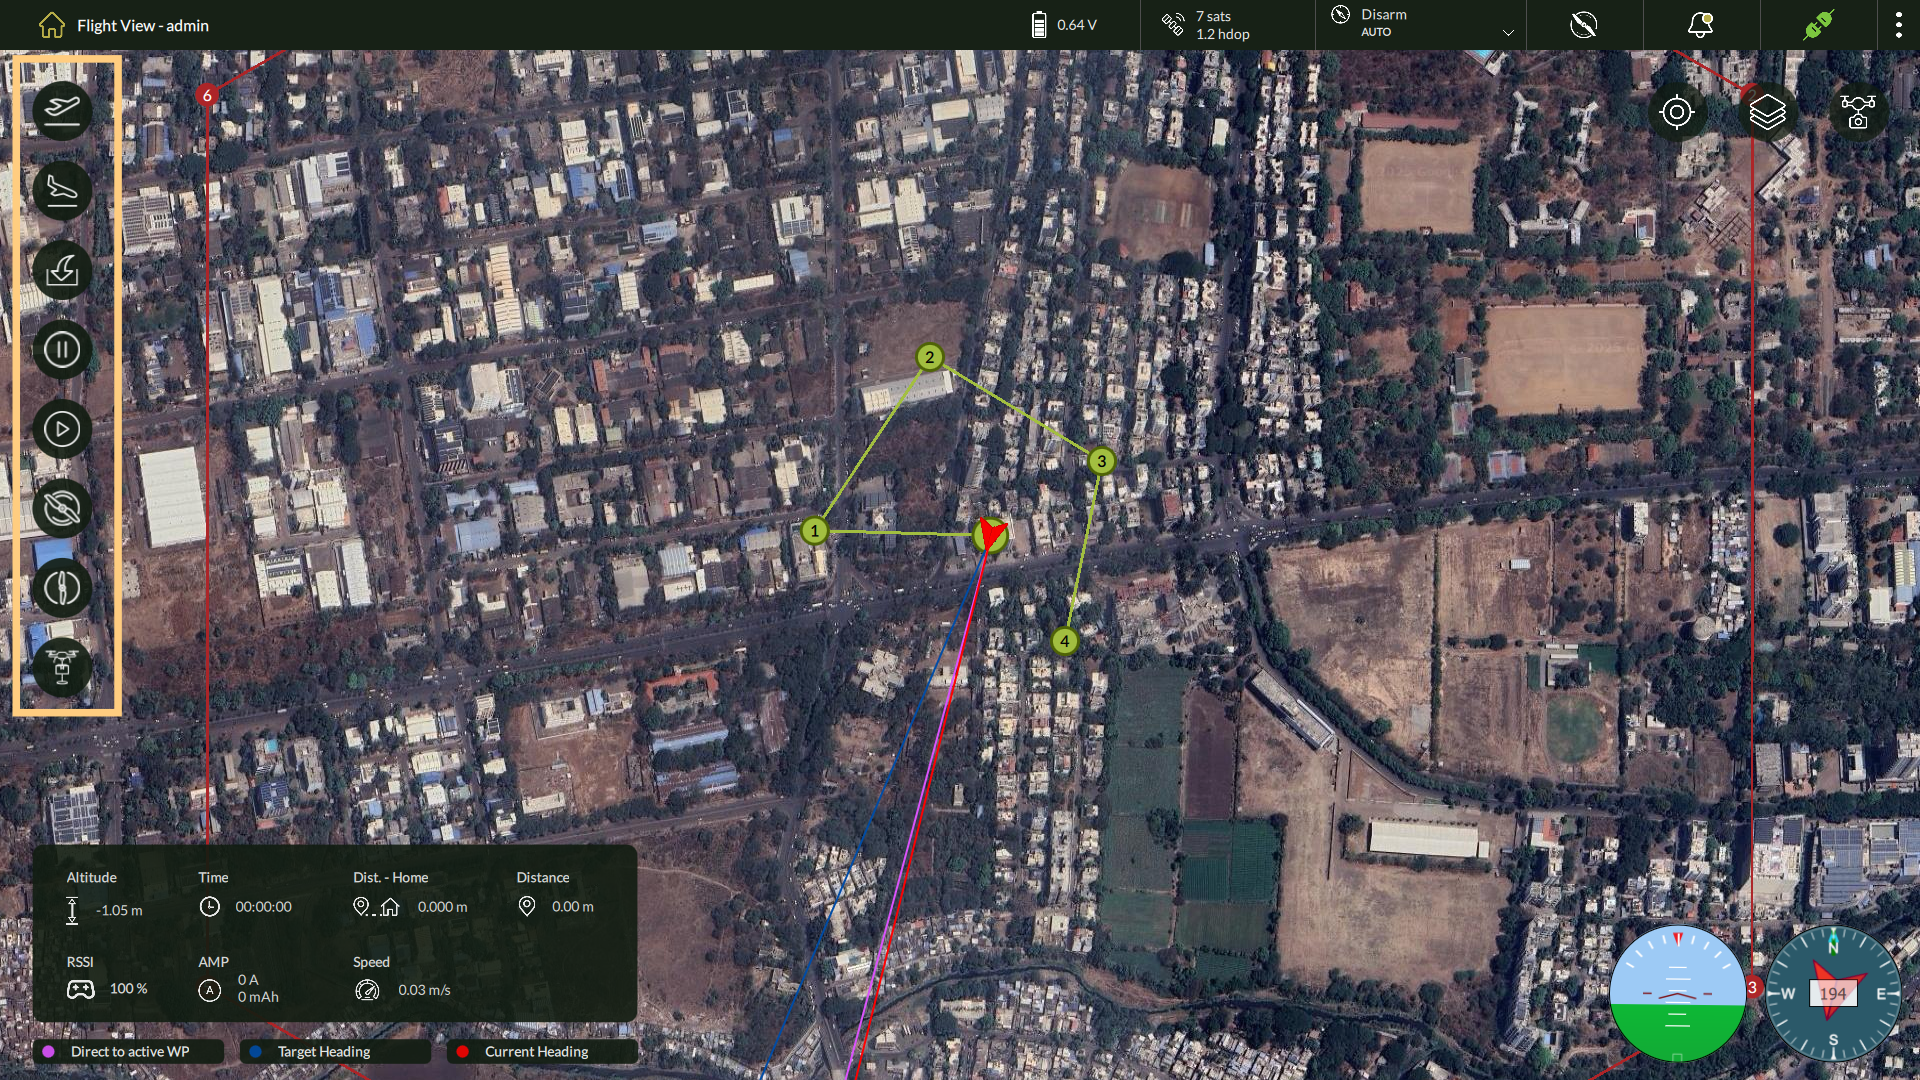
4.9.2 In-Flight Control Options
| Control | Function |
| Pause | Temporarily halts the drone’s movement and holds it in hover mode. |
| Resume | Continues the mission from the paused waypoint or location. |
| RTL | Commands the drone to return to home or the nearest rally point. |
| Land | Safely lands the drone at the current or predefined location. |
| Disarm | Deactivates motors post-landing for safe shutdown. |
| Object Drop | To drop the object at specific location manually. |
| Caution: Always monitor telemetry, drone heading, and notifications during execution. Use the Flight Logs feature post-mission to review performance and diagnose issues if needed. |
4.10 No-Fly Zone Visualization
4.10.1 How No-Fly Zones Are Displayed
- No-Fly Zones appear as red circular overlays directly on the planning and flight maps.
- These overlays are visible during both mission planning and live flight
- The system automatically renders NFZs based on the internal map data or imported restrictions.
4.10.2 Operational Guidelines for NFZs
| Scenario | System Behavior |
| Waypoint Inside NFZ | The waypoint may not be saved or the system may prompt a warning. |
| Flight Path Intersects NFZ | A visual alert is shown; mission execution might be blocked or flagged. |
| Manual Flight into NFZ | Notifications are triggered; user must override with caution if permitted. |
| Note: AeroGCS DEFENCE does not permit autonomous entry into NFZs unless manually overridden (if such an override is enabled in settings). |
4.10.3 Best Practices
- Always verify NFZ overlays before finalizing a mission plan.
- Adjust waypoints and flight path to avoid intersecting red zones.
- For areas not covered by default maps, use the Map Manager to import regulatory overlays (if supported).
4.11 Mission Type and Manual Planning Options
AeroGCS DEFENCE supports two distinct approaches to flight mission planning: Automatic and Manual. The mode selected depends on whether the user wants to create a waypoint-based plan using the map interface, or fly the drone manually using onboard controls.
This section explains the differences, the appropriate use cases, and the steps required for each mission type.
4.11.1 Understanding Mission Types
| Mission Type | Description |
| Automatic Planning | In this mode, users create a complete mission plan by placing and configuring waypoints on the map. The drone will autonomously execute the plan based on the defined parameters. |
| Manual Planning | This mode allows the user to control the drone directly using ARM, Take-Off, Pause, Resume, RTL, and Disarm commands. No waypoints or predefined path are required. |
| ✅ Tip: Choose Automatic for planned surveys or mapping tasks; use Manual for exploratory or ad-hoc operations requiring real-time user control. |
4.11.2 Automatic Mission Planning – Overview
This is the default mission planning method in AeroGCS DEFENCE and has been fully detailed in Sections 4.3 to 4.10. It involves:
Key Steps:
- Add Waypoints: Start placing waypoints on the map (first waypoint appears at drone location by default).
- Configure Properties: Define altitude, speed, gimbal behavior, camera trigger, and hold settings for each waypoint.
- Set Fence (Optional): Define a geofence boundary to limit mission area.
- Save Mission: Save the plan for later reuse or export it as a KML file.
- Execute Plan: Once connected to the drone, click Take-Off to begin autonomous execution.
For detailed instructions, refer to:
- 4.3 – Adding Waypoints
- 4.4 – Configuring Waypoint Properties
- 4.5 – Saving and Managing Missions
- 4.9 – Mission Execution Summary
4.11.3 Manual Flight Mode
In Manual Mode, no predefined mission is required. Users directly control the drone in real time using on-screen commands after connecting to the drone.
Steps to Execute a Manual Flight:
- Connect the Drone
Navigate to the Connect option in the top-right menu. Select the desired connection type (e.g., Serial, UDP, TCP). Once connected, all flight controls become active. - Arm the Drone
Click the Arm button to activate the drone motors. - Initiate Take-Off
Press Take-Off to launch the drone. AeroGCS DEFENCE performs pre-flight checks automatically. - Control Flight in Real-Time
Use the following controls on the left-side panel:- Pause: Hover at current location
- Resume: Resume paused mission
- RTL (Return to Launch): Return to home or nearest rally point
- Land: Safely land at designated point
- Disarm the Drone
After landing, click Disarm to shut down motors safely.
| ⚠️ Note: Manual mode offers greater flexibility, but should be used with caution, especially in environments with restricted airspace or complex terrain. |
4.11.4 Key Differences at a Glance
| Feature | Automatic Planning | Manual Planning |
| Uses Waypoints | ✅ Yes | ❌ No |
| Requires Pre-Plan | ✅ Yes | ❌ No |
| Real-Time Control | ❌ No (predefined execution) | ✅ Yes (manual commands) |
| Suitable for Surveys | ✅ Ideal | ⚠️ Limited |
| Requires RC Joystick | ❌ No | ✅ Recommended (for precise control) |
4.11.5 Clearing a Mission
AeroGCS DEFENCE allows users to clear an existing mission from the Fly View screen by removing all waypoints and resetting the mission workspace. This is useful when starting a new plan or discarding an incomplete mission.
Use Case
When you wish to discard the current waypoint layout and begin a fresh mission setup, use the Clear Mission option available in the Plans menu on the Home screen.
Steps to Clear a Mission:
- Click the Home icon on the top-left corner of the application to go to the main dashboard.
- In the Plans list view, locate the three dots (⋮) menu next to any listed plan.
- Select Clear Mission from the dropdown options.
- You will be redirected to the Fly View, where all waypoints on the map will be removed.
| ⚠️ Note: This operation does not delete the saved plan from storage—it only removes it from the current Fly View session. To delete a saved plan entirely, use the Delete Plan option from the same menu. |
4.11.6 Selecting Vehicle and Flight Type from Menu Options
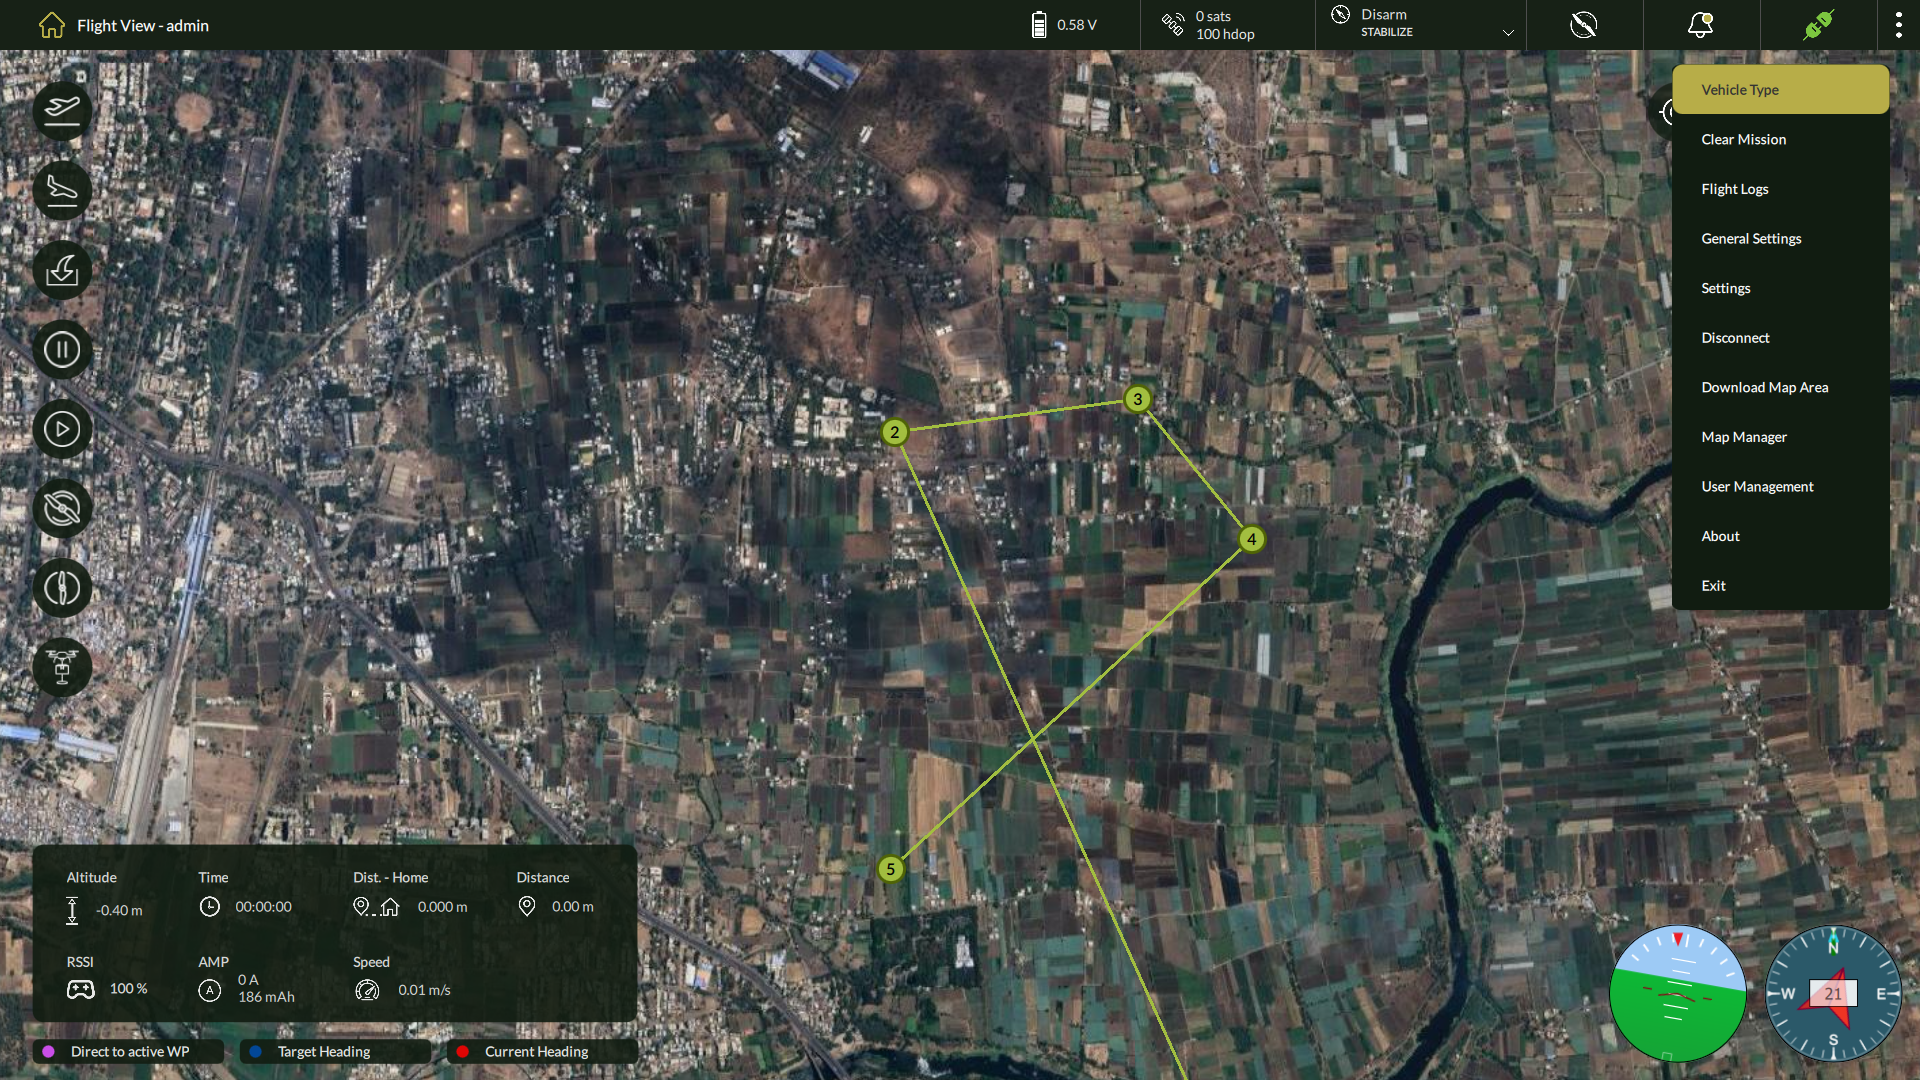
In addition to selecting the mission type during plan creation, AeroGCS DEFENCE allows you to dynamically configure the vehicle type and associated flight type from the three-dot options menu on the Home screen. This ensures flexibility in setting up the appropriate drone platform and flight mode before initiating a mission.
Vehicle Type Options
Users can choose between the following aerial platforms:
- Multirotor: Suitable for low-speed, high-precision maneuvers and hover-based missions.
- VTOL (Vertical Take-Off and Landing): Combines rotorcraft and fixed-wing benefits—ideal for long-range or large-area coverage missions.
Note: The VTOL option is currently disabled and not available in this version of AeroGCS DEFENCE. |
Flight Type Options
Once a vehicle type is selected, the system prompts you to select a Flight Type:
- Waypoint: Enables users to manually plan a new route by placing waypoints on the map.
- Read from Device: Automatically loads the last uploaded mission plan from the drone memory into the Fly View for immediate execution or review.
Steps to Select Vehicle and Flight Type:
- Click the three-dot (⋮) menu on the top-right of the Fly View screen.
- Select Vehicle Type from the dropdown list.
3. A pop-up appears prompting you to choose from:
- Multirotor
- VTOL
| Note: The VTOL (Vertical Take-Off and Landing) vehicle type is currently disabled and not available in this version of AeroGCS DEFENCE. The VTOL option may appear in menus or screenshots but is not selectable. This option may be enabled in a future release. |

4. After selecting the vehicle type, you will be prompted to select the Flight Type:
- Choose Waypoint to start a new manual plan.
- Choose Read from Device to load the last mission plan from the drone.
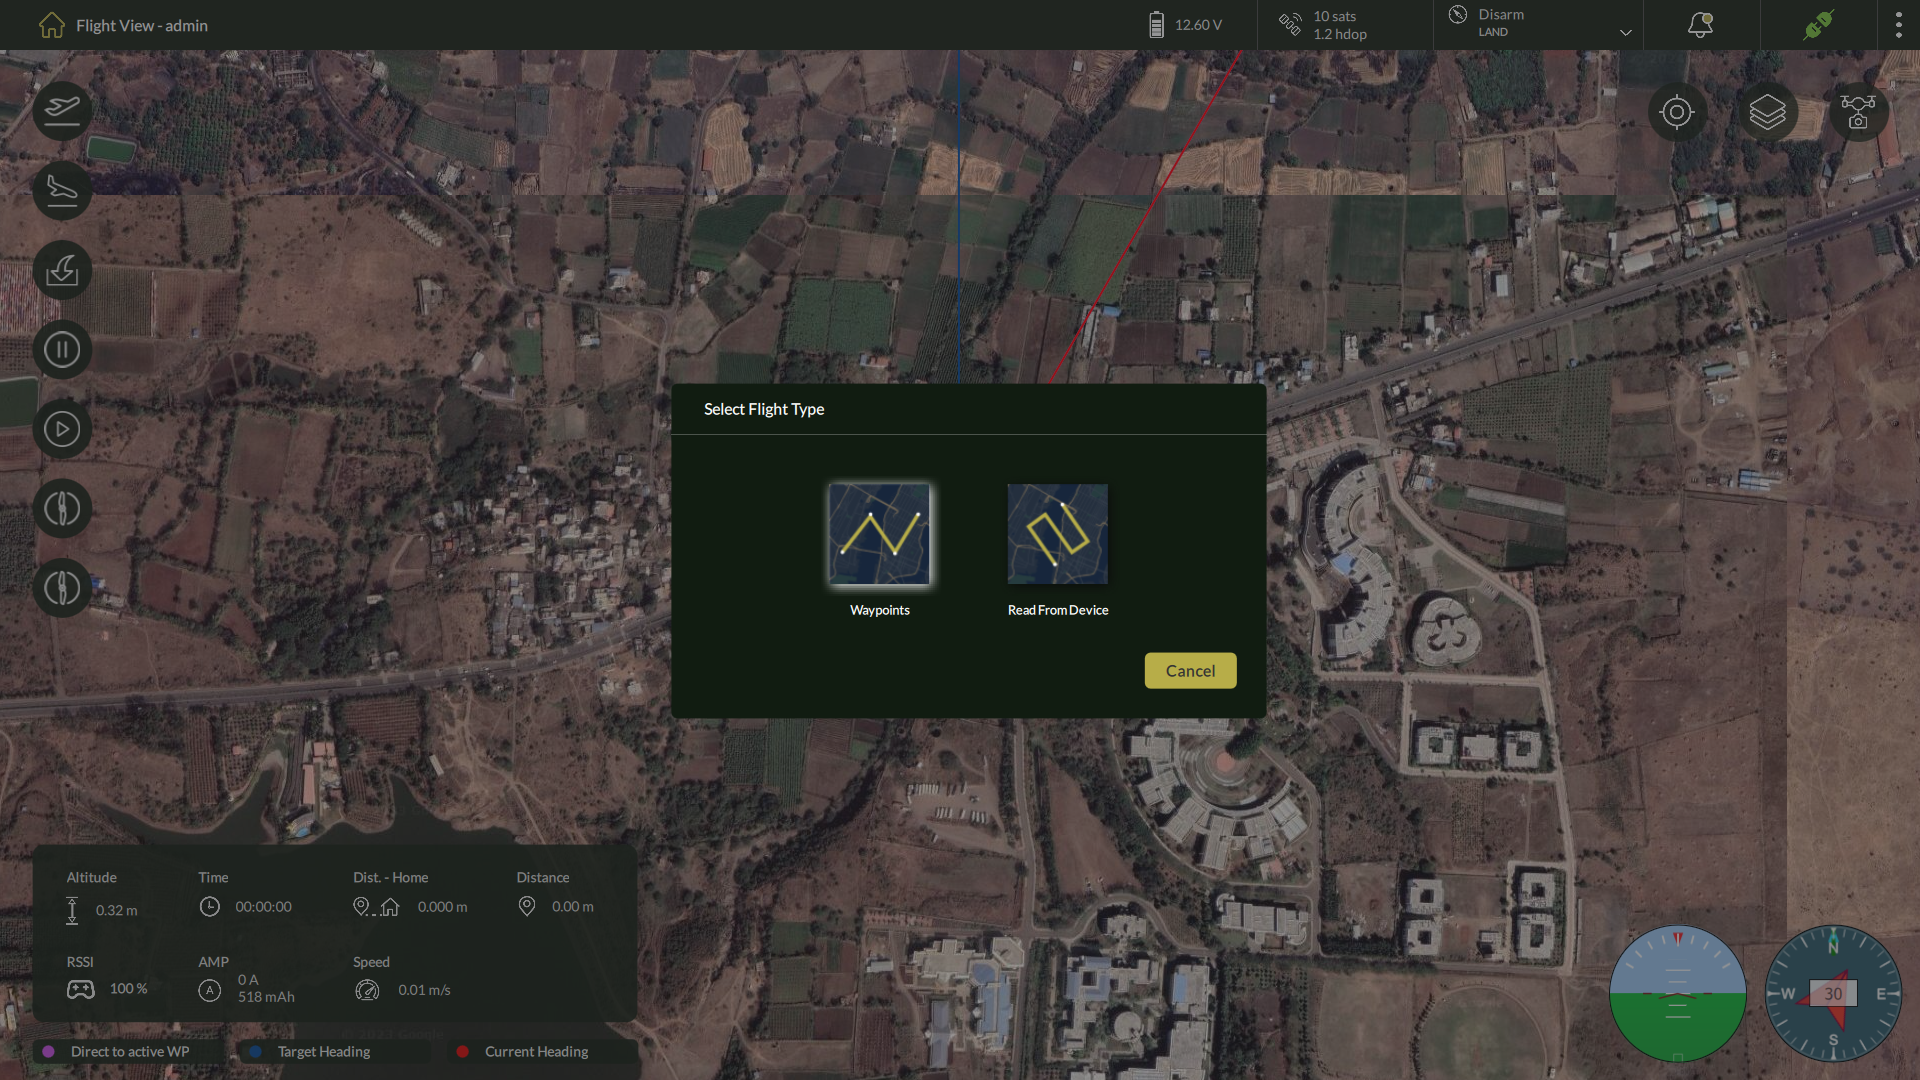
| Note: Flight type selection is critical as it dictates whether you begin fresh planning or reuse an existing onboard plan. Ensure your drone is connected before using Read from Device. |
Summary
- Automatic Planning is ideal for pre-planned, repeatable missions using the full waypoint configuration interface.
- Manual Mode is for real-time control without any waypoint setup and is covered through live control tools already explained in Section 4.9.
This section consolidates both approaches and helps users decide which path to follow based on the mission type, drone capability, and operational requirements.
4.12 Viewing Flight Logs
4.12.1 Accessing Flight Logs
Users can access flight logs from the Home screen using the main options menu.
Steps to Access Flight Logs:
- Navigate to the Home screen by clicking the Home icon on the top-left toolbar.
- On the top-right corner, click the Three-Dot Menu (⋮) to open system options.
- Select Flight Logs from the dropdown list.
- The Flight Logs screen will open, displaying a list of previously executed missions.

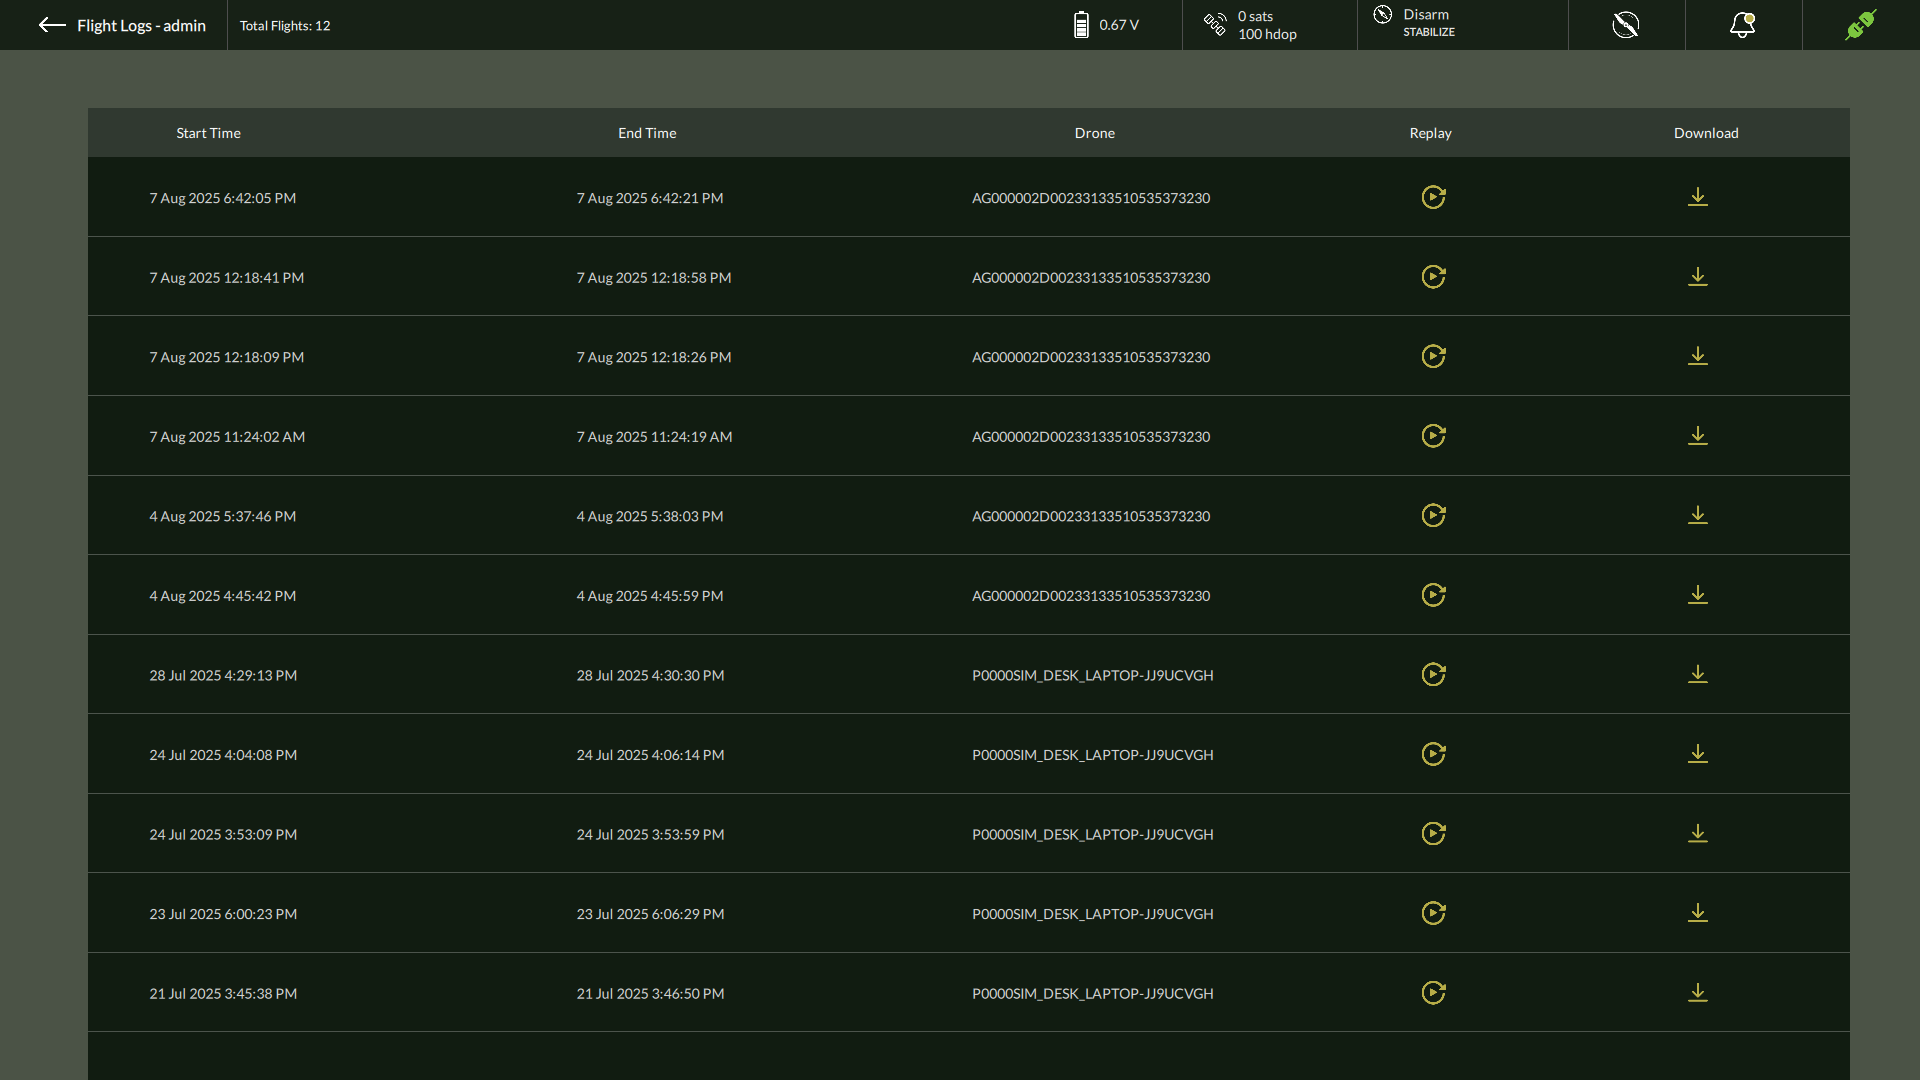
4.12.2 Viewing and Exploring Flight Logs
| Field | Description |
| Start Time | Timestamp when the mission execution started. |
| End Time | Timestamp when the mission execution ended. |
| Drone | Identifies the drone used for the flight. |
| Replay | Opens a playback view to visually replay the flight path. |
| Download | Allows the user to export the full log data locally. |
4.12.3 Reviewing Flight Log Details
Steps to View Detailed Log Entry:
- In the Flight Logs table, click on any individual row (log entry).
- A detailed record view for the selected flight will appear.
- This view includes metadata, flight behavior, execution status, warnings, and system messages associated with that mission.

| Note: Use this detailed view for technical validation, post-flight diagnostics, and operational reviews. |